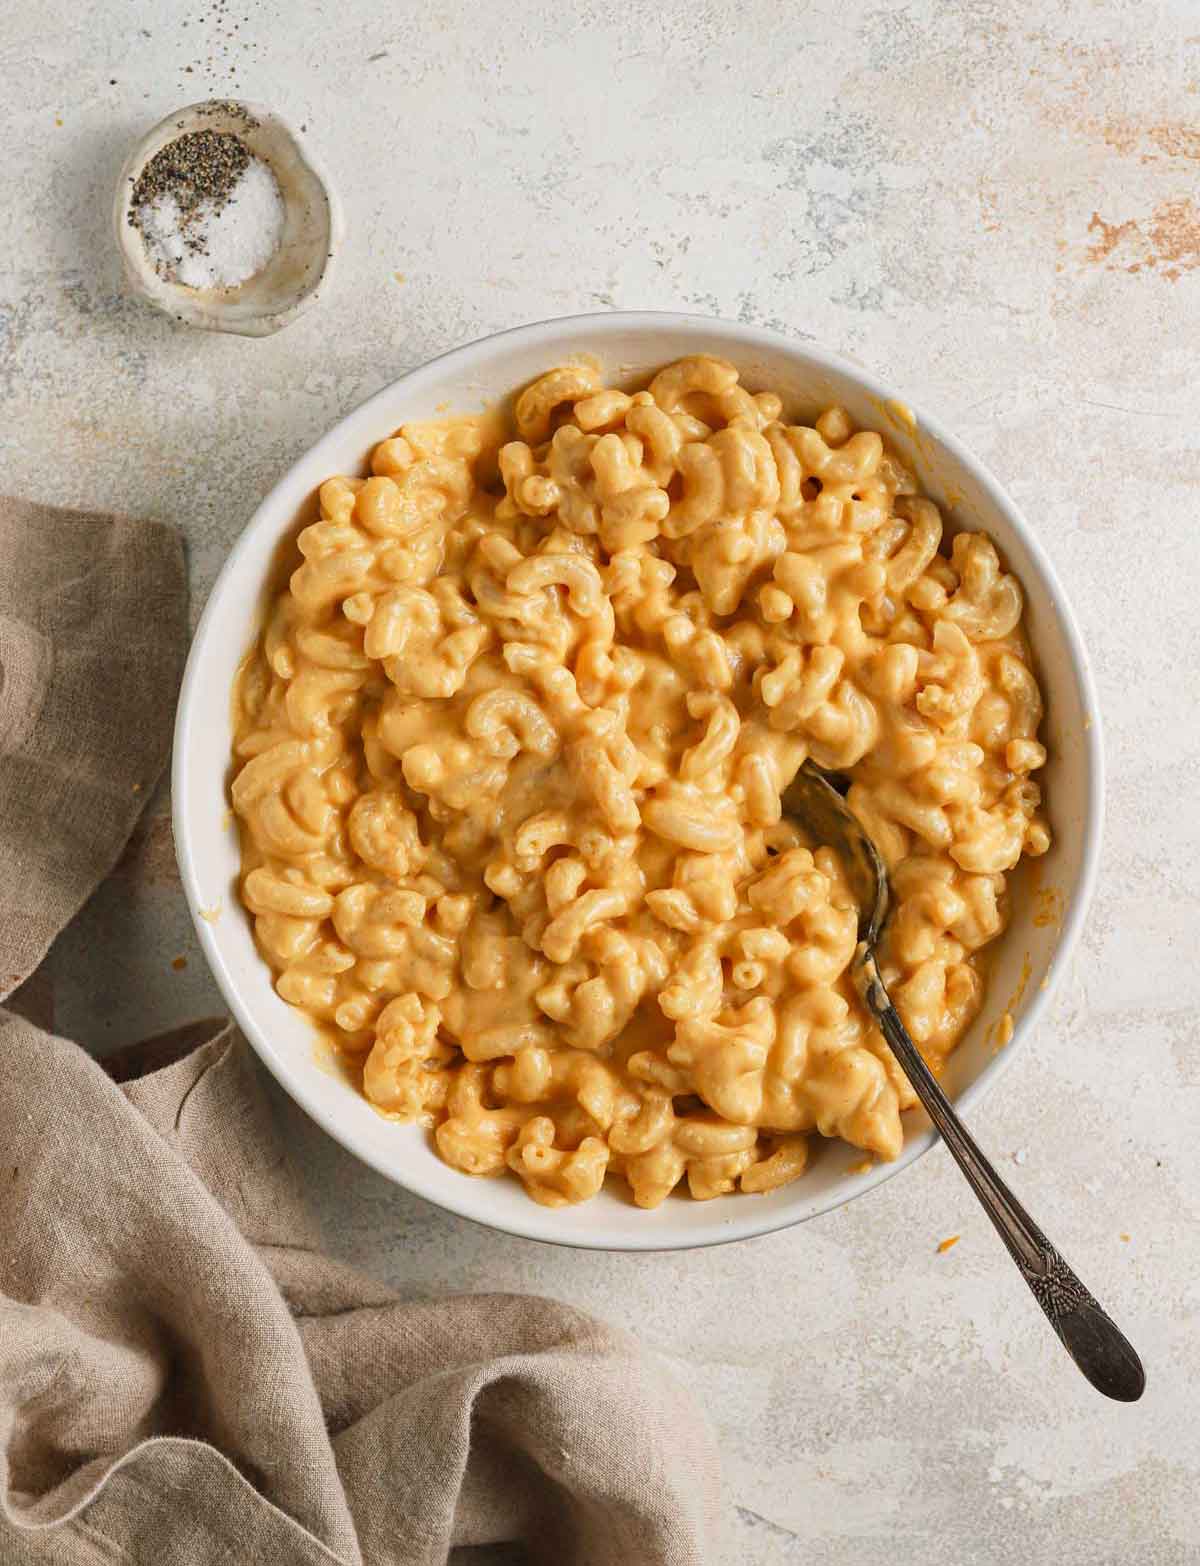
Creamy Stovetop Mac and Cheese

This is the creamiest, cheesiest stovetop mac and cheese you'll ever eat! Ready in just 30 minutes, it’s the perfect weeknight recipe. Whether you make a meal out of it or serve it alongside your favorite entree, this simple macaroni and cheese will become your go-to.
A big bowl of macaroni and cheese ranks right up there with a peanut butter and jelly sandwich for me when it comes to comfort food. My go-to recipe is my favorite baked mac and cheese version - I love the buttery crumb topping and crusted bits of macaroni and cheese around the edges! And, of course, I turn to my beloved crock pot mac and cheese when feeding a crowd.
However, there is something that feels so good about scooping creamy mac and cheese out of a pot on the stove. It took me what felt like eons to nail this recipe, but I’m convinced that this might be THE creamiest and cheesiest stovetop recipe EVER. Case closed.
Simple Ingredients
This is an incredibly simple, basic cheese sauce made with butter, flour, milk, and cheese, but the ratios result in one HECK of a cheese sauce. It's super thick and cheesy, which basically equates to perfection when you're talking about macaroni and cheese. Here is what we use:
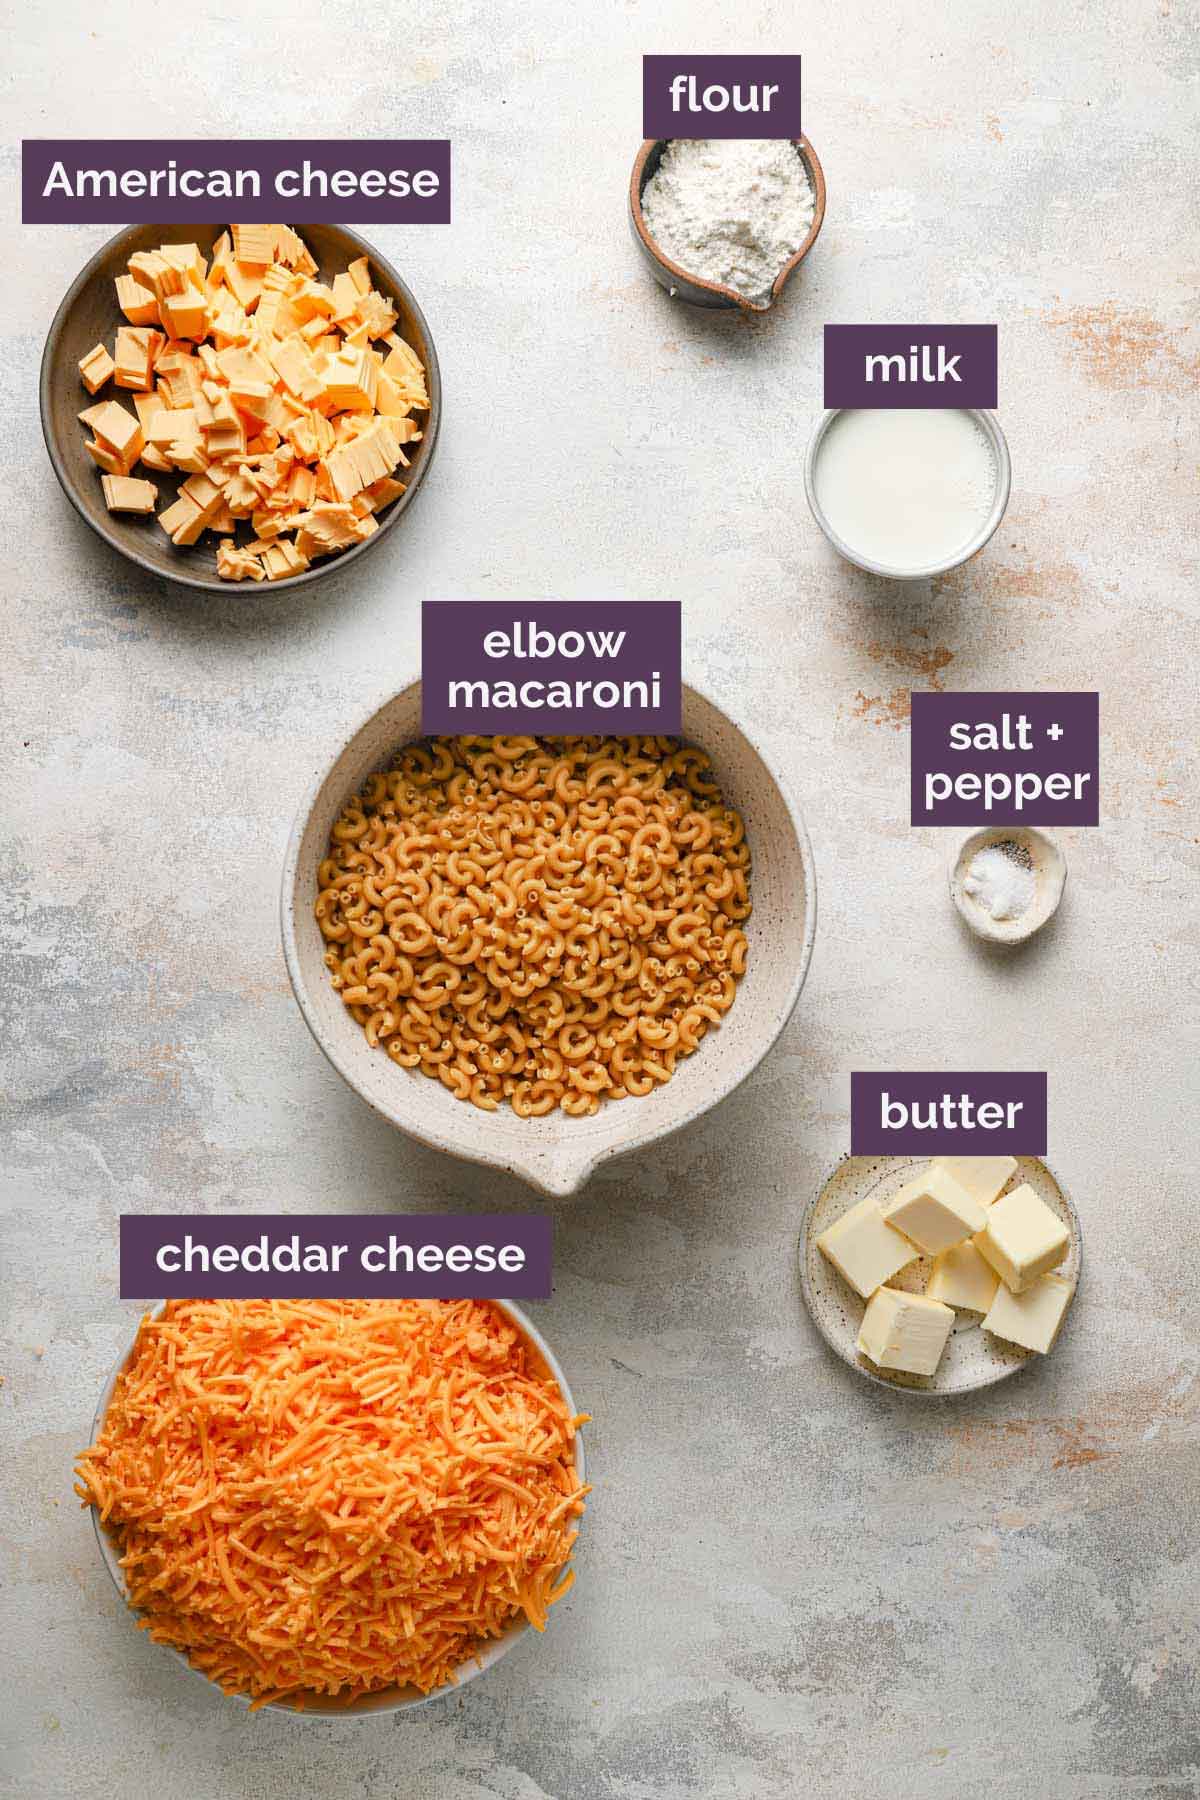
- Pasta: Elbow macaroni is the classic mac and cheese shape, but any other short noodle will work like small shells, cavatappi, gemelli, campanelle, or radiator.
- Unsalted Butter + All-Purpose Flour: The combination of these creates a roux, which thickens the cheese sauce.
- Milk: The base of the cheese sauce! I recommend using whole milk for a richer, thicker sauce, but 2% will also work.
- Cheese: We use a combination of American and cheddar cheeses for a classic, creamy flavor. However, you can play around with other varieties, such as white cheddar, Muenster, gruyere, fontina, gouda, colby, Monterey jack, mozzarella, etc. Also be sure to buy your cheese in a block (and slices of American cheese) and shred it yourself. Pre-shredded cheese is coated to prevent it from clumping, but this also prevents it from melting well and can cause your macaroni and cheese to be grainy.
Step-by-Step Overview
This comes together quickly and easily with only a few steps required.
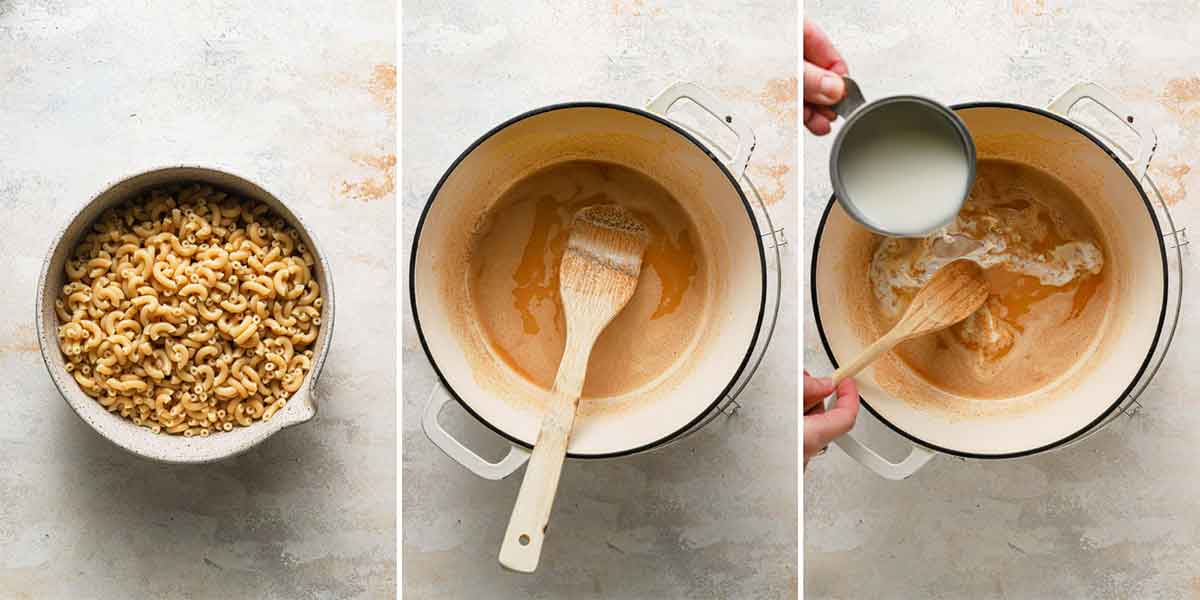
Step #1: Cook the Pasta – Boil the pasta according to the package directions, then drain and set aside.
Step #2: Make the Roux – In a large pot or Dutch oven, melt the butter over medium heat, then add the flour and whisk constantly until the mixture is light brown, about 1 to 2 minutes. Reduce the heat to medium-low and slowly whisk in the milk. Simmer and whisk occasionally until thickened, about 5 minutes.
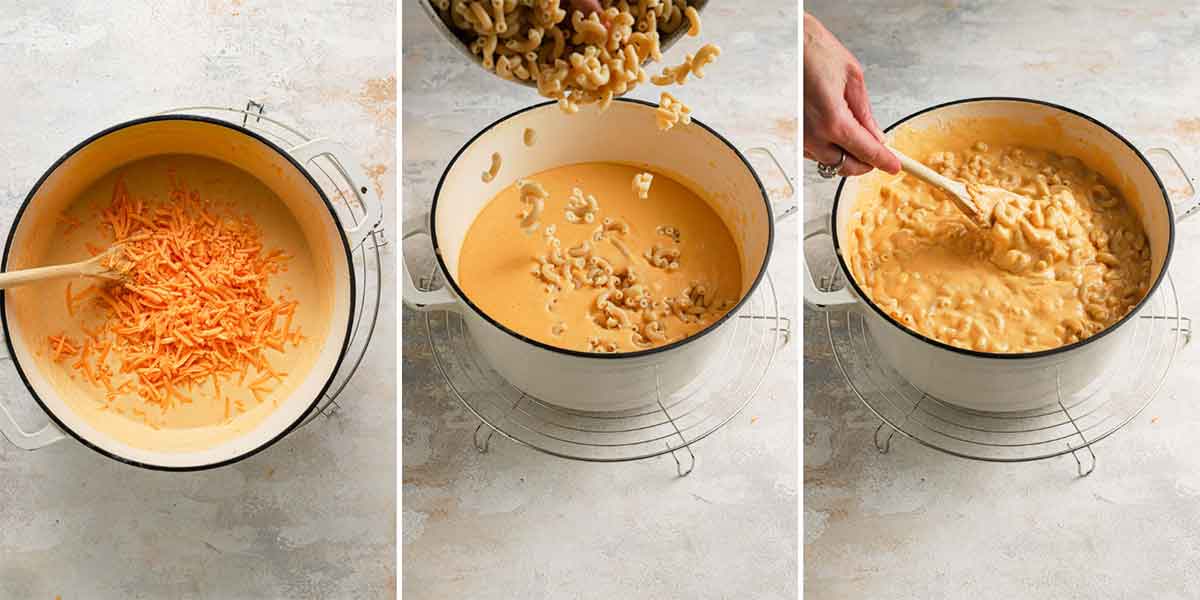
Step #3: Add the Cheese – Add the cheese a handful at a time and whisk until melted. Season to taste with salt and pepper.
Step #4: Add the Cooked Pasta – Add the drained pasta to the cheese sauce and stir to combine. Serve immediately!
Save This Recipe
Mac and Cheese Variations
My favorite way to enjoy macaroni and cheese is with a simple grind of fresh pepper on top, but there are countless ways you can modify the recipe. Aside from changing up the cheeses (see some ideas in the “Ingredients” section above), below are other ways you can customize the recipe:
- Add Meat – Chopped-up ham, bacon, turkey, or even cut-up pork chops!
- Add Veggies – Onions and peppers for a southwestern flair; broccoli florets, cauliflower, mushrooms, and spinach are all great options, too.
- Add Seasonings – While I keep the recipe pretty plain, feel free to add extra flavor by using garlic powder, mustard powder, paprika, cayenne pepper, hot sauce, Worcestershire sauce, etc.
- Add a Topping – Crush up some Ritz crackers or toast some panko breadcrumbs in butter and sprinkle on top of each serving.
Make-Ahead, Storage, Reheating, and Freezing
- Make-Ahead – You can shred your cheese ahead of time and store it in an airtight container or ziploc bag in the refrigerator for up to 2 days before you prepare the mac and cheese.
- Storage – Store the prepared mac and cheese in an airtight container in the refrigerator for up to 3 days.
- Reheat – This reheats like a DREAM! Simply re-warm in the microwave or in a saucepan on the stove; while it stays nice and creamy, you can always add a splash of milk when reheating if you think it needs to smooth out a bit.
- Freezing – This mac and cheese freezes beautifully. Store in an airtight ziploc bag (or airtight container) for up to 3 months. Thaw in the refrigerator overnight before reheating.

Serving Suggestions
While I wholeheartedly believe that mac and cheese can be a bona fide main dish, it is most often served as a side dish. The following are great pairings for creamy mac and cheese:
- Classic Meatloaf
- Buttermilk Fried Chicken
- Pulled Pork
- Slow Cooker BBQ Brisket
- Slow Cooker BBQ Ribs
- Homemade Fish Sticks
More Popular Mac and Cheese Recipes
- Crock Pot Mac and Cheese
- Ultimate Baked Mac and Cheese
- Chrissy Teigen’s Mac and Cheese
- Cajun Shrimp Macaroni and Cheese
- Hatch Chile Mac and Cheese
- Butternut Squash & Bacon Mac and Cheese
Watch the Recipe Video
If you make stovetop mac and cheese and love it, remember to stop back and give them a 5-star rating - it helps others find the recipe! ❤️️

Creamy Stovetop Mac and Cheese
Ingredients
- 1 pound elbow macaroni
- ½ cup (113 g) unsalted butter
- ¼ cup (49 g) + 2 tablespoons all-purpose flour
- 5 cups (1200 ml) whole milk
- 24 ounces sharp cheddar cheese, shredded
- 8 ounces American cheese, sliced and chopped
- Salt and pepper, to taste
Instructions
- Cook the pasta according to the instructions on the box, then drain; set aside.
- In a large Dutch oven or saucepan, melt the butter over medium heat. Add the flour and whisk to combine, then cook for 1 to 2 minutes, whisking constantly, until the mixture is a light golden brown color and beginning to emit a nutty smell.
- Reduce the heat to medium-low and slowly whisk in the milk until smooth. Simmer until slightly thickened, about 5 minutes, whisking occasionally.
- Add the cheese, a handful at a time, whisking well after each addition and not adding more until the previous handful is fully melted and incorporated. Season to taste with salt and pepper.
- Add the drained pasta to the cheese sauce and stir to combine, breaking up any clumps of macaroni. Serve immediately. Leftovers can be stored in an airtight container in the refrigerator for up to 3 days.
Notes
- Pasta: Elbow macaroni is the classic mac and cheese shape, but any other short noodle will work like small shells, cavatappi, gemelli, campanelle, or radiatore.
- Milk: I recommend using whole milk for a richer, thicker sauce, but 2% will also work.
- Cheese: You can substitute other cheeses, such as white cheddar, Muenster, gruyere, fontina, gouda, colby, Monterey jack, mozzarella, etc. Also, be sure to buy your cheese in a block (and slices of American cheese) and shred it yourself. Pre-shredded cheese is coated to prevent it from clumping, but this also prevents it from melting well and can cause your macaroni and cheese to be grainy.
- Add Meat - Chopped-up ham, bacon, turkey, or even cut-up pork chops!
- Add Veggies - Onions and peppers for a southwestern flair; broccoli florets, cauliflower, mushrooms, and spinach are all great options, too.
- Add Seasonings - While I keep the recipe pretty plain, feel free to add extra flavor by using garlic powder, mustard powder, paprika, cayenne pepper, hot sauce, Worcestershire sauce, etc.
- Add a Topping - Crush up some Ritz crackers or toast some panko breadcrumbs in butter and sprinkle on top of each serving.
- Make-Ahead - You can shred your cheese ahead of time and store it in an airtight container or ziploc bag in the refrigerator for up to 2 days before you prepare the mac and cheese.
- Storage - Store the prepared mac and cheese in an airtight container in the refrigerator for up to 3 days.
- Reheat - This reheats like a DREAM! Simply re-warm in the microwave or in a saucepan on the stove; while it stays nice and creamy, you can always add a splash of milk when reheating if you think it needs to smooth out a bit.
- Freezing - This mac and cheese freezes beautifully. Store in an airtight ziploc bag (or airtight container) for up to 3 months. Thaw in the refrigerator overnight before reheating.
Did you make this recipe?
Leave a review below, then snap a picture and tag @thebrowneyedbaker on Instagram so I can see it!


I followed this recipe down to the T, it has the same taste and texture to that of sand. I would recommend this recipe to those with no tastebuds and an hour to waste.
Kids loved this. I mixed it with seasoned cooked ground beef, and then added croutons for additional flavor. I will definitely use this again, could possibly be used for a queso dip as well as Mac. N cheese.
What happened to the other stovetop mac and cheese recipe? That was the one I always made and now only this one comes up 😭 I’m not interested in trying this one because the other one was perfect.
Will replacing the American cheese with more of the sharp cheddar make a big difference?
Hi Nancy, The American adds more creaminess to the dish, but it will still work without it.
The worst recipe I’ve ever had to make. The milk is no where mention in the instructions. My cheese was basically gone by the time I put it on. Wasteful.
I am not sure what you mean. Step 3 clearly mentions slowly adding the milk and whisking. Perhaps you missed this.
Followed this recipe to a T. It is awful. This is by far the worst version of Mac and cheese we’ve made yet. What a waste of milk, , cheese, and pasta. It’s now all going in the trash.
Sorry you you did not like this recipe. You could change any part.. just saying.
This is by far my favorite stove top creamy mac and cheese recipe. I have adjusted a little bit by swapping one cup of heavy cream for milk and swapping out two additional cheeses. The base is perfect for the creamy texture that you look for in a stove top mac and cheese.
Creamy and delicious with 3 varieties of cheese. Ratios are spot on as Mac n cheese transforms from soup like to absorbed perfection
I was making Mac and cheese for 14 people for Easter, so I doubled this recipe. Huge mistake – I now have more Mac and cheese than even my family of seven will be able to consume all week. This makes a ton!! Do not double it. This is pretty good – I’m still on the hunt for a super cheesy tasting homemade Mac and cheese, but this is the best one I’ve tried (and I’ve made several different ones).
Have you tried her crockpot Mac and cheese? It is my go to. Everyone loves it, very cheesy. I am always asked to bring this to parties and events!
Thank you! It was absolutely delicious and just what I wanted after playing outside with my snowshoes. It didn’t take much longer than the boxed stuff either.
This is by far the best Mac n cheese recipe! Those that say it’s grainy are not using freshly grated cheese or boiling their sauce mix. YES this is fairly runny/soupy immediately after you make it. I let mine cool for 1 hour and the noodles absorb all the cheesy goodness. Absolutely perfect every time!
Absolutely devine … thank you