How to Make Pie Crust: The Ultimate Guide
Learn how to make the absolute best pie crust with this recipe and step-by-step tutorial that creates a wonderfully tender and flaky crust each and every time. From a surprising ingredient to detailed instructions on rolling, chilling, and blind-baking, as well as adaptations for single-crust and double-crust pies, you will never need another pie recipe. Use this for all of your favorite pie recipes; everything from savory pies like quiche to fruit pies, cream and custard pies, and everything in between!
Whenever I ask people what frustrates them the most in the kitchen or what they feel is their biggest baking challenge, two prevailing answers always emerge: yeast bread and pie crust.
It took me YEARS and countless recipes to finally find that one perfect pie crust recipe. It's the one I use exclusively now - it's perfect for single-crust pies, double-crust pies, for blind baking, fruit pies, cream pies… for literally any type of pie you want to make.
THIS is best homemade pie crust recipe I've found. It's easy to work with, unbelievably tender and flaky, and it has one surprising, secret ingredient.
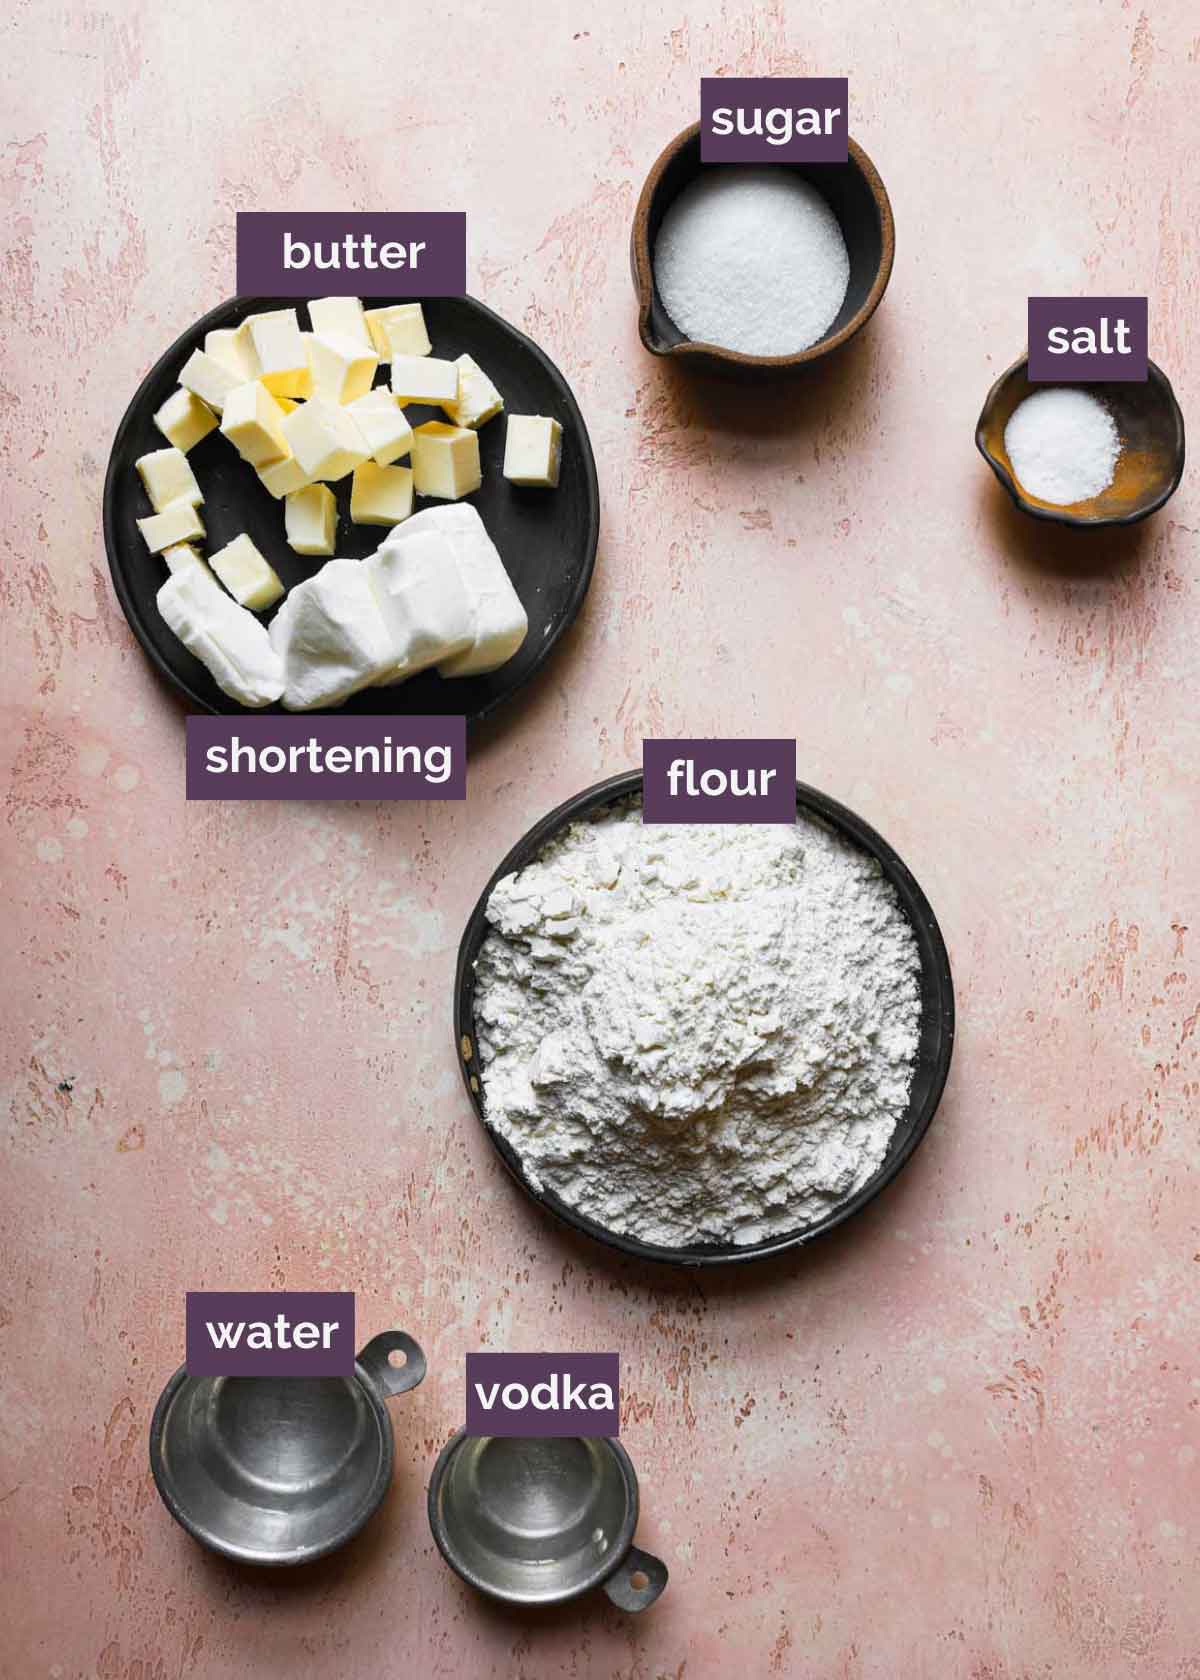
Pie Dough Ingredients
It's astonishing that some pie crust recipes can be foolproof while others turn into a mess when they're all made with mostly the same ingredients - flour, a little sugar, a little salt, butter and/or shortening, and water. You’ll see that this recipe uses one special ingredient that sets it apart from typical pie crusts:
It stands to reason, then, that the trick lies in the ratios and the technique.
Butter vs. Shortening in Pie Crust
You’ll notice that this crust uses BOTH butter and vegetable shortening; I believe the combination results in the absolute best crust that is incredibly flaky, tender, and full of flavor.
- The Butter – This imparts wonderful flavor and incredible flakiness.
- The Shortening – This keeps the crust tender, which means you can work with the dough a little more easily without it falling apart or cracking; it also holds its shape better, which means the perfect crimps around the edges of the pie will stay exactly as you made them and not warp.
I’ve made crusts with just butter, as well as just shortening, and I am a huge advocate of using both together. The balance of the two creates a wonderfully flavorful, flaky, tender pie crust that rolls out beautifully and holds its shape.
If you prefer to just use butter, try my all-butter pie crust recipe.
The Secret Ingredient: Vodka
Well over a decade ago, I was trying my darndest to master wonderfully flaky crust… I had done all butter pie crusts, all shortening pie crusts, using a food processor, mixing by hand, and I was still having mixed results until I tried this recipe from Cook's Illustrated. Their recipe has a surprising ingredient that shocks most people - vodka.
Why vodka?
When water mixes with flour (as it does in a pie crust), it forms gluten, and too much of it can create a tough crust, which affects the final texture, and can give you fits when trying to roll it out. Using vodka, which is only 60% water, gives the dough the moisture it needs, creates less gluten, and vaporizes in the oven, which means a super flaky pie crust.
Here's the kicker though - you cannot leave out the vodka or replace it with more water - it just won't work with this recipe. You can use another 80-proof liquor instead of the vodka, but if you want to avoid alcohol altogether, a more traditional pie crust is probably what you'll need to go with.
How to Make the Pie Dough (Step-by-Step Photos)
This recipe is written using a food processor, as it works quickly and helps to not overwork the dough since the ingredients are pulsed together quickly, however, you can absolutely make this by hand.
Here’s how it comes together:
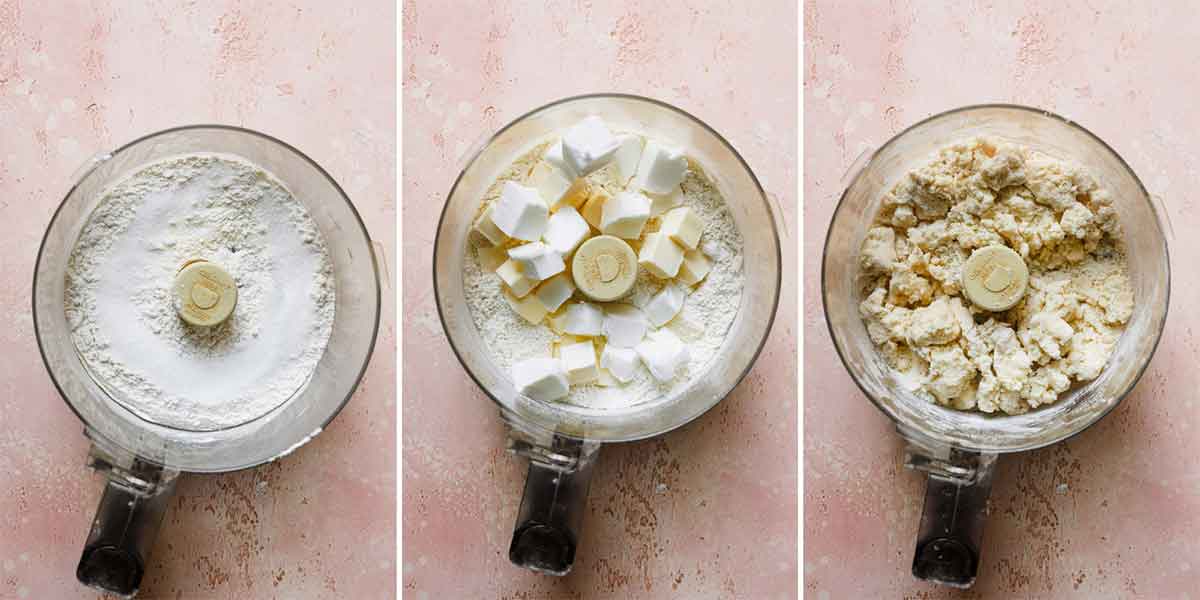
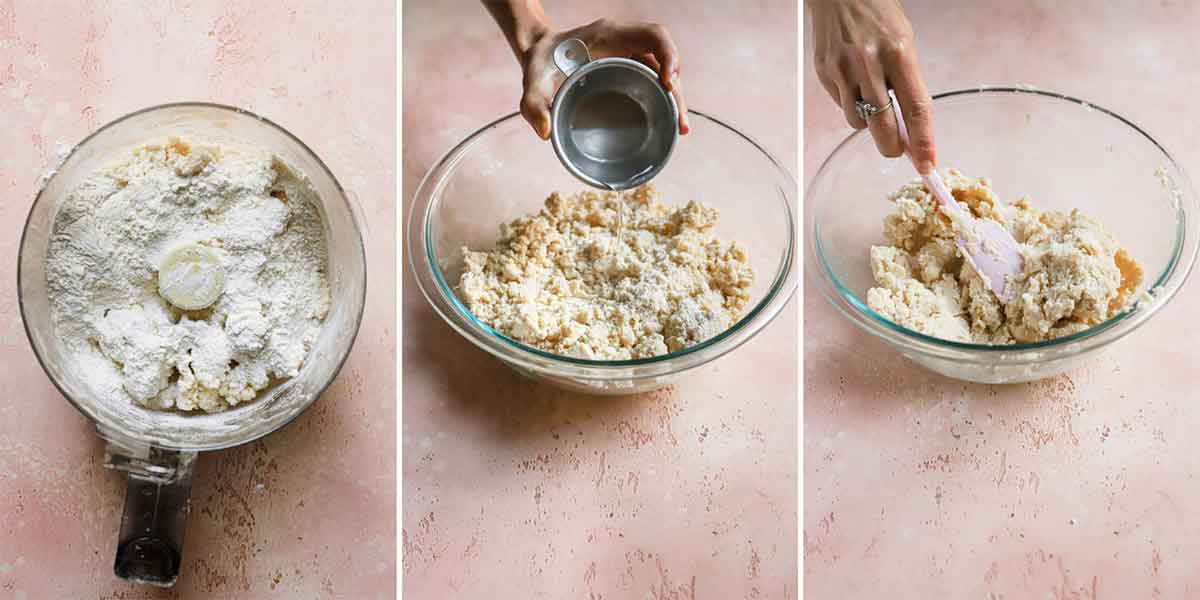
- In a food processor, pulse together about two-thirds of the flour, the sugar, and the salt.
- Add the butter and shortening and process for up to 10 seconds, until the dough begins to clump and there are some pea-sized pieces of butter remaining.
- Add the rest of the flour and pulse until the mixture is evenly distributed.
- Empty the mixture into a medium bowl.
- Sprinkle the cold water and chilled vodka over the mixture and use a rubber spatula to fold and press the dough until it sticks together.
To Make it By Hand:
- In a large bowl, whisk together two-thirds of the flour, the sugar, and the salt.
- Using a pastry cutter, cut in the cold butter and shortening until it is evenly distributed amongst the flourmixture. Then, add the rest of the flour and cut it in.
- Sprinkle the water and vodka over the mixture and use a rubber spatula to fold and press the dough until it sticks together.
Proceed to roll out the crust unless you are planning to freeze the dough for a later date (see freezing directions further below).
How to Roll Out Pie Crust
Don't be surprised at how soft and supple this pie crust is - it's much softer and malleable than others you've likely tried. It's okay to add quite a bit more flour when rolling it out, simply brush off any excess when you’re done rolling with a pastry brush.
Dust a clean work surface with some flour and place your pie dough in the center (I personally love using a silicone dough mat with measurement markings for any type of dough work!).
Gently roll the dough into a 12-inch circle. As you're rolling, dust a little flour as needed and give the dough a quarter turn after each roll to keep it from sticking. Once it's rolled out into a circle, gently transfer it to your pie plate.
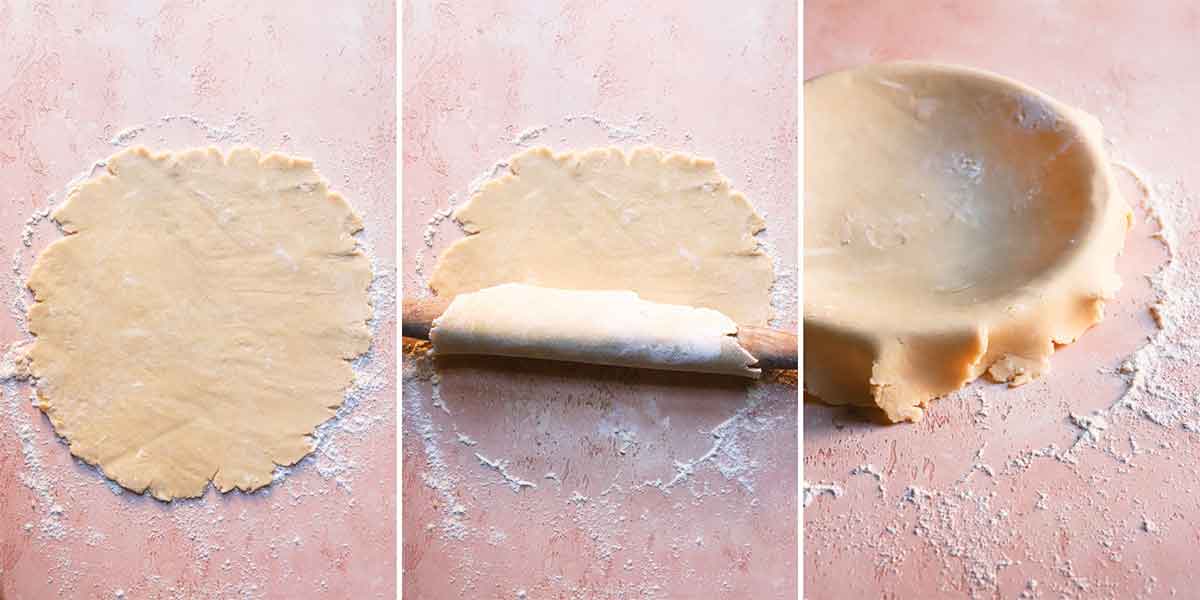
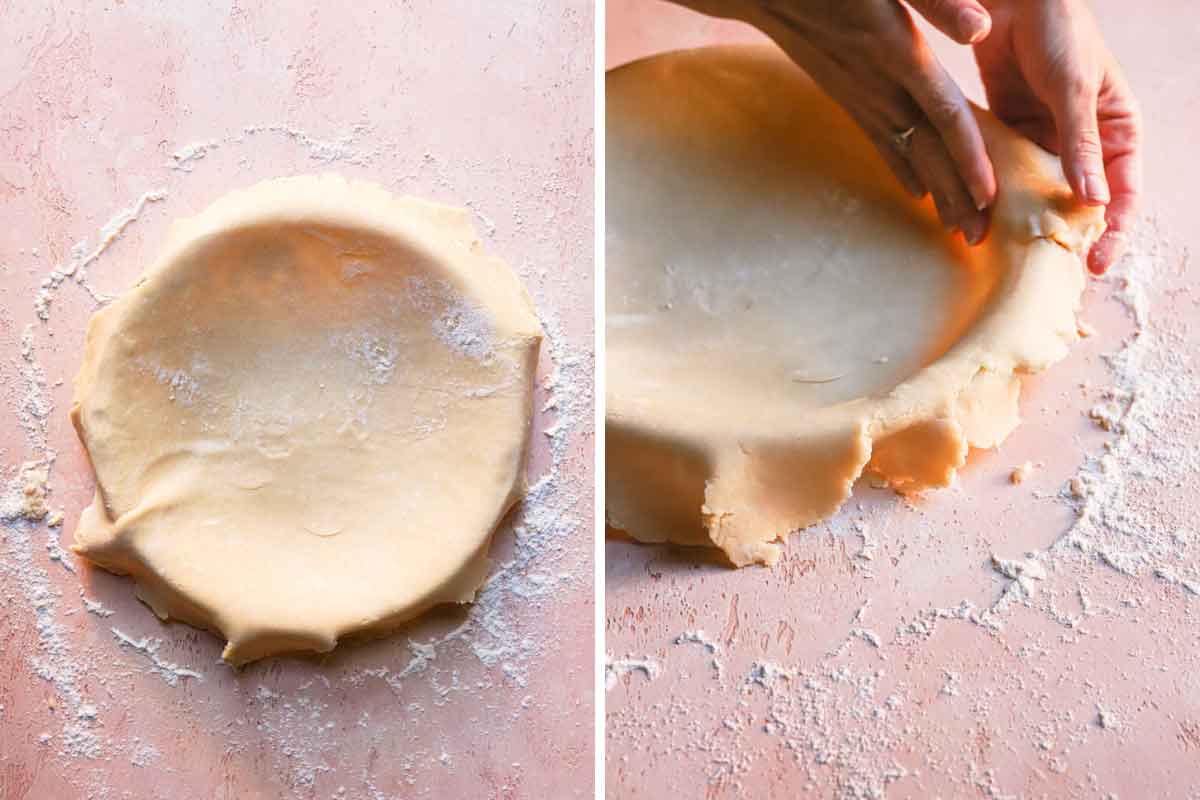
Some people find it helpful to use the rolling pin to help transfer the dough to the pie plate. To do so, gently roll one end of the dough over the rolling pin, pick it up, and carefully roll it off over the pie plate. Try to center it on the pie plate so there is at least a 1-inch overhang around all the edges.
Ease the dough into the plate by gently lifting the edge of the dough with one hand while pressing into the plate bottom with the other hand.
Save This Recipe
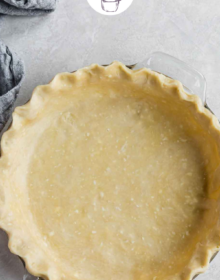
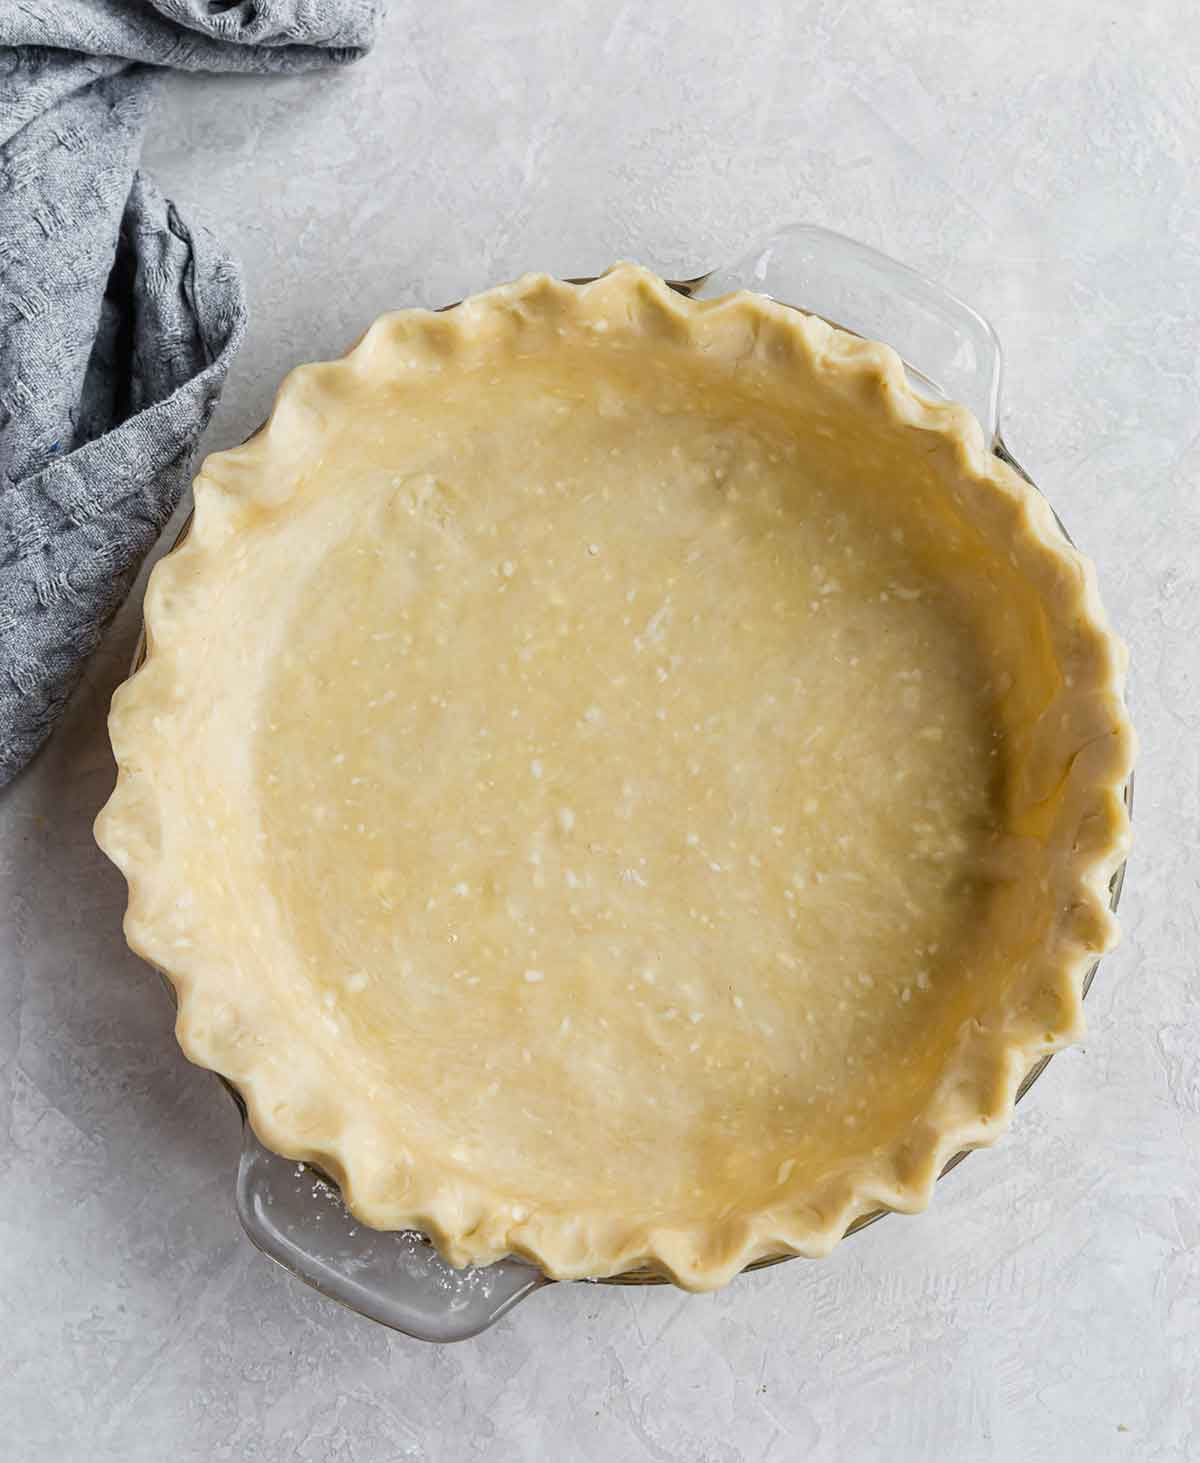
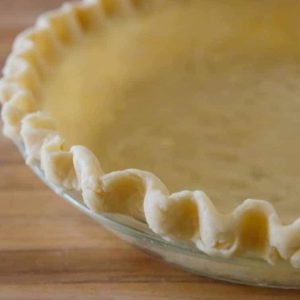
Now Flute or Crimp the Pie Crust
With scissors or kitchen shears, trim the edge so that it overhangs by at least one inch. Fold the overhang over itself to create a thick border that sits on the top edge of the pie plate, not below.
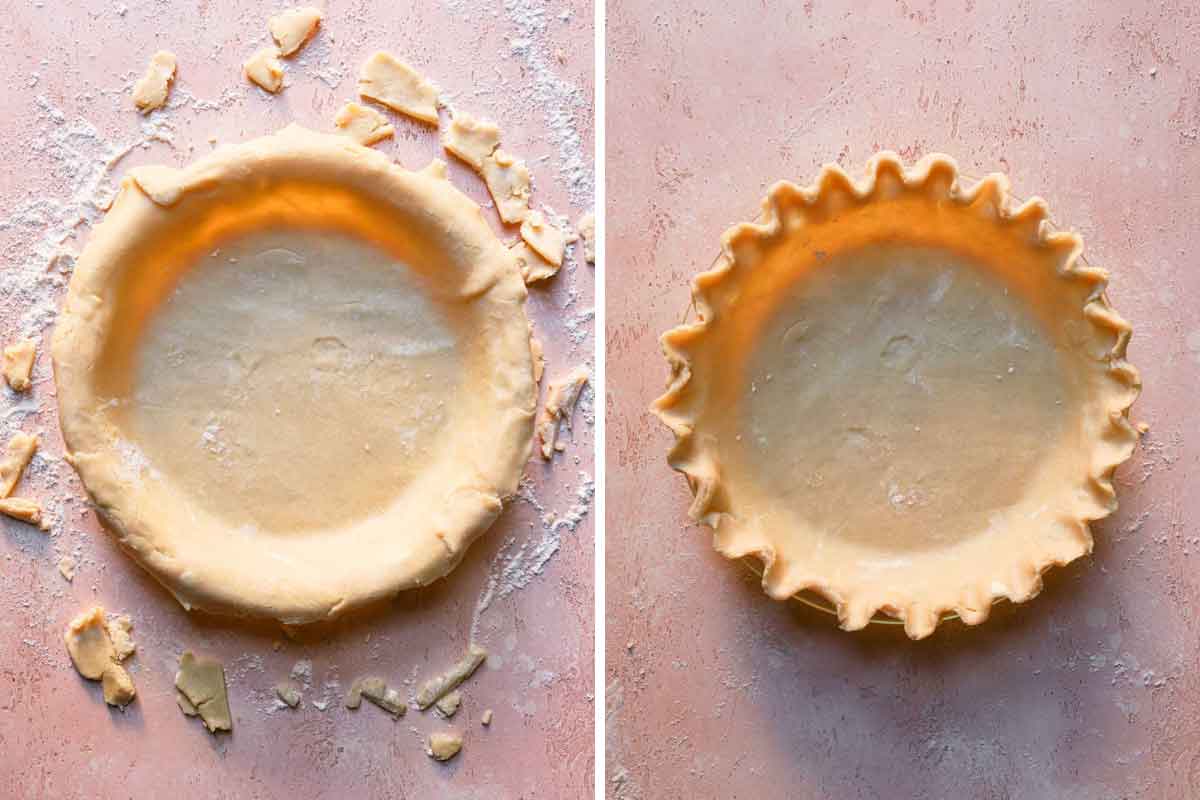
Then crimp, flute, or shape the crust as desired.
To Flute the Crust: Push your thumb or knuckle from one hand in between the thumb and index finger of the opposite. This will give the crust a classic look, as seen in this Dutch apple pie.
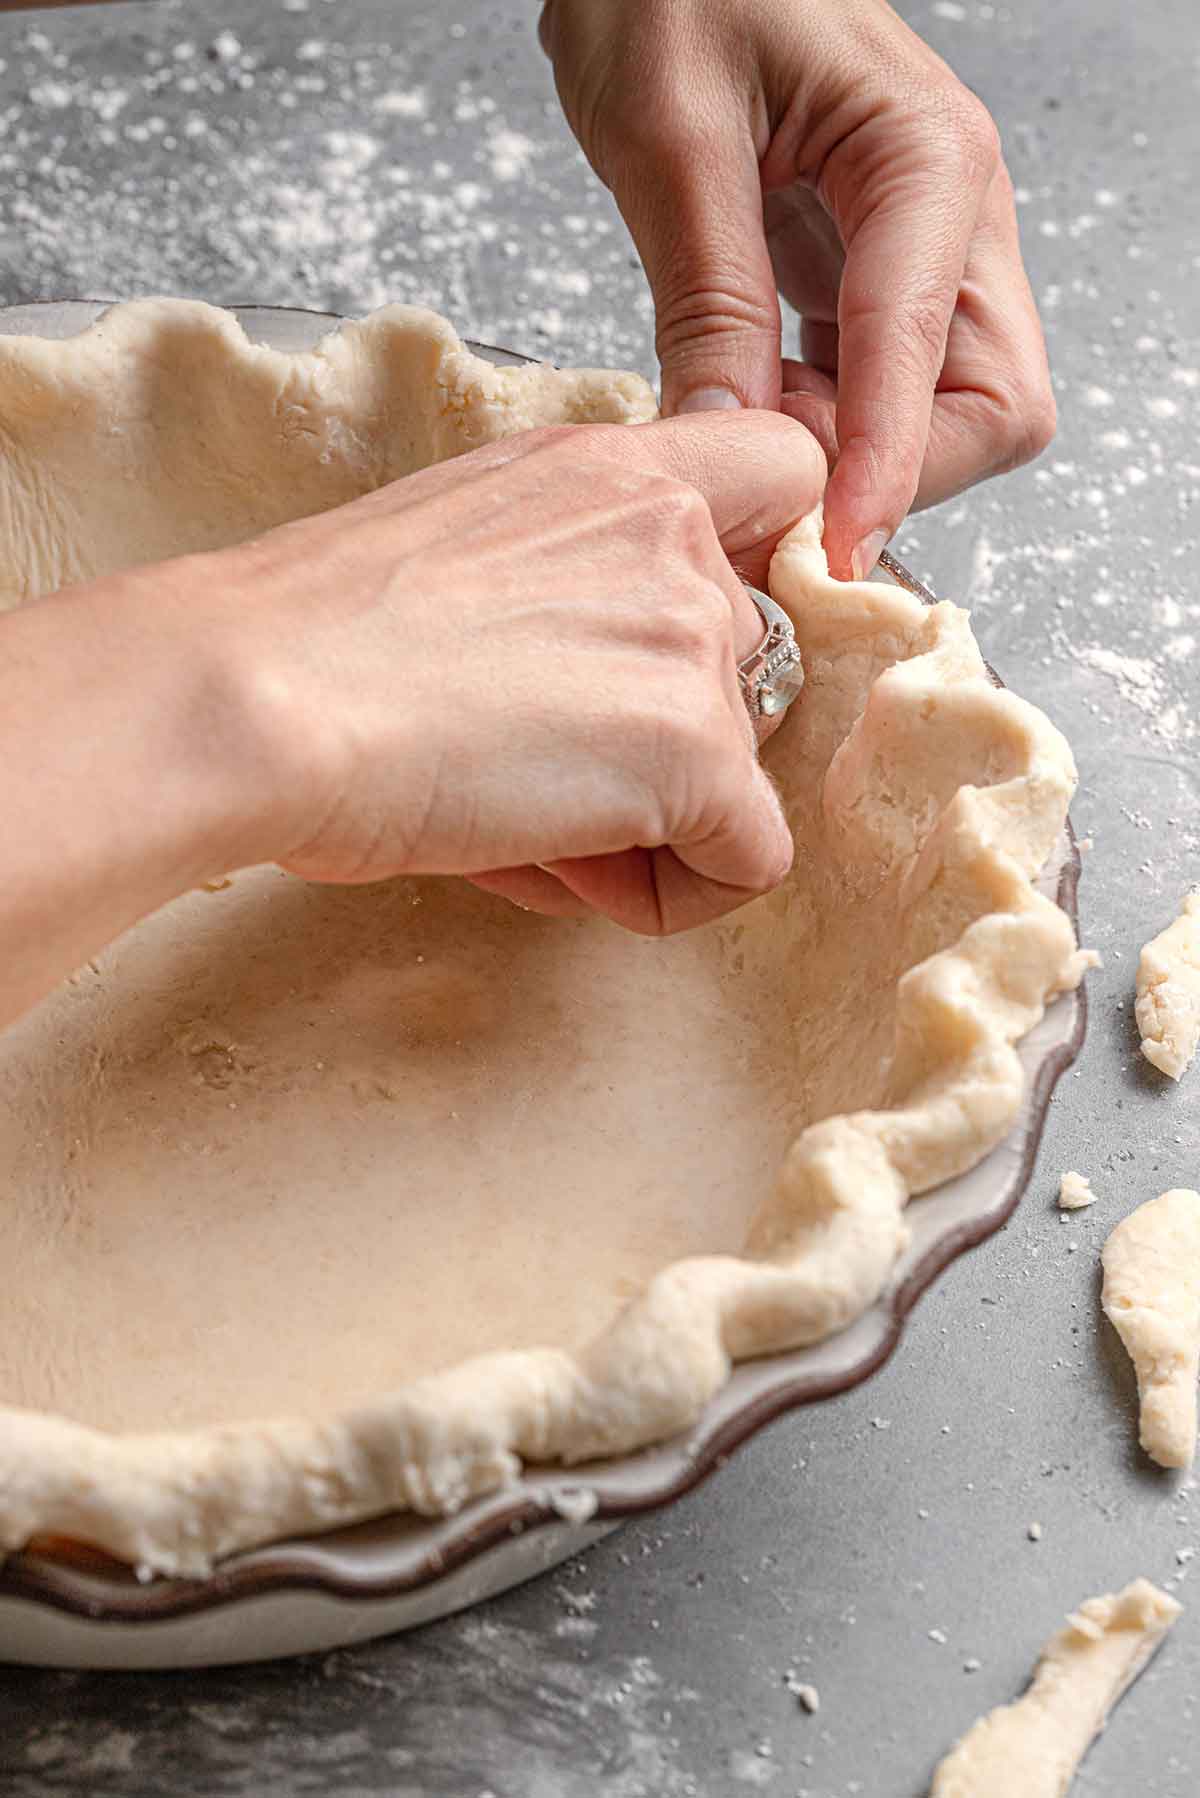
To Crimp the Crust: A simple method for crimping the pie crust is to use a fork; simply press the tines of the fork into the edges of the pie crust to leave indentations evenly around the edge of the pie.
Time to Chill!
At this point, gently cover the dough-lined pie plate with plastic wrap and refrigerate for at least 2 hours, or up to 24 hours, then use it as directed in your pie recipe.
If you will need to blind-bake the crust, see the section below on how to do it…
How to Blind Bake Pie Crust
I always recommend my favorite method for blind baking the pie crust. Be sure to refer to that tutorial if you plan to blind bake a pie crust, but here is a quick overview..
At this point, we have already mixed together our dough, rolled it out, lined the pie plate, and chilled it for at least 2 hours.
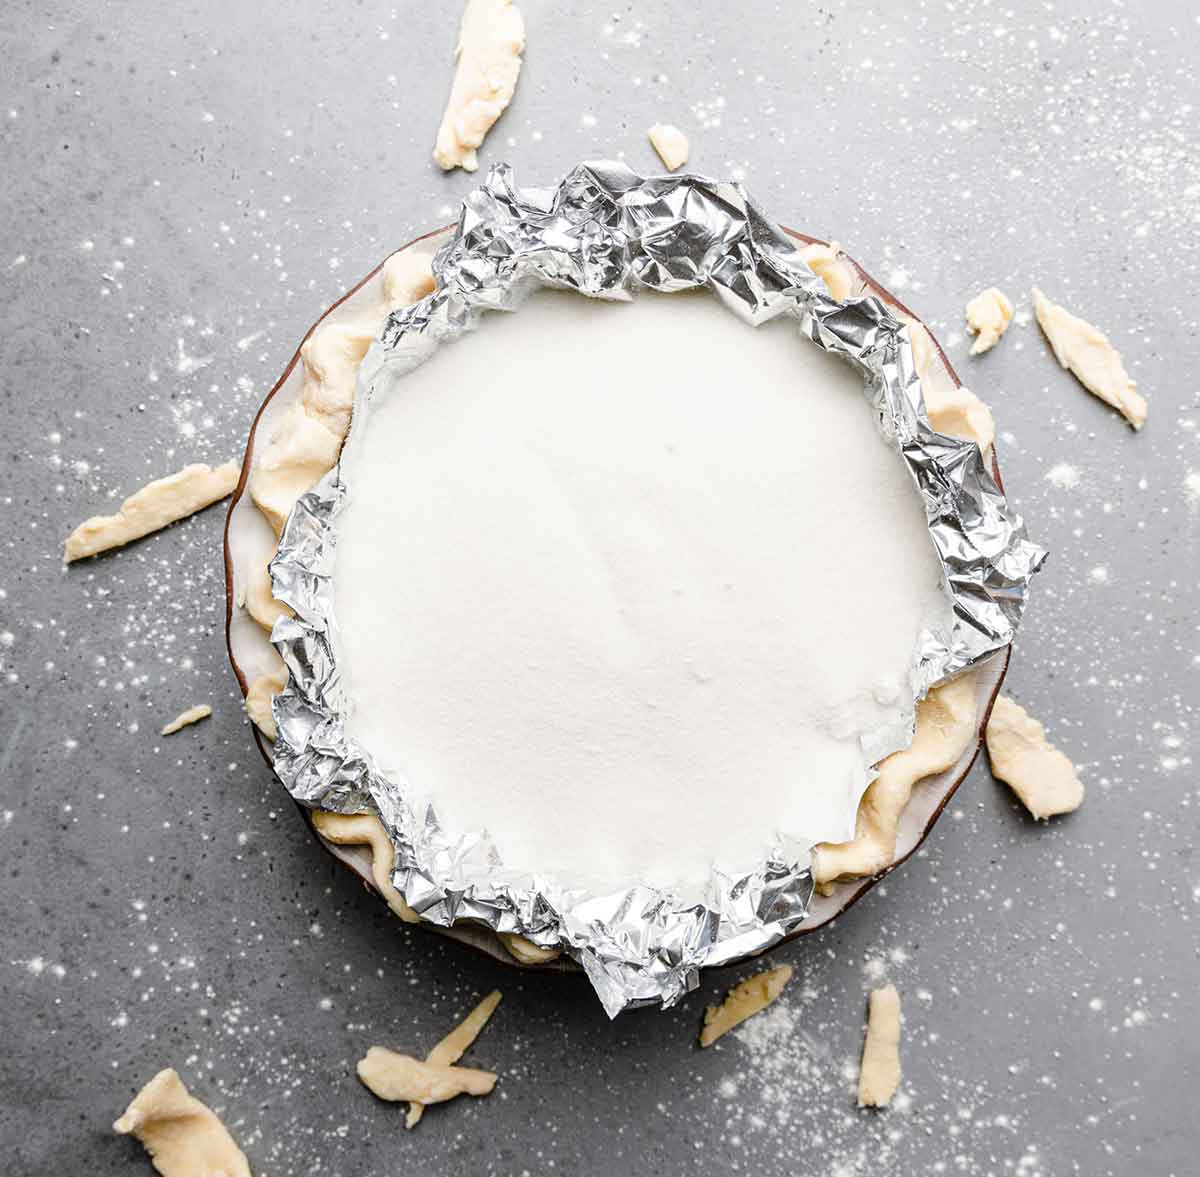
You'll now line the pie dough with aluminum foil and fill it up the whole way with sugar (it is heavier than beans or rice and can fill the entire shell of pie unlike pie weights, all of which ensure that the crust does not shrink and stays put), then do a partial bake in the oven, keeping it covered and weighted the entire time.
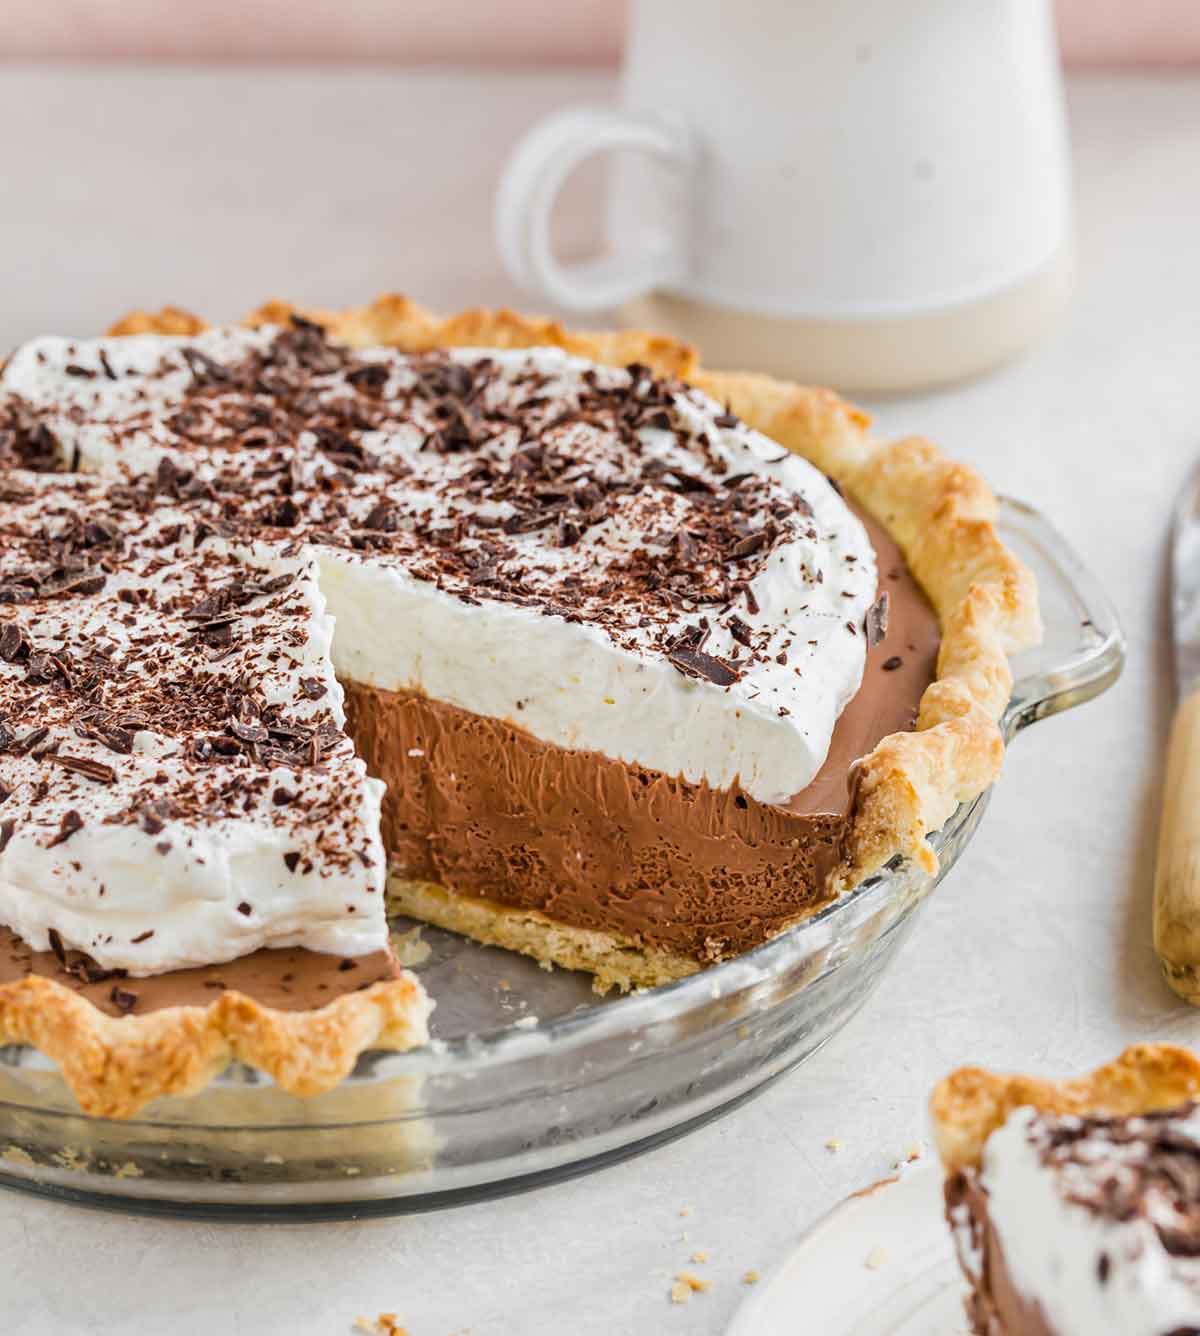
I was blown away the first time I tried this method and have used it exclusively since; it creates the most perfectly blind-baked crust! You can see the result of the blind-baked crust below in my French silk pie.
Freezing Pie Dough
Pie crust freezes beautifully and it’s a great way to get a head start on holiday baking.
To freeze your pie dough, once you have finished mixing the dough, turn it out onto a lightly floured surface and gather it together with floured hands, pressing it together into a cohesive ball. Flatten the dough into a 1-inch thick disc and wrap it tightly with plastic wrap. Place the wrapped disc in a freezer-safe ziploc bag and freeze for up to 3 months. Thaw overnight in the refrigerator before rolling out.
Pie Pan Recommendations
First and foremost, you want to be sure you have a quality pie plate. Glass is great for all pies, as you can see exactly what your crust is up to!
I use and recommend a classic glass 9-inch Pyrex pie dish.
There are many different types of pie plates you can use, so if you want to try something other than glass, here are my other recommendations:
- Ceramic Pie Plate – Rose Levy Berenbaum’s Perfect Pie Plate
- Metal Pie Plate – Williams Sonoma Goldtouch Nonstick Pie Dish
Recipe Notes
- Cold ingredients are essential! Be sure to have the butter, shortening, vodka, and ice water as chilled as possible before beginning. Once you start, work quickly and pop the dough back into the refrigerator for 10-15 minutes if the dough is getting too soft or the butter is too warm.
- Equipment recommendations: Pie plate / pastry blender / food processor / silicone dough mat / rolling pin
- Double crust: If you have a pie recipe that calls for a double crust, simply double this recipe. I recommend lining the pie plate but leaving the overhang in place until ready to fill and bake. Roll the second piece of dough out into a 12-inch circle and place on a parchment-lined baking sheet and chill for 2 hours as well.
- Double Crust? Chill Again: If you are making a double-crusted pie, after filling the pie and sealing the crusts together, refrigerate 30 minutes before baking.
- Make-Ahead: You can refrigerate the dough-lined pie plate up to a day in advance of baking. You can also prepare the pie dough and wrap the disk in plastic wrap and refrigerate for up to 3 days. Let sit on the counter for about 20 minutes before rolling out. Once the pie plate has been lined with the dough and the edges crimped as desired, be sure to chill again for at least 2 hours before proceeding with the recipe.
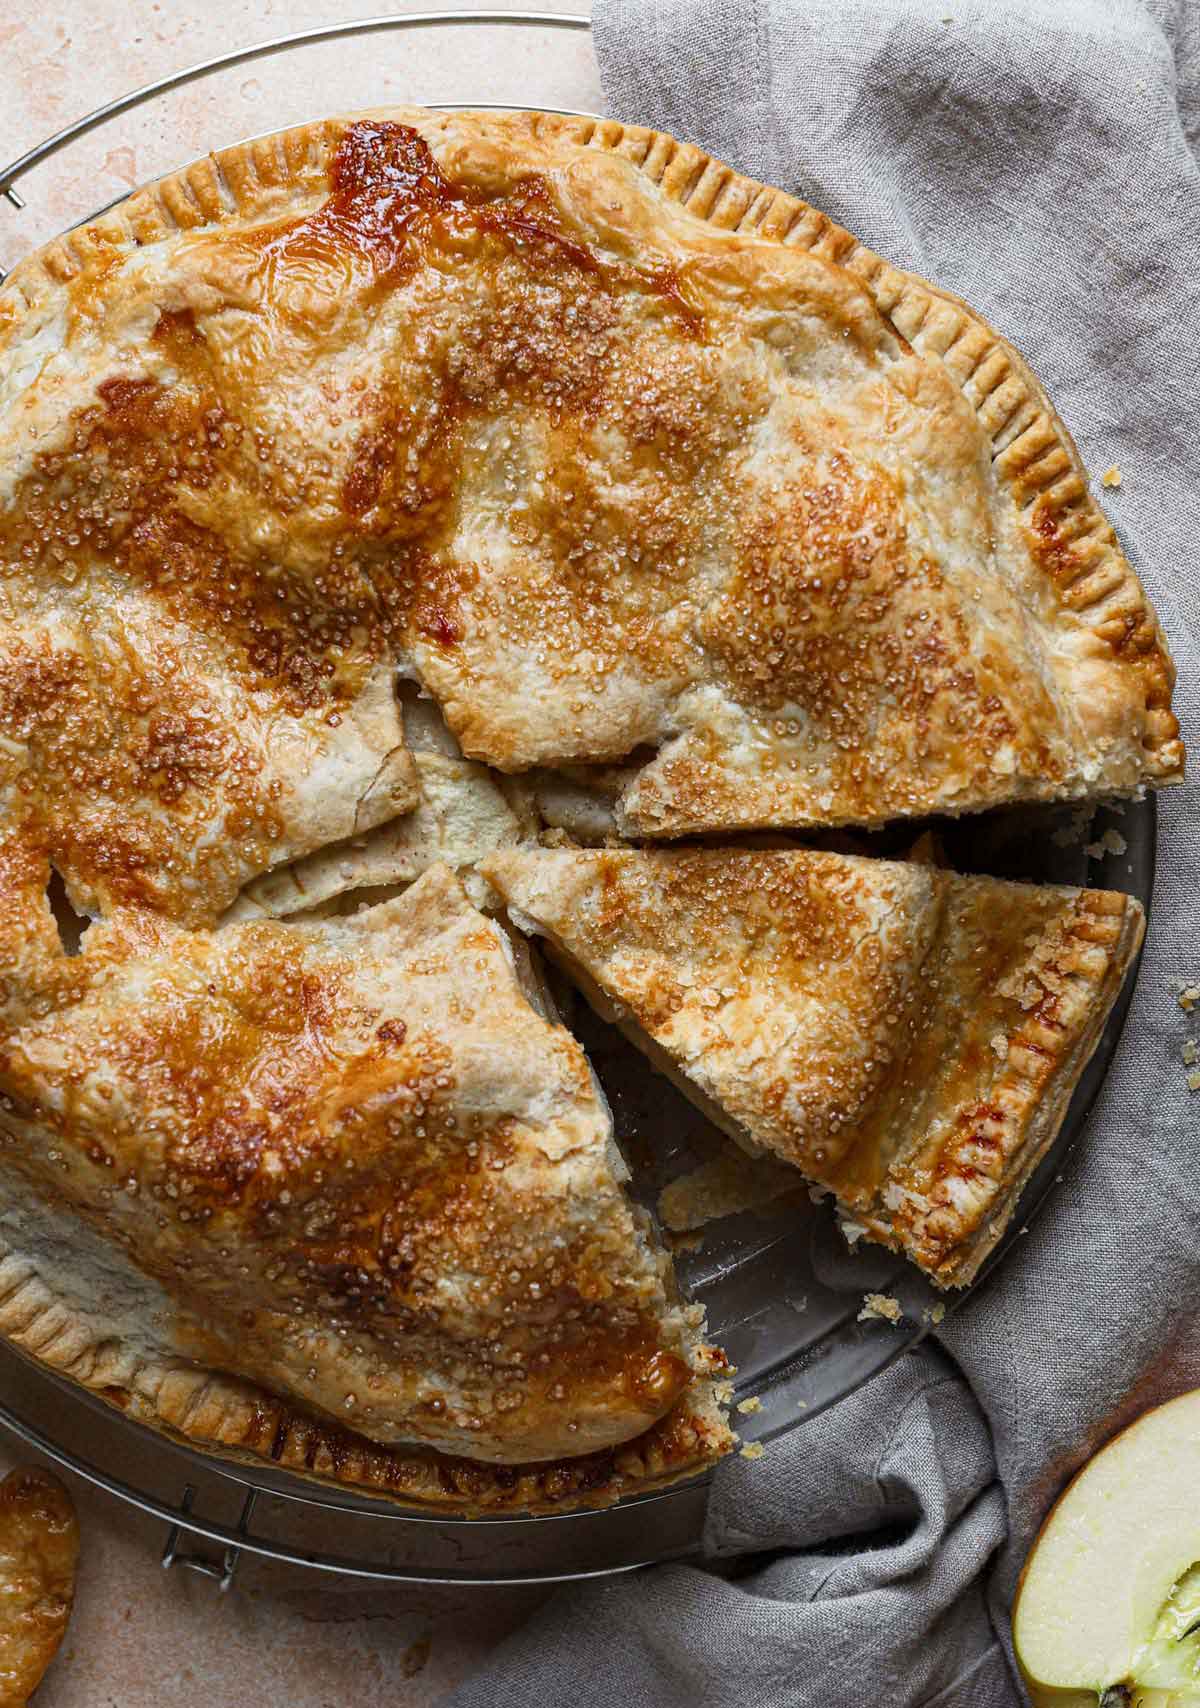
Example of the crust used on a double-crust pie (classic apple pie!) below:
Use This Crust Recipe to Make These Pies (or any of your favorite pie recipes!):
- French Silk Pie
- Salted Caramel Apple Pie
- Perfect Pecan Pie
- Sweet Potato Pie
- Perfect Pumpkin Pie
- Kentucky Derby Chocolate Bourbon Walnut Pie
- Classic Apple Pie
- Fresh Strawberry Pie
- Blueberry Pie
If you make this pie crust and love it, remember to stop back and give it a 5-star rating - it helps others find the recipe! ❤️️
The BEST Pie Crust Recipe
Ingredients
For Single Crust Pie
- 1¼ cups (163 g) all-purpose flour, divided
- 1 tablespoon granulated sugar
- ½ teaspoon salt
- 6 tablespoons (85 g) cold unsalted butter, cut into ¼-inch slices
- ¼ cup (46 g) chilled solid vegetable shortening, cut into 2 pieces
- 2 tablespoons vodka, cold
- 2 tablespoons ice water
For Double Crust Pie
- 2½ cups (325 g) all-purpose flour, divided
- 2 tablespoons granulated sugar
- 1 teaspoon salt
- 12 tablespoons (170 g) cold unsalted butter, cut into ¼-inch slices
- ½ cup (92 g) chilled solid vegetable shortening, cut into 2 pieces
- ¼ cup (60 ml) vodka, cold
- ¼ cup (60 ml) ice water
Instructions
- Food Processor Instructions: Process ¾ cups of the flour, the sugar and salt together in a food processor until combined, about 2 one-second pulses. Add the butter and shortening and process until a homogenous dough just starts to collect in uneven clumps, about 7 to 10 seconds (the dough will resemble cottage cheese curds with some very small pieces of butter remaining, but there should be no uncoated flour). Scrape down the sides and bottom of the bowl with a rubber spatula and redistribute the dough evenly around the bowl. Add the remaining ½ cup flour and pulse until the mixture is evenly distributed around the bowl and the mass of dough has been broken up, 4 to 6 quick pulses. Empty the mixture into a medium bowl.
- By Hand Instructions: In a large mixing bowl, whisk together the flour, sugar, and salt. Toss the butter and shortening with the flour mixture to break up any big pieces. Use a pastry blender to cut the butter and shortening into the flour mixture until it looks like coarse crumbs.
- Sprinkle the vodka and water over the mixture. With a rubber spatula, use a folding motion to mix, pressing down on the dough until it is slightly tacky and sticks together.
- For Single Crust Pies: Roll out on a generously floured work surface to a 12-inch circle. Transfer to a 9-inch pie plate, leaving at least a 1-inch overhang on each side. Working around the circumference, ease the dough into the plate by gently lifting edge of the dough with one hand while pressing into the plate bottom with other hand. Dust off any excess flour with a pastry brush. With scissors or kitchen shears, trim the edge so that it overhangs by 1 inch. Fold the overhang under itself; the folded edge should be flush with edge of pie plate. Flute the dough or press the tines of a fork against dough to flatten it against the rim of pie plate. Wrap with plastic and refrigerate at least 2 hours and up to one day in advance. Use as directed in your favorite recipe.
- For Double-Crust Pies: Divide the dough into two portions. Roll one out on a generously floured work surface to a 12-inch circle. Transfer to a 9-inch pie plate, leaving at least a 1-inch overhang on each side. Working around the circumference, ease the dough into the plate by gently lifting edge of the dough with one hand while pressing into the plate bottom with other hand. Dust off any excess flour with a pastry brush. With scissors or kitchen shears, trim the edge so that it overhangs by 1 inch. For solid top crust, roll remaining dough as before (into a 12-inch circle); for a lattice-top pie, roll it into a 9- by 15-inch rectangle instead. Transfer to a parchment-lined baking sheet. Wrap both portions in plastic wrap and refrigerate for at least 2 hours and up to one day in advance. Use as directed in your favorite recipe; after filling the pie and sealing the crusts together, refrigerate another 30 minutes before baking.
- For Blind-Baked Pie Crust: Adjust oven rack to lower-middle position and preheat to 350 degrees F. Remove the chilled pie shell from the refrigerator and line with a large sheet of aluminum foil, pressing it so it conforms to the pie plate, and over the edges of the pie. Fill the whole way to the top with white granulated sugar, then transfer the pie plate to a rimmed half sheet pan and bake. For a par-baked pie crust (one that needs to be filled and then continue baking), bake for 40 minutes; remove the foil and sugar and set the crust aside while you make the filling. For a fully baked pie crust, bake for 55 to 60 minutes, remove the foil and sugar, and proceed with the recipe as directed.
Notes
- Equipment recommendations: Pie plate / pastry blender / food processor / silicone dough mat / rolling pin
- Vodka – The vodka is essential in this particular recipe and cannot be substituted with more water. If you do not have vodka, use another 80-proof liquor. If you do not want to use alcohol, I recommend using my all-butter pie crust.
- Cold ingredients are essential! Be sure to have the butter, shortening, vodka, and ice water as chilled as possible before beginning. Once you start, work quickly and pop the dough back into the refrigerator for 10-15 minutes if the dough is getting too soft or the butter is too warm.
- For a Blind-Baked Pie – To carefully remove the foil and sugar, fold and gather the foil towards the middle, then use both hands to carefully transfer to a heat-safe bowl. Let cool completely. Fold long sides of foil toward middle, gather short sides, and use both hands to carefully transfer sugar to heat-safe bowl. Let sugar cool to room temperature.
- Make-Ahead: You can refrigerate the dough-lined pie plate up to a day in advance of baking. You can also prepare the pie dough and wrap the disk in plastic wrap and refrigerate for up to 3 days. Let sit on the counter for about 20 minutes before rolling out. Once the pie plate has been lined with the dough and the edges crimped as desired, be sure to chill again for at least 2 hours before proceeding with the recipe.
- Freezing Instructions: To freeze your pie dough, once you have finished mixing the dough, turn it out onto a lightly floured surface and gather it together with floured hands, pressing it together into a cohesive ball. Flatten the dough into a 1-inch thick disc and wrap it tightly with plastic wrap. Place the wrapped disc in a freezer-safe ziploc bag and freeze for up to 3 months. Thaw overnight in the refrigerator before rolling out.
- Recipe adapted from Cook’s Illustrated.
Did you make this recipe?
Leave a review below, then snap a picture and tag @thebrowneyedbaker on Instagram so I can see it!
[Photography by Dee Frances]


What do you do with the sugar after baking the shell?
After it cools, I pour it into an airtight container and re-use it; I have a container of just “pie weight” sugar :)
Can I use lard for the shortening?
Yes, you definitely can!
I intended to put you this tiny observation to be able to thank you as before for your magnificent tricks you’ve contributed in this case. It is simply strangely generous with people like you to supply publicly what most people could possibly have distributed for an e-book to generate some money for their own end, most notably now that you might well have done it in the event you decided. These things in addition worked like the great way to realize that other individuals have similar interest really like mine to figure out a whole lot more with regard to this problem. I am sure there are some more enjoyable sessions ahead for folks who see your site.
Thanks – Enjoyed this article, can I set it up so I get an update sent in an email every time you make a new post?
I’ve used this pie crust recipe ever since she first posted it, a few years ago, and it’s the best! It comes together nicely and handles well. It’s about time to start thinking about my Thanksgiving pies!
I use a pie crust recipe that calls for vinegar which I believe retards gluten formation like the vodka in your recipe. It also has 1 egg and always comes out great. I roll my crusts between plastic wrap, two pieces overlapping long ends on bottom, and two on top. I never have to add more flour. Just remove the top pieces, flip onto the pie plate, then peel off the bottom. Totally enjoy your recipes, instructions and tips…
My dough is so soft I can’t roll it. I added more flour, and put back in the refrigerator
Best pie crust ever. How do I defrost your frozen pie crust! I froze a double recipe for later use. I need it for st. Patrick’s day.
Thank you Michelle! Your recipes are the best. My family loves all that I make!
How would you adjust for a 10 in single or double crust?
Only one recipe I use now
Hi Michelle, for a lattice-top pie, would you make the same amount of dough (double the recipe) as you would for a double-crust pie? Thank you!
Yes, I would!
I have made this countless times over the past 7 years. It’s flawless and better than more intensive crusts even when compared side by side! I also use this crust (omit sugar) for chicken pot pie.
I have not gotten a brown eyed baker in months if not years…I am glad to see your name and hop that I get Friday thing also Thank you for so many good recipes
I am making the pie crust for a cream pie, how much would I heat the oven and how long I will bake it?
Thanks
Antoinette
Can pastry flour be used (some or all) in this crust?
Hi Lorraine, I haven’t used pastry flour, so I could not say for sure.
Could I substitute with 1for1 gluten free flour?
Hi Jessa, I haven’t experimente with gluten free flour for this pie crust; if you give it a go, let me know how it turns out!
I have always made pie crusts in my KitchenAid mixer because I don’t own a food processor. Will a mixer work with this recipe?
Hi Linda, I’ve never used a mixer for pie crust, but if you’ve always had success with it, it should work!
Want to try this recipe. Can I use only unsalted butter? I will be waiting for your response. Thank you!
Awwww girl!! WOW!! AWESOME!! DO NOT even begin to cover this or any of your recipes I’ve made and tried!! HOLY SMOKES not even close! I missed your post about the pix & Instragram but it won’thappen next time and there WILL BE a next time 😉😁😉 Did you by chance sometime back say something along the lines of “You wish you could be a Southern girl with all the wonderful Southern RECIPES you’ve made and loved?” Because if this is you, “Darlin’ consider yourself a Southern Belle. WELCOME TO THE SOUTH KATIE SCARLETT O’HARA!!
This crust is amazing!!
Best pie crust I’ve ever made. So flaky. Thanks for sharing.