Traditional Focaccia Bread

A traditional focaccia bread recipe that bakes up crisp on the outside and warm and soft on the inside. With endless topping options you can easily make this focaccia recipe your own by simply changing out how you dress it up! Perfect for serving with soups and stews, or even for making into sandwiches.
I don’t think there is much that can beat a fresh-baked loaf of bread. Whether it’s a slice of warm homemade white bread, classic Italian bread, an airy ciabatta, or a cheesy slice of garlic bread you truly can’t go wrong. One of the bread recipes I thoroughly enjoy making, especially during the winter months, is traditional focaccia.
Focaccia has always been one of my favorite bakery splurges, with the crusty exterior and soft interior, plus tons of flavor from the herbs and garlic are just heavenly. The traditional Italian bread can also double as a flatbread or pizza dough but is most commonly served as an appetizer bread or side to soup or salad.
What is Focaccia?
This flat, oven-baked Italian bread is often referred to as Italian flatbread or pizza Bianca. It’s a dimpled dough loaded with olive oil and various seasonings and toppings.
Focaccia is most commonly compared to pizza dough. They are both flat, oven-baked bread that often includes different toppings. One of the main differences between the two breads is rise time. Focaccia gets an extra rise after being flattened out while pizza dough bakes immediately after flattening.
How to Make Focaccia
I’ve tried many, many recipes and always come back to this classic from Peter Reinhart’s The Bread Baker’s Apprentice. It bakes up perfectly every single time and is packed full of flavor. The olive oil creates a crisp exterior while the interior remains soft and fluffy.
When you look at this recipe, it will seem very time-intensive, but nearly all of the time is rest time with very little hands-on work. Let’s talk through the recipe…
Ingredients
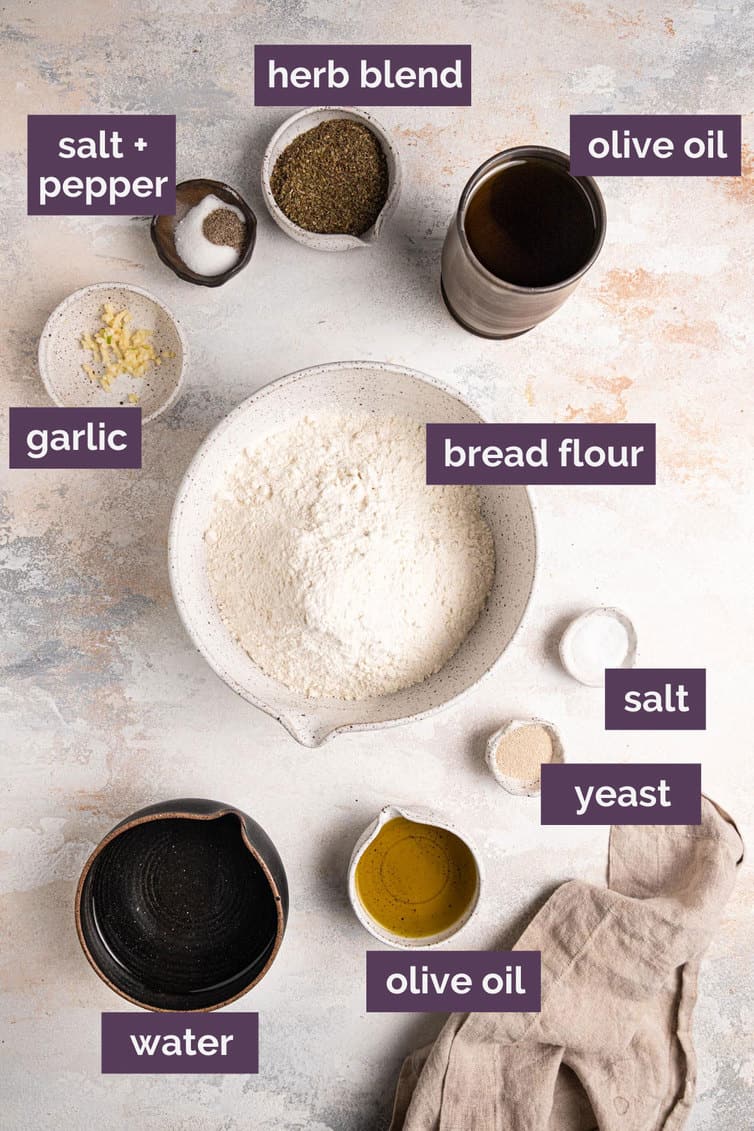
- Herb Oil – Made with olive oil, fresh or dry herbs, kosher salt, black pepper, and minced garlic.
- Bread Flour – Using bread flour gives the focaccia a chewy texture; you can substitute all-purpose flour without ruining the recipe, but your bread will be significantly lighter and missing that characteristic texture.
- Salt – Gives flavor to the dough.
- Instant Yeast – Feeds on the sugars activated in the flour and helps the focaccia rise.
- Olive Oil – Used both in and on the dough helps tenderize the dough and gives the toppings something to stick to on the bread.
- Water – Activates the yeast and turns your ingredients into a dough.
Make the Herb Oil
This is what infuses the bread with tons of flavor and gives it that characteristic texture. There are lots of flavor modifications and additions you can make to suit your tastes, so be sure to check the recipe notes below. To make herb oil:
- Heat Olive Oil: Warm 2 cups of olive oil in a small saucepan over low heat to 100°F (this only takes a few minutes).
- Season Olive Oil: Add the herbs, salt, pepper, and garlic; stir together.
- Steep Herb Oil: Remove from heat and allow to steep while you prepare the dough.

Herb Oil Notes:
- Herbs – If using fresh herbs, use any combination of basil, parsley, oregano, tarragon, rosemary, thyme, cilantro, and sage. If using dried herbs, you can use a combination of any of the previous herbs, or use a blend such as herbes de Provence. You can substitute 1 tablespoon granulated garlic for the fresh garlic.
- Herb Oil Extras – You can also add 1 teaspoon paprika, 1 teaspoon cayenne pepper, 1 tablespoon fennel seeds, 1 teaspoon onion powder, or 1 tablespoon dried, minced onions.
- Herb Oil Storage – Keep any leftover herb oil in the refrigerator for up to 2 weeks (it makes a wonderful dipping oil!).
Make the Focaccia Dough
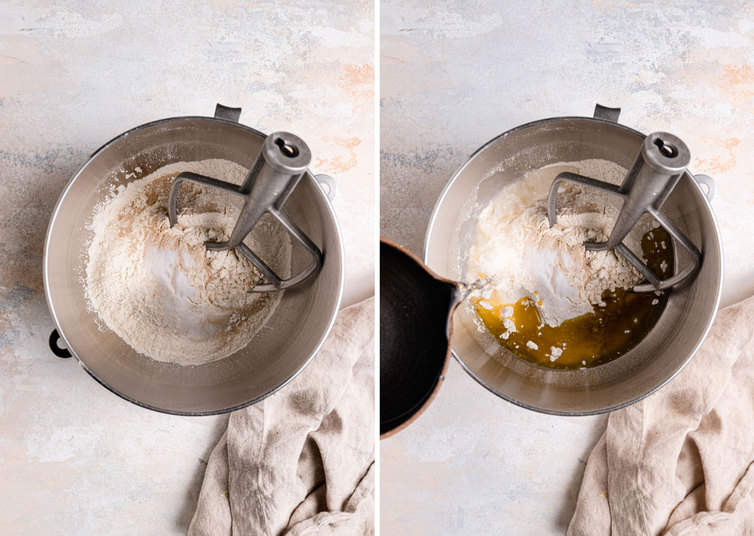
- Mix the dough: Stir together flour, salt, and yeast in the bowl of an electric mixer. Add the olive oil and water and mix on low speed with the paddle attachment until it forms a wet, sticky ball.
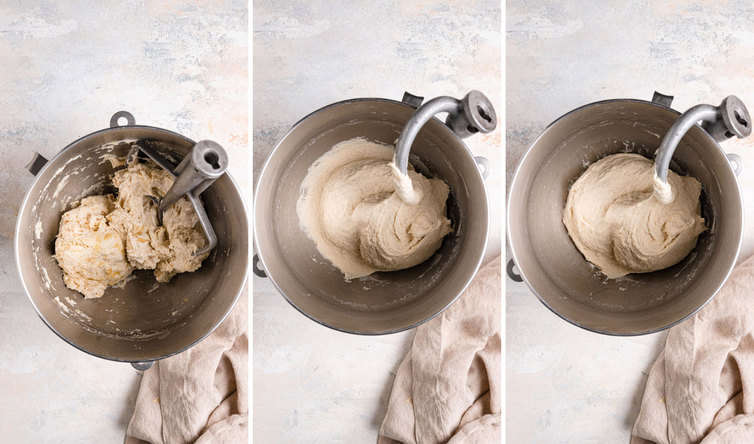
- Knead the dough: Switch to a dough hook and mix on medium for 5-7 minutes to form a smooth, sticky dough. The dough should clear the sides of the bowl but stick to the bottom of the bowl. Add additional flour to firm up the dough enough to clear the sides of the bowl.
- Transfer and stretch the dough: Sprinkle workspace with a 6-inch square bed of flour. Transfer dough to the flour bed and dust liberally with flour. Pat dough into a rectangle and allow to rest 5 minutes. Coat your hands with flour and stretch the dough from each end to twice its size.
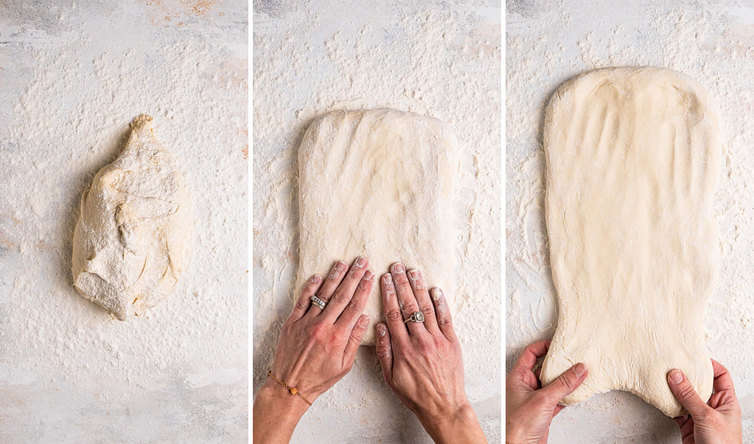
- Shape the dough: Fold it, letter style, over itself to return to a rectangular shape. Mist with olive oil or non-stick spray, dust with flour, and cover with plastic wrap. Allow dough to rest for 30 minutes.
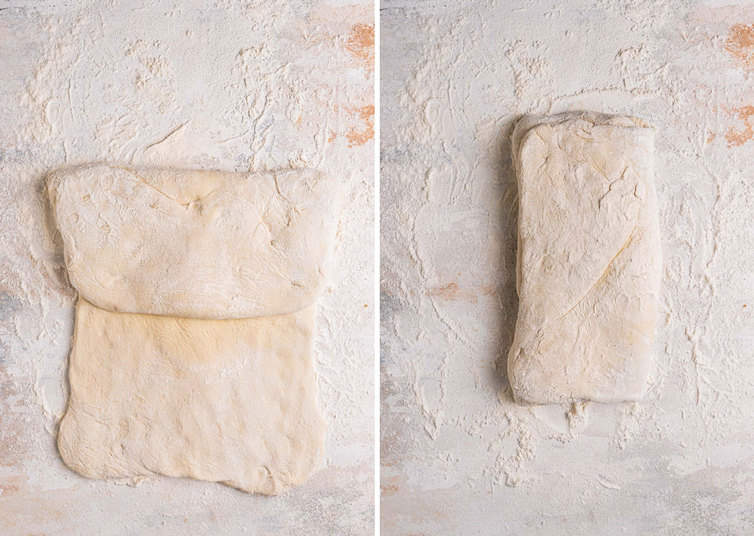
- Stretch and Fold: Again, stretch the dough to twice its size and fold over, letter style, to return to a rectangular shape. Repeat the mist, flour, and cover, and allow to rest for 30 minutes.
Save This Recipe
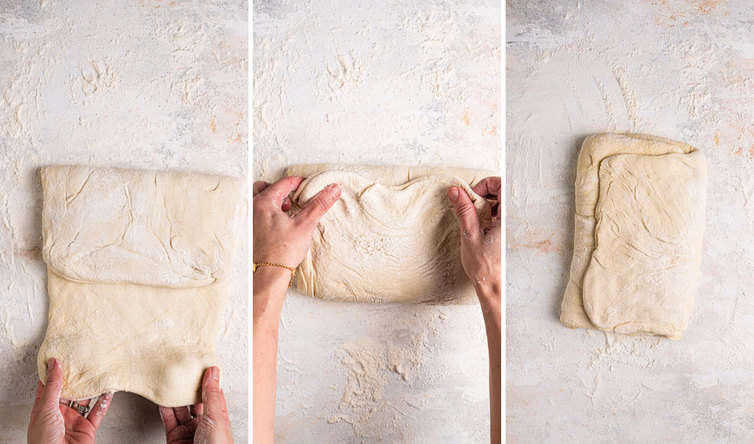
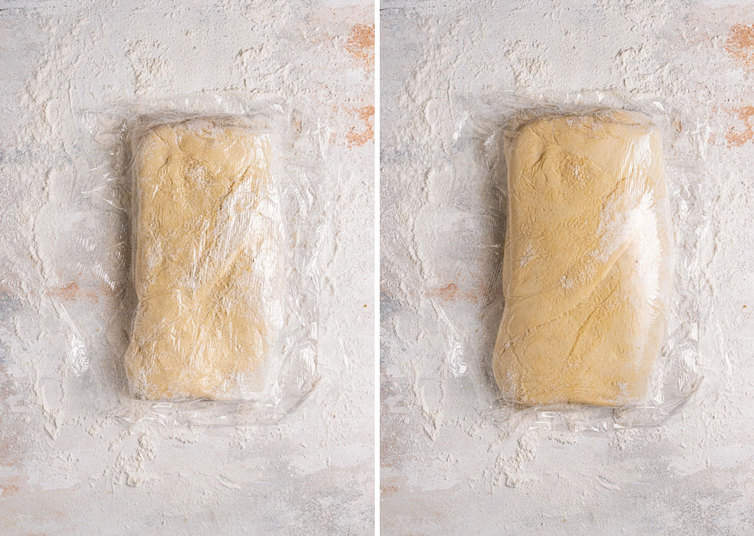
- The final stretch: Once more, stretch and fold the dough. Cover loosely with plastic wrap and allow to ferment on the work surface for 1 hour. It should swell but not necessarily double in size.
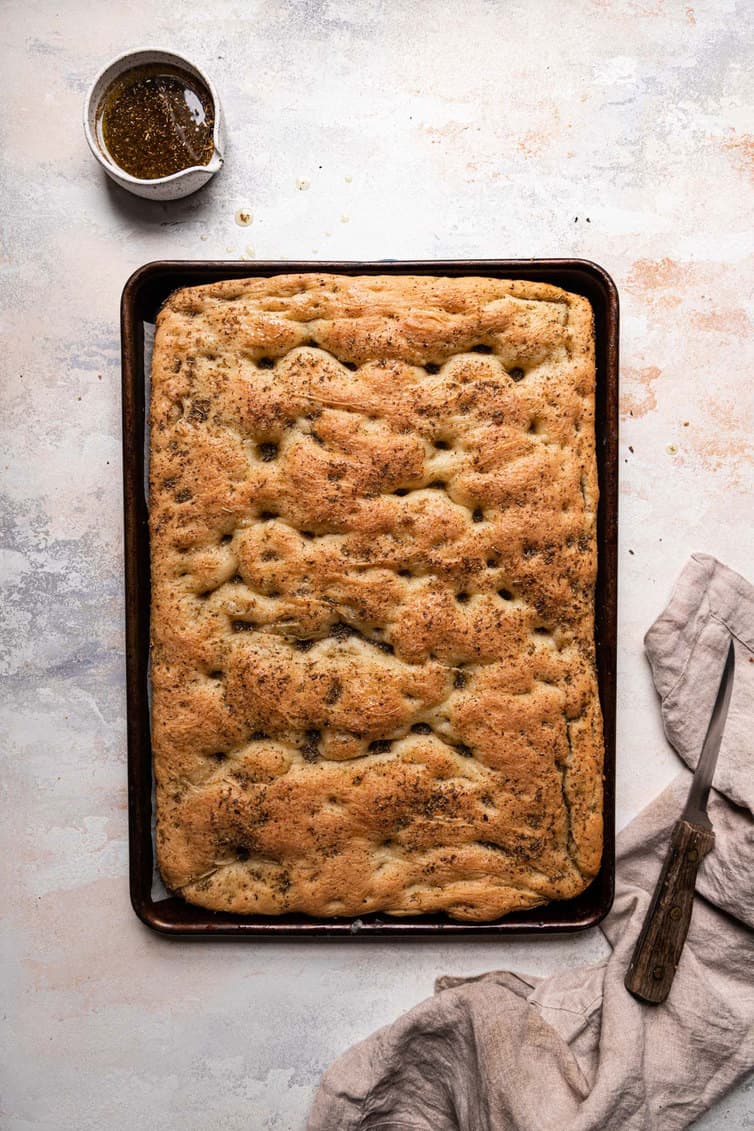
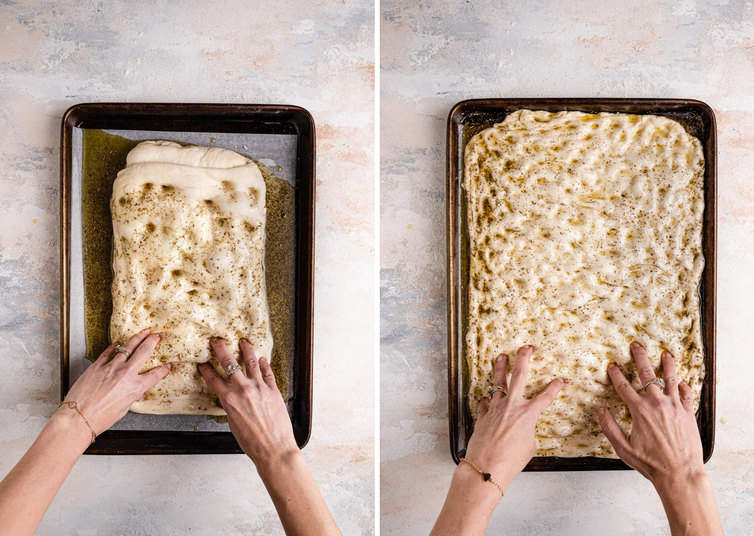
- Prepare the baking sheet: Line a half sheet pan with parchment paper. Drizzle 1/4 cup olive oil over the paper, and spread it with your hands or a brush to cover the surface. Lightly oil your hands and using a plastic dough spatula, transfer the dough to the sheet pan, maintaining the rectangular shape as much as possible. Spoon half the herb oil over the dough.
- Dimple the dough: Use your fingertips to dimple the dough and spread it to fit the pan. If the dough becomes too springy, let it rest for 15 minutes and then continue dimpling. Don’t worry if you are not able to completely fill the pan, especially the corners. Use more herb oil as needed to ensure the entire surface is coated.
- Refrigerate overnight: Cover the pan with plastic wrap lightly and refrigerate overnight or up to 3 days.
How to Bake the Focaccia
- Remove from the refrigerator: Remove the pan from the refrigerator 3 hours before baking.
- Proof the dough: Drizzle with additional herb oil and dimple it in. Optional- add any pre-proof toppings (see below). Cover with plastic wrap and proof at room temperature for 3 hours. The dough should double in size and be about 1 inch thick.
- Preheat the oven: Set the oven to 500°F and top the focaccia with any optional pre-bake toppings (see below)
- Bake the focaccia: Place the pan in the oven and lower the temperature to 45o°F and bake for 10 minutes. Rotate the pan 180° and bake 5-10 more minutes, or until golden brown. If you are using any optional during-bake toppings, sprinkle them on at this point and continue baking for an additional 5 minutes.
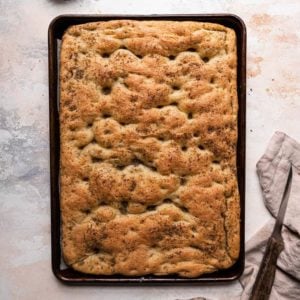
- Remove the focaccia: Remove the pan from the oven and transfer the focaccia out of the pan and onto a cooling rack. Allow the focaccia to cool for 20 minutes before slicing or serving.
Focaccia Bread Success Tips
- Make the Dough By Hand – The dough can be prepared without a stand mixer by mixing the dough with a large metal spoon in lieu of the kneading step. You will need to mix vigorously for about 3 to 5 minutes, or until the dough is smooth and the ingredients are evenly distributed.
- Gentle Dimpling – When dimpling the dough, be sure to use ONLY your fingertips and not the flat of your hands to avoid tearing or ripping the dough. This helps reduce the air in the dough and prevents the bread from rising too quickly.
- Picking Olive Oil – Pick an extra virgin olive oil that works well in cooking and baking. You do not want to use a finishing oil in the dough or during the baking process.
Topping Ideas for Focaccia
There are various points in the recipe when you can add toppings to your focaccia. Here are just a few suggestions for topping focaccia bread pre-proof, pre-bake, and during baking.
- Pre-Proof Topping Ideas:
- Sun-dried tomatoes
- Olives
- Roasted garlic
- Fresh herbs
- Walnuts, pine nuts, or other nuts
- Sauteed mushrooms, bell peppers, or onions
- Pre-Bake Topping Ideas:
- Soft cheeses – Blue cheese, fresh mozzarella, and feta
- Cooked ground meat
- Strips of deli meat
- Coarse salt
- Coarse sugar
- During-Bake Topping Ideas:
- Dry or semihard cheeses – Parmesan, Romano, regular mozzarella, Monterey Jack, Cheddar, and Swiss
Serving Ideas
No matter how you choose to serve it, I can promise you with 100% certainty that making it at home is a thousand times better than buying it somewhere. You can easily make this bread with any soup or chili recipe. I also love serving my focaccia with:
Freezing, Storing and Reheating Tips
- Freeze Before Baking – If you wish to prepare the dough in advance, complete steps #1 through 7. After the 1 hour rise, wrap tightly in plastic wrap, place in a freezer-safe bag, and freeze for up to 3 months. Thaw overnight in the refrigerator, then proceed with the rest of the recipe.
- Freeze After Baking – Wrap individual slices of focaccia in plastic wrap, then in foil, and place in a freezer-safe bag. Freeze for up to 1 month. Thaw at room temperature and, if desired, reheat in a 325-degree oven for 5 minutes, or until warmed through and crispy.
- Storage – The focaccia is best the day it is made, but it can be stored, tightly covered, at room temperature for up to 2 days.
- Reheating – While I think this focaccia is best right after baking, you can easily bring it back to life by baking in the oven at 350°F for about 8-10 minutes.
Other Bread to Bake Next:
- Basic Pizza Dough
- Homemade Pita Bread
- Italian Bread
- Potato Rosemary Bread
- 10 Best Yeast Bread Recipes
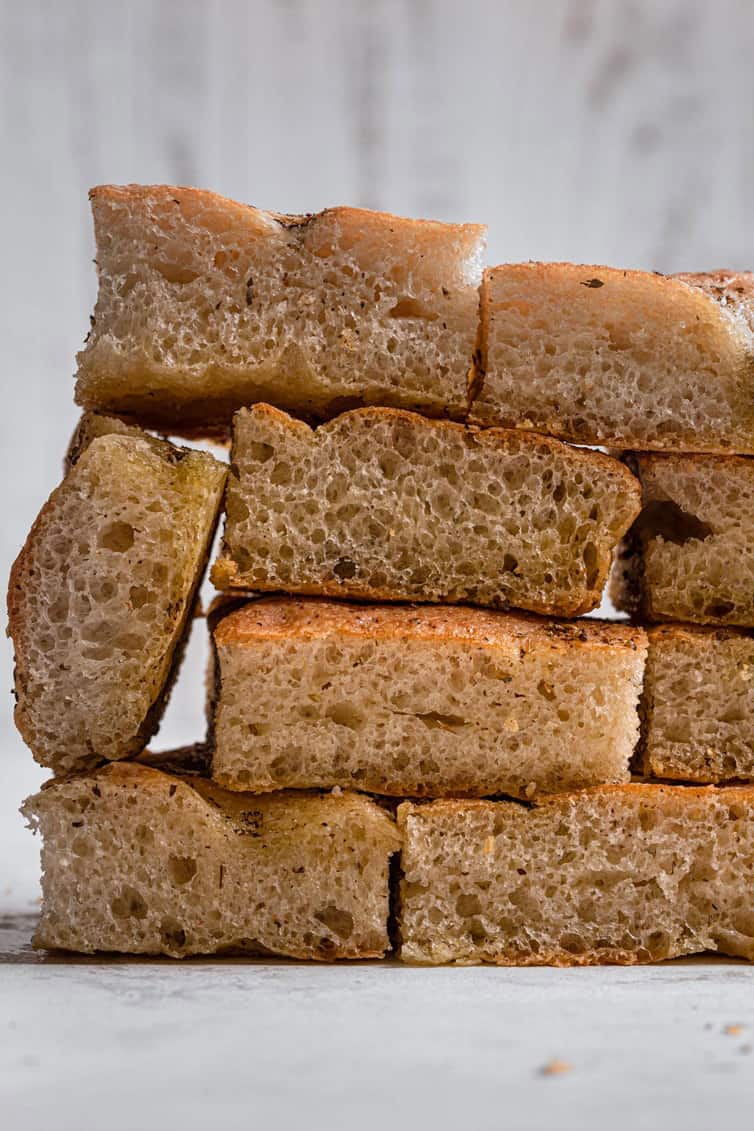
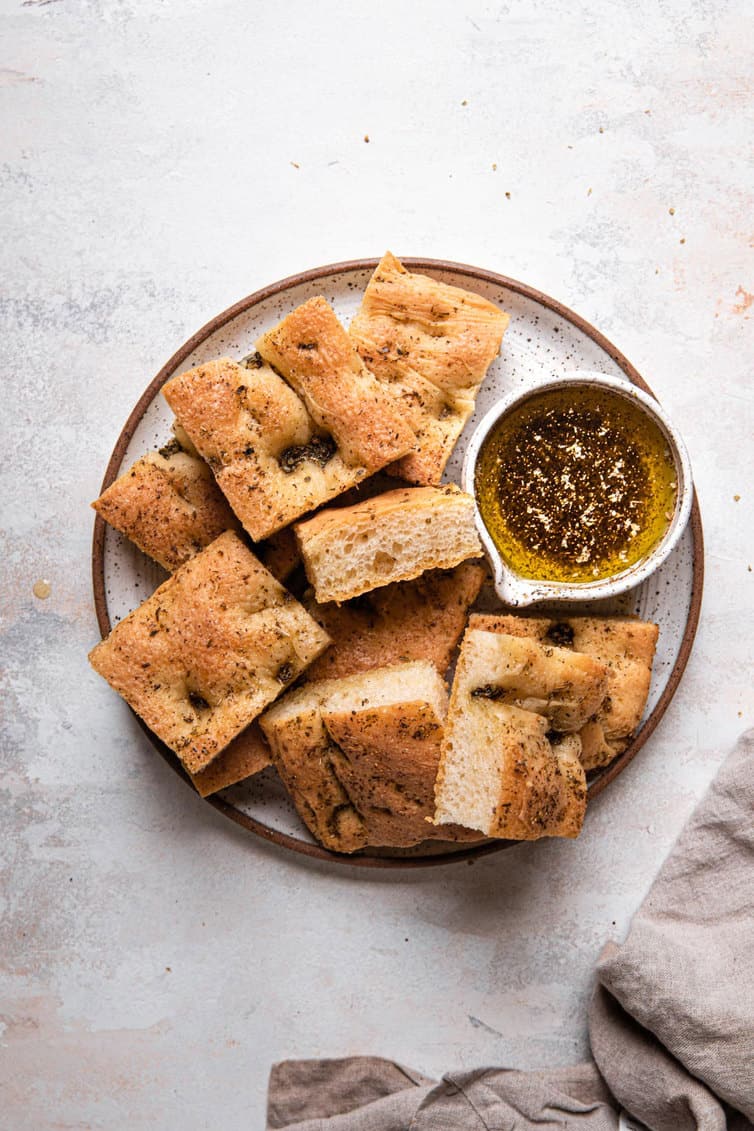
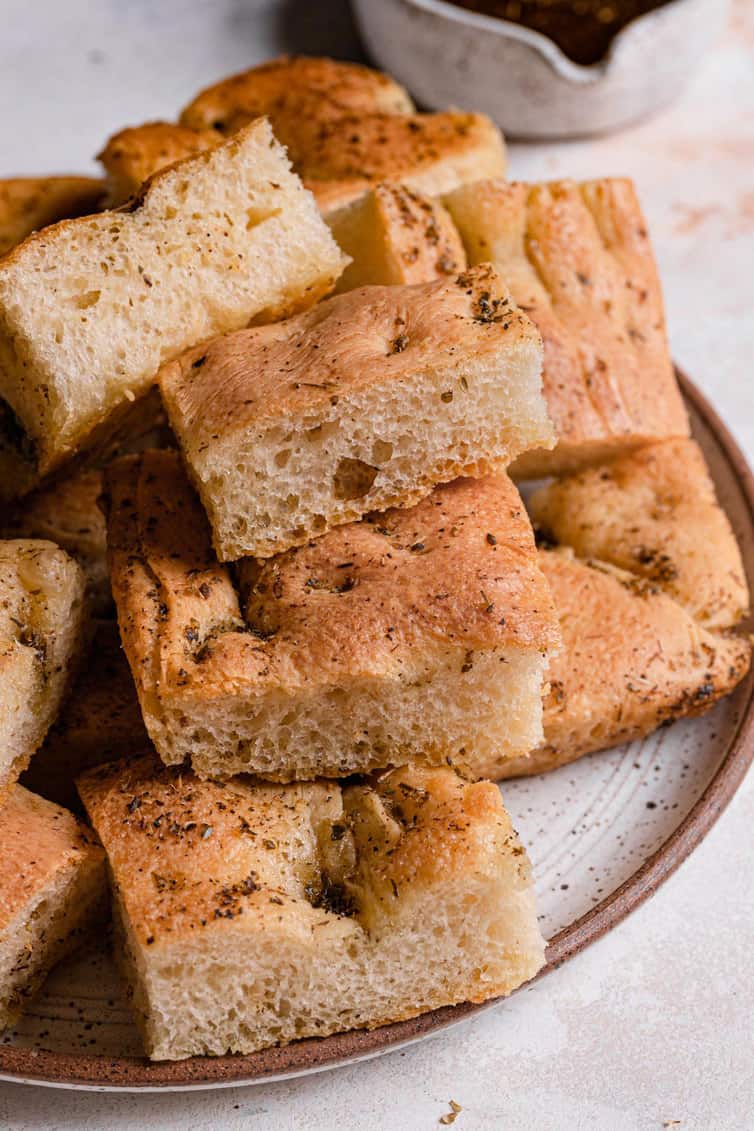
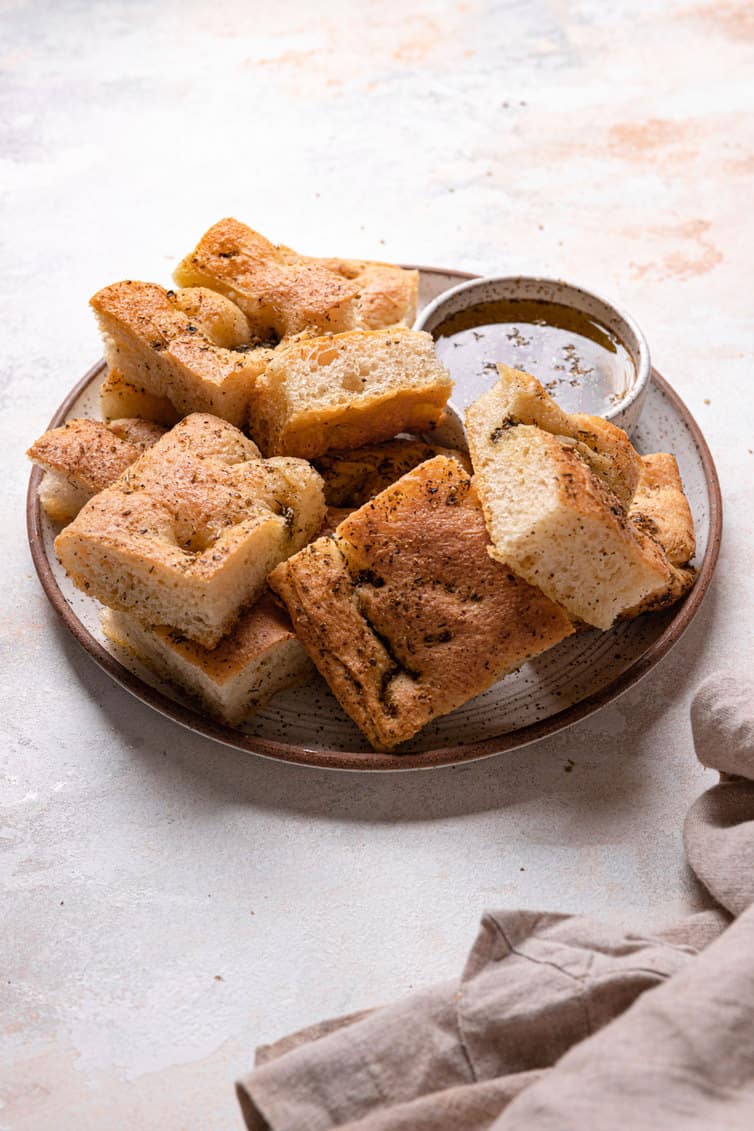
Golden and dimpled on the outside with a soft tender interior, this focaccia makes the perfect side to your soups, stews, or hearty pasta. Slice it up and serve it with olive oil or herb oil, you truly can’t go wrong!
Watch How to Make This Classic Focaccia Bread:
If you make this recipe and love it, remember to stop back and give it a 5-star rating - it helps others find the recipe! ❤️️
Focaccia Bread
Ingredients
For the Herb Oil:
- 2 cups olive oil
- 1 cup chopped fresh herbs, OR 1/3 cup dried herbs
- 1 tablespoon kosher salt
- 1 teaspoon ground black pepper
- 6 cloves garlic, minced
For the Dough:
- 5 cups (638 g) high-gluten or bread flour
- 2 teaspoons salt
- 2 teaspoons instant yeast
- 6 tablespoons olive oil
- 2 cups (480 ml) water, at room temperature
For Preparation
- ¼ cup olive oil
- Pre-proof toppings, optional
- Pre-bake toppings, optional
- During-bake toppings, optional
Instructions
- Make the Herb Oil: Warm 2 cups olive oil in a small saucepan over low heat to 100 degrees F (this only takes a few minutes). Add the herbs, salt, pepper, and garlic; stir together, remove from the heat and allow to steep while you prepare the dough.
- Make the Dough: Stir together the flour, salt, and yeast in the bowl of an electric mixer. Add the oil and water and mix on low speed with the paddle attachment until all of the ingredients form a wet, sticky ball.
- Switch to the dough hook and mix on medium speed for 5 to 7 minutes, or as long as it takes to create a smooth, sticky dough. The dough should clear the sides of the bowl but stick to the bottom of the bowl. You may need to add additional flour to firm up the dough enough to clear the sides of the bowl, but the dough should still be quite soft and sticky.
- Sprinkle enough flour on a clean work surface to make a bed about 6 inches square. Using a dough spatula or bench scraper dipped in water, transfer the sticky dough to the bed of flour and dust liberally with flour, patting the dough into a rectangle. Allow the dough to rest for 5 minutes.
- Coat your hands with flour and stretch the dough from each end to twice its size. Fold it, letter style, over itself to return it to a rectangular shape. Mist the top of the dough with spray oil or nonstick cooking spray, again dust with flour, and loosely cover with plastic wrap. Allow the dough to rest for 30 minutes.
- Stretch and fold the dough again; mist with oil, dust with flour, and cover loosely with plastic wrap. Allow the dough to rest for 30 minutes.
- Once more, stretch and fold the dough. Cover loosely with plastic wrap and allow to ferment on the work surface for 1 hour. It should swell but not necessarily double in size.
- Line a half sheet pan with parchment paper. Drizzle ¼ cup olive oil over the paper, and spread it with your hands or a brush to cover the surface. Lightly oil your hands and, using a plastic dough spatula or bench scraper, lift the dough from the work surface and transfer it to the sheet pan, maintaining the rectangular shape as much as possible. Spoon half of the herb oil over the dough.
- Use your fingertips to dimple the dough and spread it to fill the pan. If the dough becomes too springy, let it rest for 15 minutes and then continue dimpling. Don't worry if you aren't able to completely fill the pan, especially the corners. User more herb oil as needed to ensure that the entire surface is coated with oil.
- Loosely cover the pan with plastic wrap and refrigerate overnight (or up to 3 days).
- Remove the pan from the refrigerator 3 hours before baking.
- Drizzle additional herb oil over the surface and dimple it in (you can use all of the herb oil if you want; the dough will absorb it even though it looks like a lot). The pan should be filled completely with the dough and the dough should have a thickness of about ½-inch. Add any other pre-proof toppings (see notes below). Cover the pan with plastic wrap and proof at room temperature for 3 hours, or until the dough double in size, rising to a thickness of nearly 1 inch.
- Preheat oven to 500 degrees F. Gently place any pre-bake toppings on the dough (see notes below).
- Place the pan in the oven. Immediately lower the oven temperature to 450 degrees F and bake for 10 minutes. Rotate the pan 180 degrees and continue baking for 5 to 10 minutes, or until it begins to turn a light golden brown. If you are using any during-bake toppings (see notes below), sprinkle them on at this point and continue baking an additional 5 minutes or so. The internal temperature of the dough should register at least 200 degrees F on an instant-read thermometer.
- Remove the pan from the oven and immediately transfer the focaccia out of the pan onto a cooling rack. Allow the focaccia to cool for at least 20 minutes before slicing or serving.
Notes
- Herb Oil – If using fresh herbs, use any combination of basil, parsley, oregano, tarragon, rosemary, thyme, cilantro, and sage. If using dried herbs, you can use a combination of any of the previous herbs, or use a blend such as herbes de Provence. You can substitute 1 tablespoon granulated garlic for the fresh garlic.
- Herb Oil Extras – You can also add 1 teaspoon paprika, 1 teaspoon cayenne pepper, 1 tablespoon fennel seeds, 1 teaspoon onion powder, or 1 tablespoon dried, minced onions.
- Herb Oil Storage – Keep any leftover herb oil in the refrigerator for up to 2 weeks (it makes a wonderful dipping oil!).
- Make the Dough By Hand – The dough can be prepared without a stand mixer by mixing the dough with a large metal spoon in lieu of the kneading step. You will need to mix vigorously for about 3 to 5 minutes, or until the dough is smooth and the ingredients are evenly distributed.
- Gentle Dimpling – When dimpling the dough, be sure to use ONLY your fingertips and not the flat of your hands to avoid tearing or ripping the dough.
- Pre-Proof Topping Ideas:
-
- Sun-dried tomatoes
- Olives
- Roasted garlic
- Fresh herbs
- Walnuts, pine nuts, or other nuts
- Sauteed mushrooms, bell peppers, or onions
-
- Pre-Bake Topping Ideas:
-
- Soft cheeses – Blue cheese, fresh mozzarella, and feta
- Cooked ground meat
- Strips of deli meat
- Coarse salt
- Coarse sugar
-
- During-Bake Topping Ideas:
-
- Dry or semihard cheeses – Parmesan, Romano, regular mozzarella, Monterey Jack, Cheddar, and Swiss
-
- Freeze Before Baking – If you wish to prepare the dough in advance, complete steps #1 through 7. After the 1 hour rise, wrap tightly in plastic wrap, place in a freezer-safe bag, and freeze for up to 3 months. Thaw overnight in the refrigerator, then proceed with the rest of the recipe.
- Freeze After Baking – Wrap individual slices of focaccia in plastic wrap, then in foil, and place in a freezer-safe bag. Freeze for up to 1 month. Thaw at room temperature and, if desired, reheat in a 325-degree oven for 5 minutes, or until warmed through and crispy.
- Storage – The focaccia is best the day it is made, but it can be stored, tightly covered, at room temperature for up to 2 days.
- Recipe from The Bread Baker’s Apprentice
Did you make this recipe?
Leave a review below, then snap a picture and tag @thebrowneyedbaker on Instagram so I can see it!
Photography by Dee Frances


I love bread, any kind especially Focaccia, but never thought about making my own, thanks for the recipe
My dad makes focaccia all of the time. I love it! I need to try it in my own kitchen.
This looks stunning! I love focaccia bread, it has to be one of my favorites!!
I’ve been making focaccia bread for years although if my youngest daughter was around I had to hide it; that girl could literally eat a whole tray of it!
I use my bread machine which makes it even easier; it manages the mixing and rising and then I remove the dough and prepare and bake it on a tray. I’m not one to get any soul satisfying moment out of stretching and kneading; I”m more inclined to have carpel tunnel flare up so my method allows this to be on our table often.
It is quite literally our most favorite bread; wish I had some now!
This looks absolutely wonderful and you made it sound so easy! I pinned this recipe, it’s now on my to-make list :)
I have approximately 1000 recipes I have bookmarked that I want to try. Funny how they slip through the cracks! Maybe my New Year’s resolution should be to make 1 new recipe every week. Or stop bookmarking recipes! I will never keep up!
This bread looks awesome. There is nothing like homemade bread! I, like you, would love to make more of my own homemade bread. But I also think I would never stop eating it!
I LOVE Focaccia, but I haven’t made it since last year. That needs to change!
Wow pretty labor-intensive recipe but the focaccia looks well worth it! I loooove focaccia. I’m terrible at resisting, especially when theres a bread section leading to the check out at an amazing local market & the bakers bring out fresh focaccia, I’m a sucker! I’m going to have to set some time aside to try this!
I bought the Bread Baker’s Apprentice two years ago and have used it quite heavily. It’s such a great book with a ton of recipes for artisanal breads. There’s a lot of waiting in most of the recipes, but as you’ve said, it’s well worth the wait. The focaccia is one of my family’s favorites along with the Semolina Bread and the Ciabatta.
This looks amazing, but whow, what a lot of work! I bet it tastes wonderful!! I need to make some bread!
I have always wanted to try making this! You make it look so easy :)
I love focaccia! I’ve never tried making it myself, but I may have to change that, this recipe looks fantastic
This looks amazing!! Just one question… the recipe appears to require a stand mixer, which is unfortunately still on my wish list. Is it possible to make this with a hand mixer/rubber spatulas/etc., and still produce the same final product? I want to try this so badly, but I don’t want to end up with a disaster!! Thanks in advance for anyone’s advice :)
I made this yesterday/today and I didnt use my mixer. Once all the ingredients were combined I stirred it with a wooden spoon til it was clearing the bowl. Then I kneaded it with floured hands and a bit of flour on my counter. I tried not to add too much flour to the counter and just kept it on my hands. Mine is cooling at the moment.
It tastes delicious (cause of course we snuck a taste cause it unfornately broke coming out of the pan, dimples too deep maybe lol) but I think mine came out a little too oily on the bottom. But thats mostly bakers error on my part. Regardless it is a fabulous recipe and I will def. be making it again
I love foccaccia but have never made it! This looks gorgeous, nice photos as well! What a treat!
MMM yum! I love focaccia. I always have it in restaurants, but have never made any on my own…..first time for everything :)
OMG. Yum! Can I have a sandwich too?
I think I could eat the whole thing in one sitting…it looks absolutely delicious. Excited to give this a try!
I love this and a paninni made from it would be off the hook!
Ooh, totally on board with a thicker foccacia. This looks amazing. Love all the herbs. Mmmmm.
Delish. There is nothing better than focaccia with lots and lots of rosemary!!! yum
This is on my list to make too. Thanks for posting….I might make this over the weekend for my husband’s birthday.
Yum! I love this bread. It’s so great dipped in pesto :)
Really good recipe! The more you make bread, the more you will realize the wonderfulness of it, for all of the reasons you mentioned. One of my favorite things to do!
It looks wonderful! Focaccia is one of my favorite breads to make. I frequently add asiago or parmesan cheese as I am mixing it up, then I put more cheese on it before I bake it. As for the pan, I bake it in round cake pans the way Panera does it, so my focaccia is taller than the recipe says, but it’s still yummy. My husband and I like it during the summer with tomato-mozzarella salad with balsamic vinaigrette. Thank you for reminding me how good focaccia can be. :)
Looks amazing! Focaccia has always bean of my favorites, especially with olives :)
looks really good!
Love love love foaccia! Haven’t made it since last spring… sigh!
I’ve tried to make focaccia a couple of times recently and my attempts have been disasters! This looks like a fairly foolproof recipe though so I will have to give it a try!
Focaccia is SO good! I can’t be trusted around it :) I resolved to make more homemade bread in 2012 as well, it really is the best thing.
Looks delicious! Focaccia is one of the breads I’ve yet to make… but I love it too, so I might as well try soon!