Red Velvet Cheesecake

Treat yourself with a slice (or two) of this divine Red Velvet Cheesecake. Tender red velvet cake sandwiches creamy cheesecake for the ultimate dessert pairing. Based on the Cheesecake Factory's decadent version, this unforgettable cheesecake recipe is perfect for Valentine's Day, date night in, or just because.
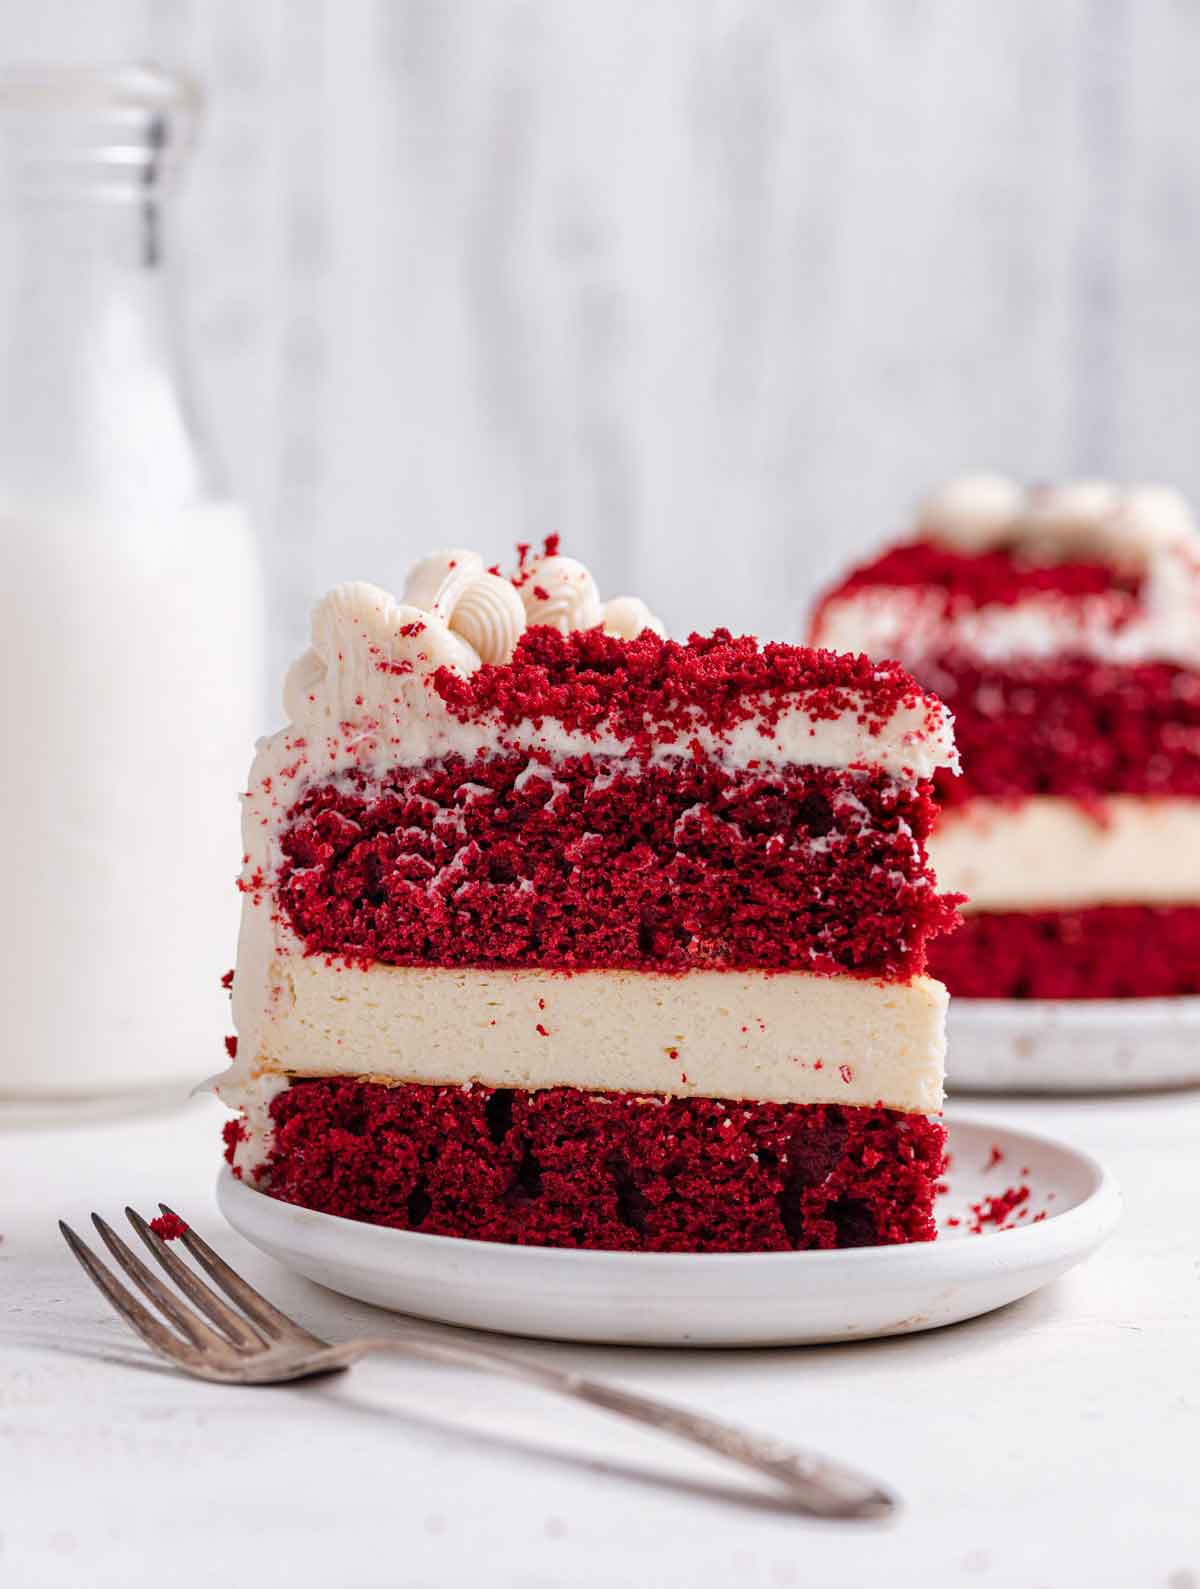
I have made my share of red velvet desserts over the years, but this red velvet cheesecake truly stands above the rest. Moist red velvet cake layered with creamy cheesecake all wrapped up in a velvety cream cheese frosting… What more could you want?!?
Cheesecake Factory Copycat Recipe
This beauty originated at the Cheesecake Factory, where all incredibly decadent cheesecakes are born into existence.
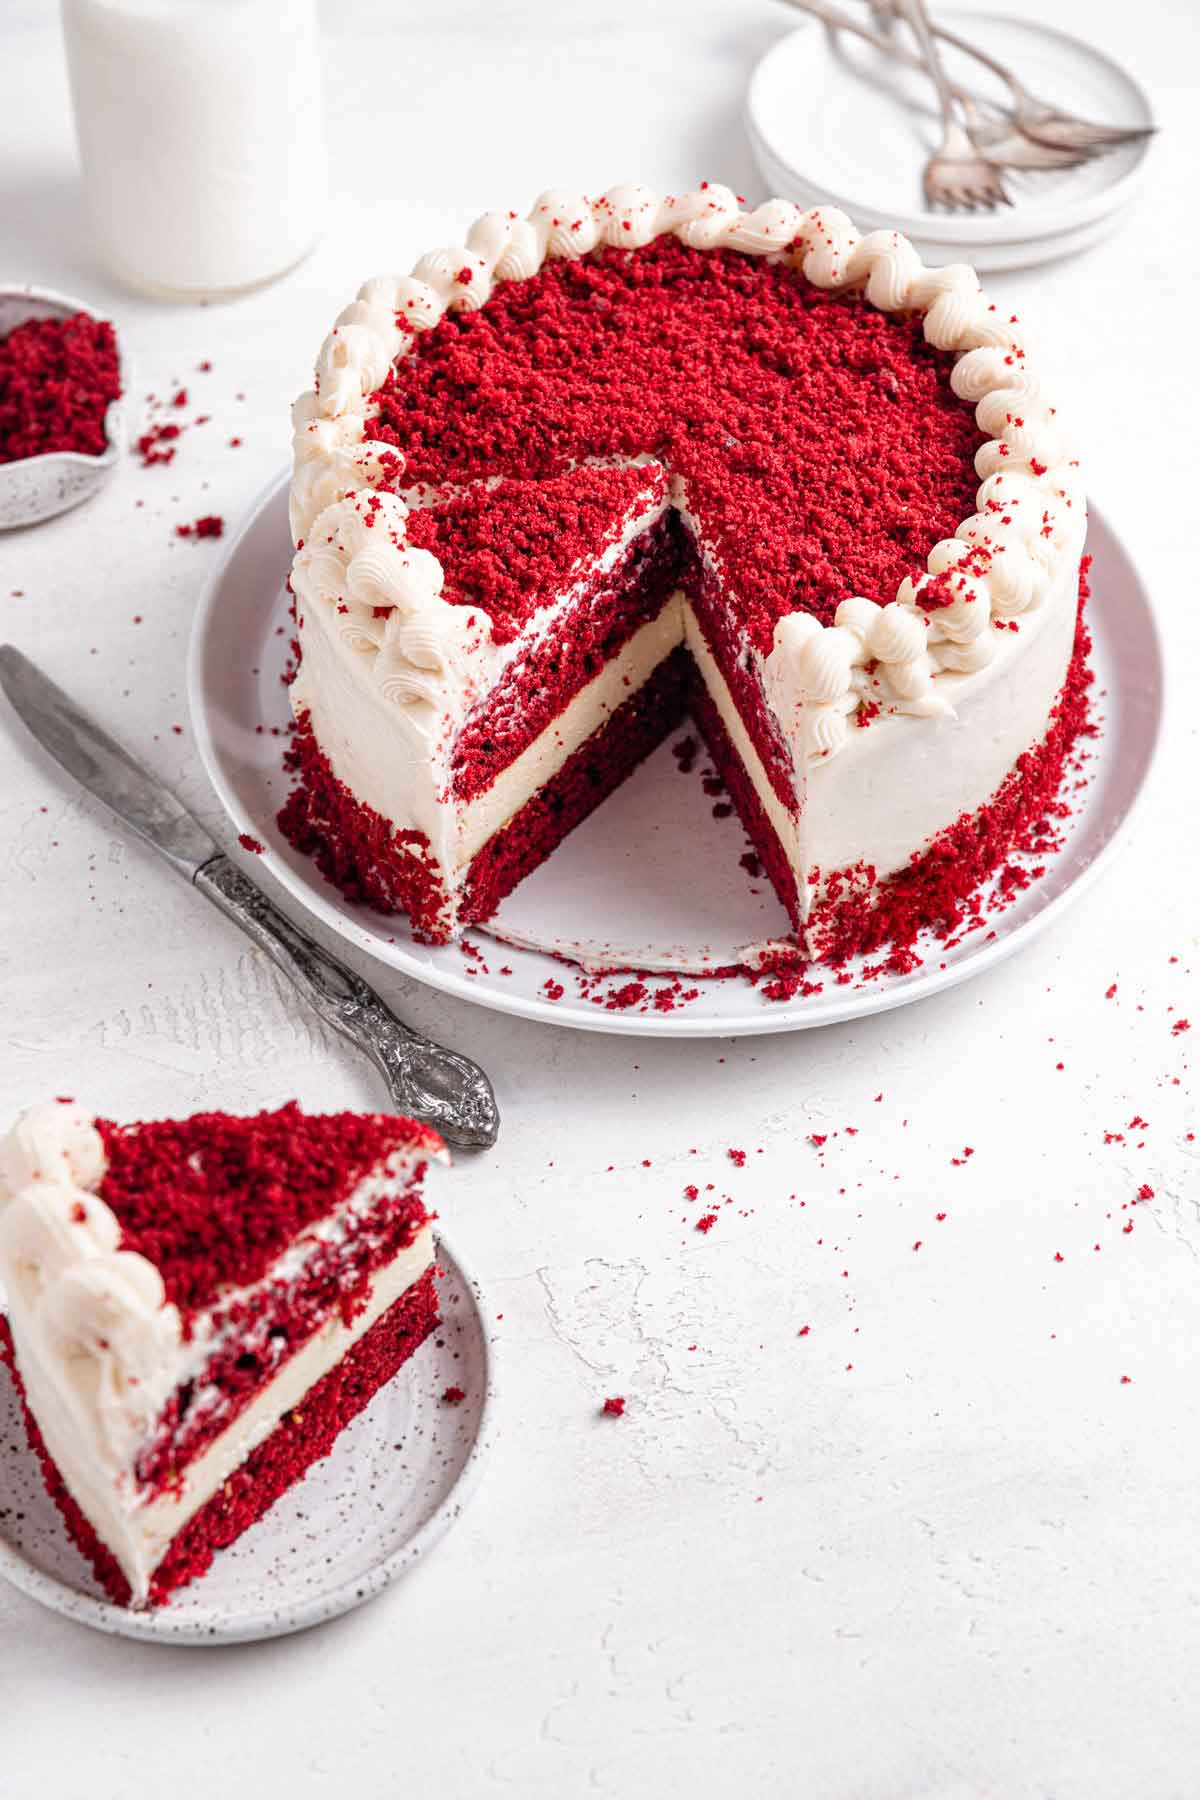
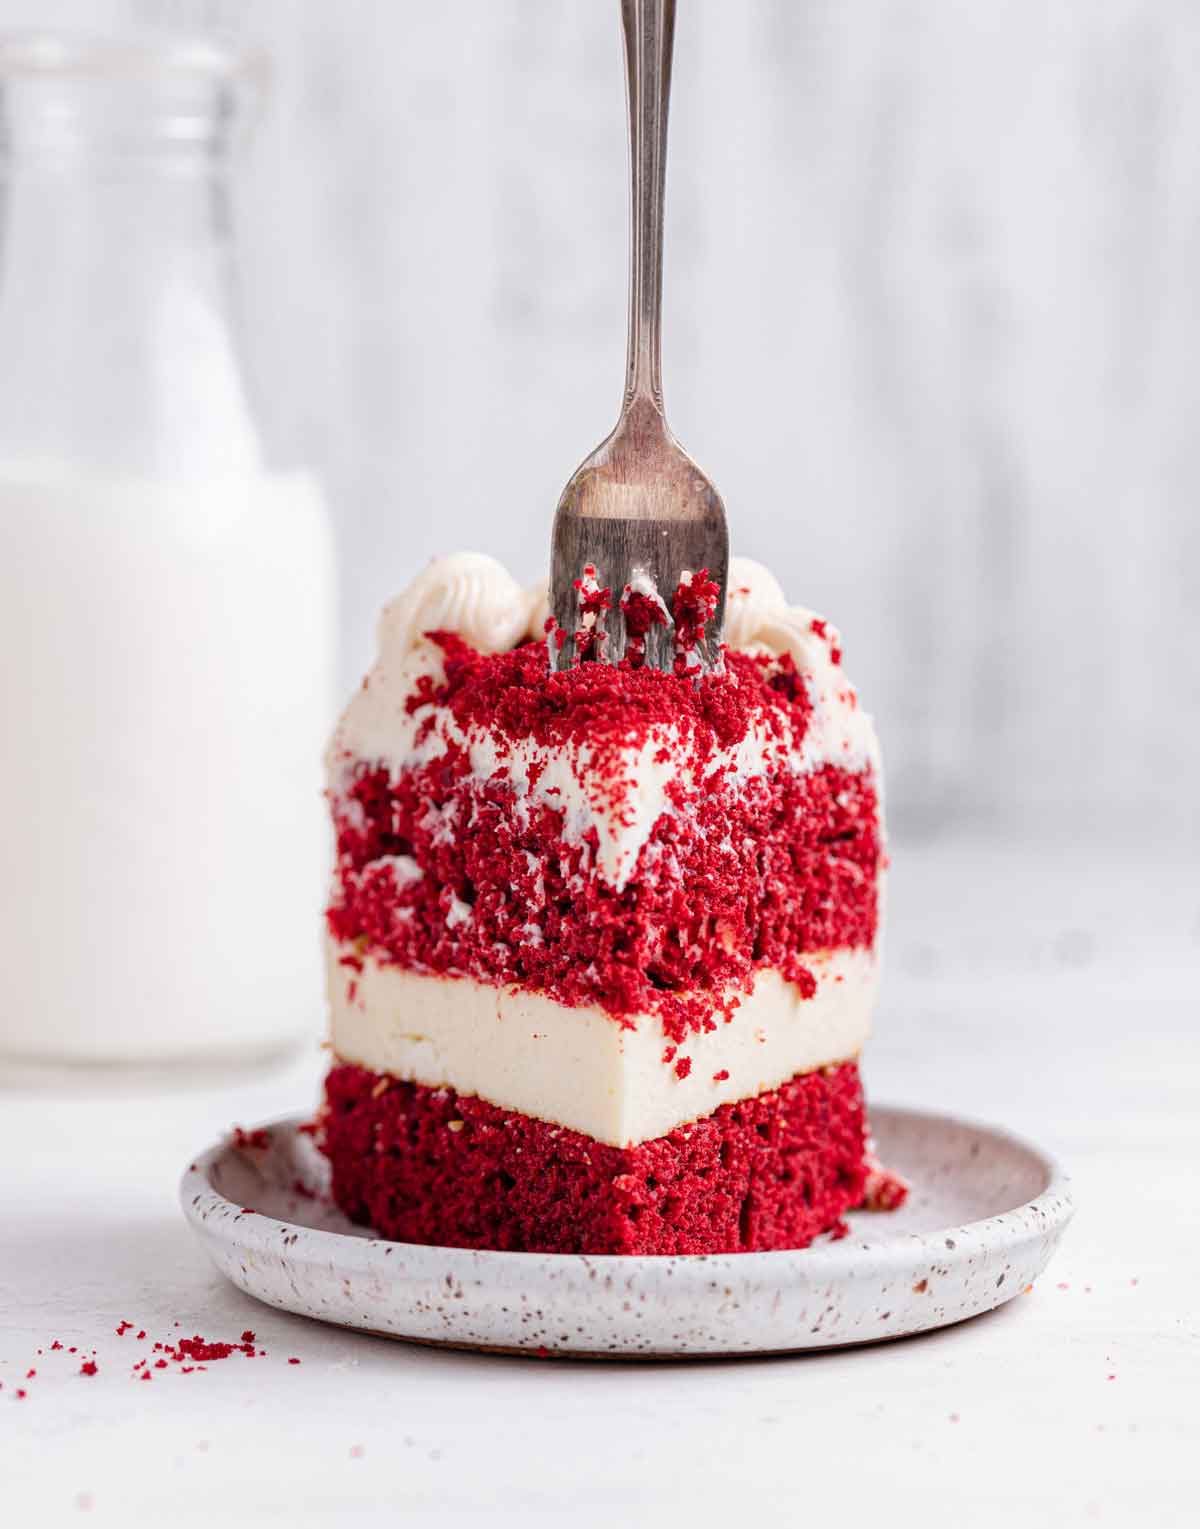
For a long time, Oreo cheesecake reigned supreme for me, then I tried some different varieties and crowned the Snickers cheesecake as my favorite. It's been many years since we've had a slice from there, but my husband has an old standby favorite - the red velvet cheesecake. It is a four-layered dessert, with two layers each of red velvet cake and creamy cheesecake, all covered in cream cheese icing. I was so excited to make my own homemade version finally!
A previous version of this cheesecake recipe featured all four layers, but slicing a cheesecake in half horizontally isn't the easiest, so I've streamlined and simplified the recipe. If you want to go the full four-layer route, double the cheesecake layer, and once it has been chilled, slice it in half horizontally and alternate layers with the red velvet cake.
Important Ingredients
While many of the ingredients for the cake and cheesecake are pantry and refrigerator staples (flour, sugar, eggs, etc.), there are a few important ones to make note of:
For the Cheesecake
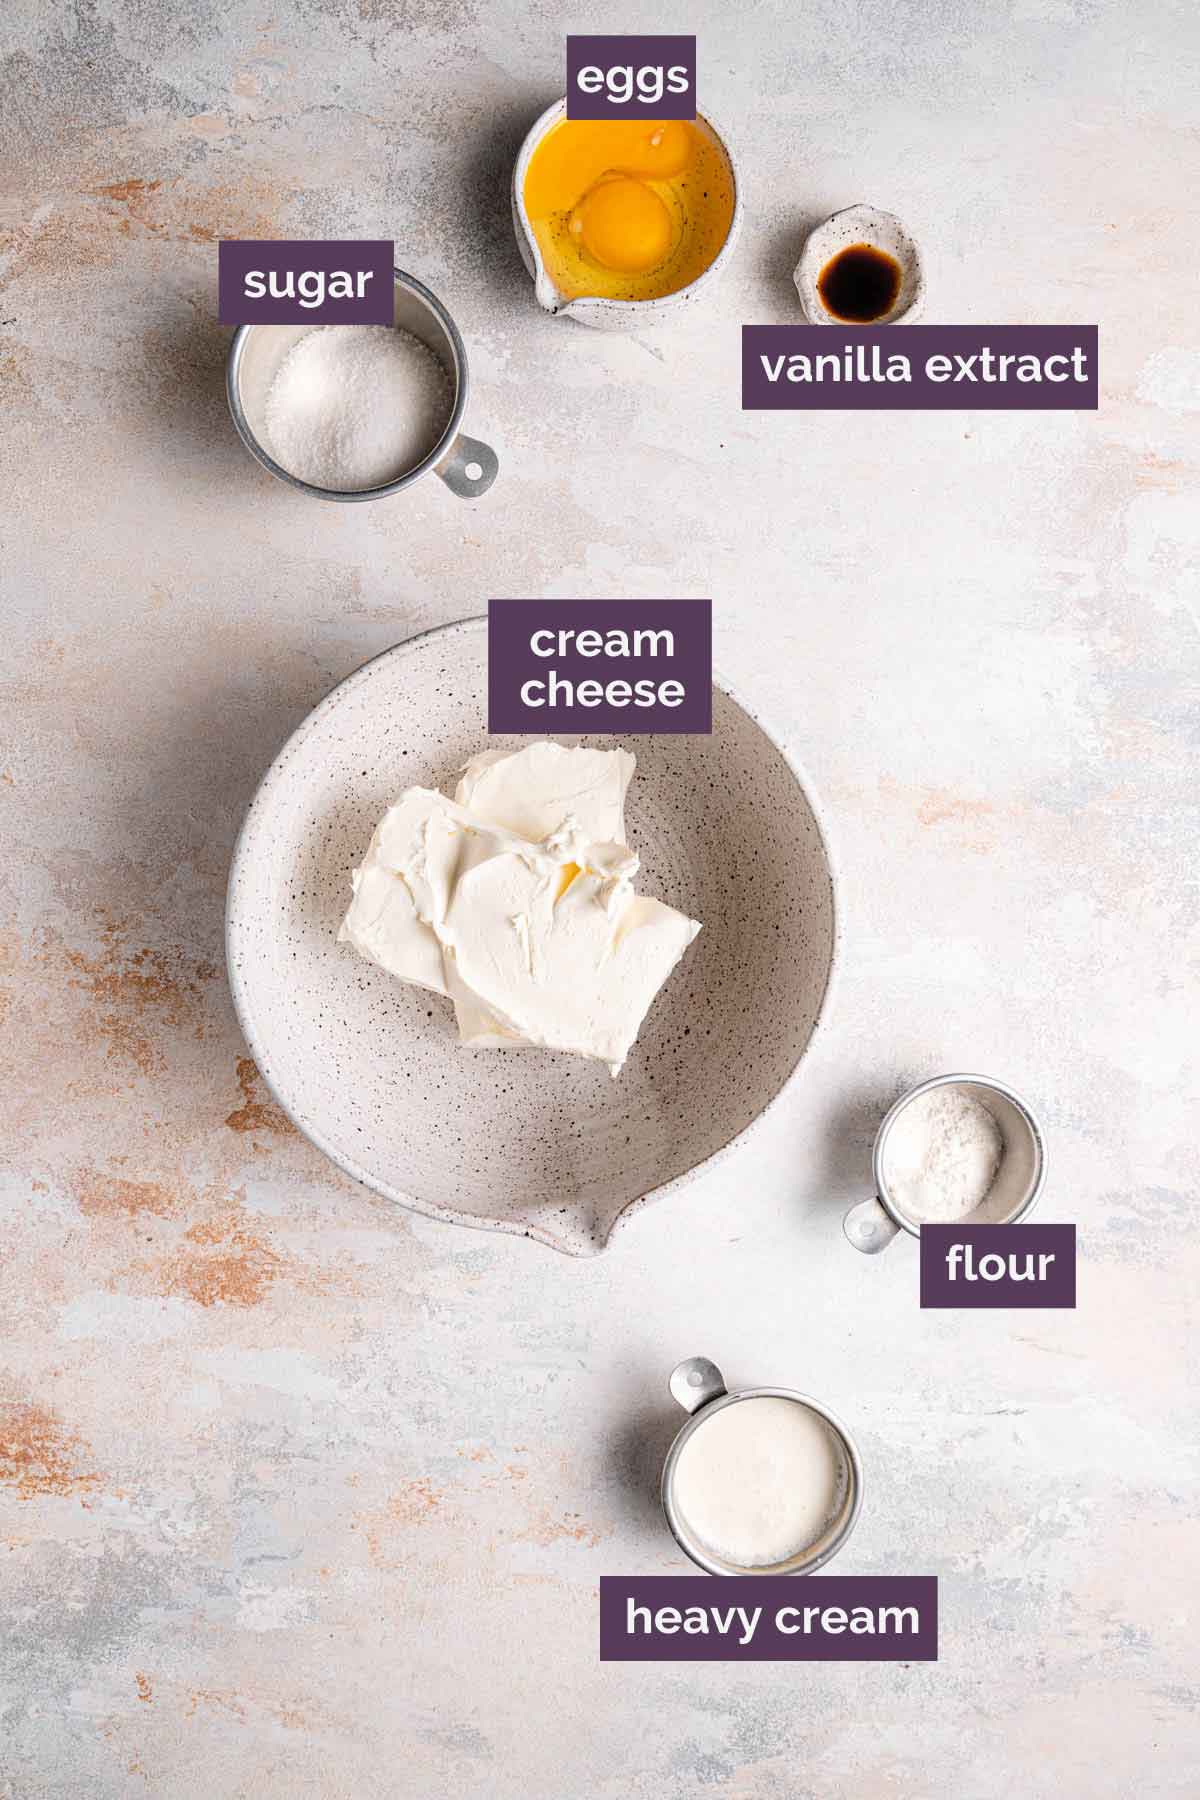
- Cream Cheese – For the cheesecake layer. Use full fat cream cheese to ensure the cheesecake is rich and creamy.
- Heavy Cream – This softens the texture of the cream and cheese and adds a little moisture. It is sometimes also called heavy whipping cream. You can substitute half and half or whole milk if necessary.
For the Cake Layers
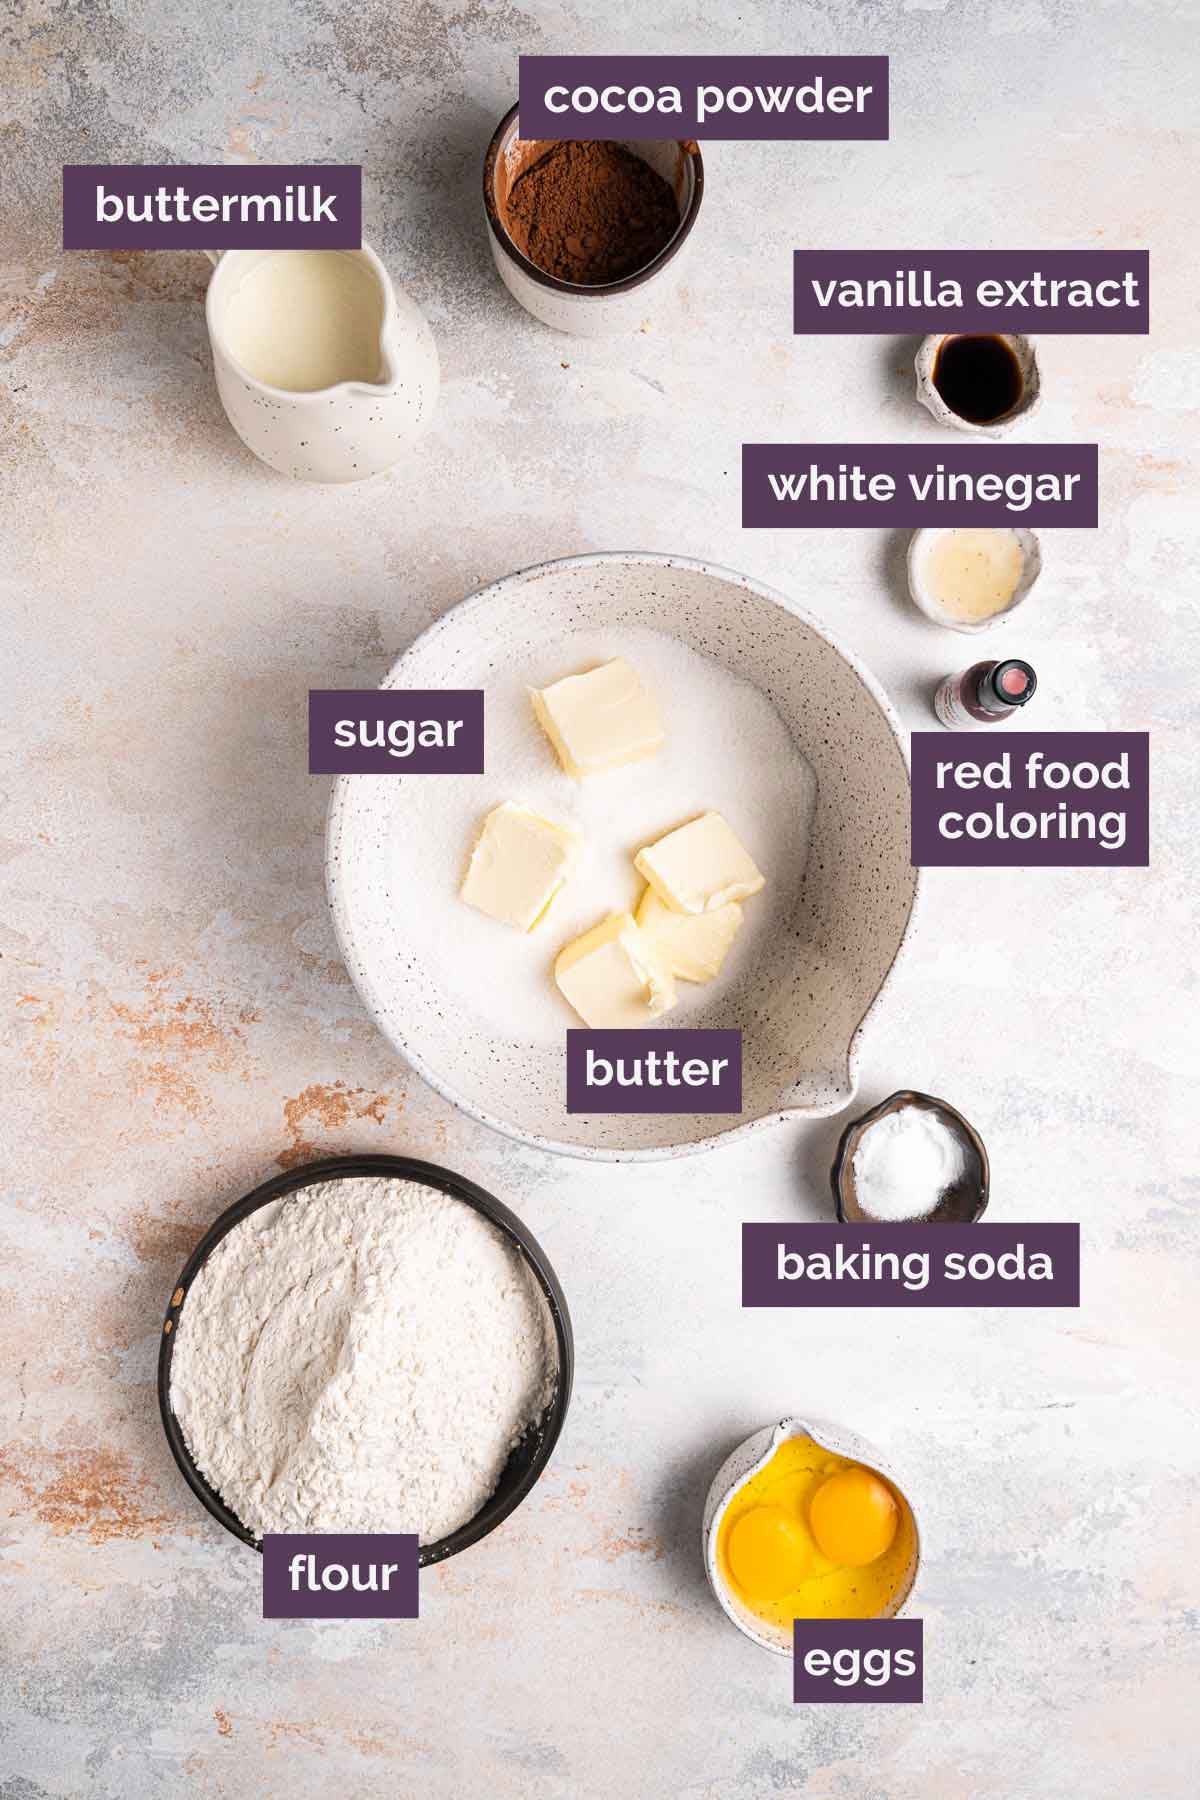
- Cocoa Powder – Use unsweetened, natural cocoa powder here. We want to avoid Dutched since it has already been alkalized.
- Vinegar - The reaction of the vinegar with the buttermilk helps to pull out the red hue in the cocoa powder. For this recipe, we use white vinegar, but you could also substitute apple cider vinegar.
- Buttermilk - Using soured milk is a key component of red velvet cake batter, as the acidic liquid is needed to combine with the baking soda and cocoa powder to get the rise and texture right. You can substitute sour cream or plain Greek yogurt.
- Baking Soda - This works magic with cocoa powder and buttermilk to get a beautiful rise and tender crumb.
- Red Food Coloring - We want to boost that beautiful red color! If you prefer to use gel food coloring, substitute 1 teaspoon gel food coloring and add about 1 tablespoon of water.
How to Make Red Velvet Cheesecake
Now on to the cheesecake… this really isn't terribly difficult, just a little time-consuming. It helps to spread the work out over a couple of days, and then it's easy breezy.
The Cheesecake Layer
To start, you will want to make the cheesecake first to ensure it sets and cools in time. I would plan to make the cheesecake layer at least one day in advance. Here is the cheesecake-making process:
Step #1: Spray a 9-inch springform pan with non-stick cooking spray and line the bottom with parchment paper (pre-cut parchment rounds are so handy for things like this!).
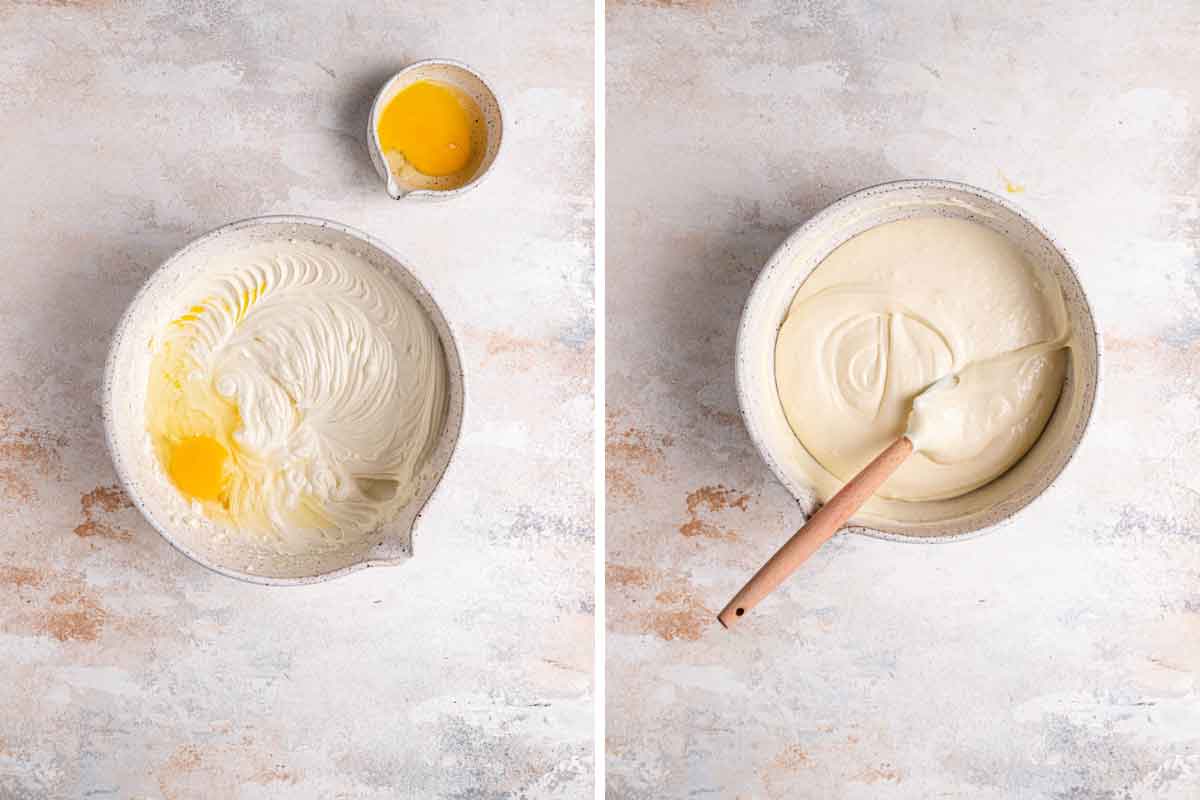
Step #2: Beat the cream cheese, sugar, flour, and salt until the mixture is creamy with no lumps. Add the heavy cream and vanilla, then the eggs, one at a time.
Step #3: Pour the filling into the pan and bake until the cheesecake is set and does not jiggle (40 to 55 minutes). Remove from the oven and cool for an hour on a wire rack. Once at room temperature, place in the freezer for 3 hours, or overnight.
The Red Velvet Cake Layers
Red velvet cake often gets written off as just a red chocolate cake, but it is SO much more than that. With a slightly acidic taste coming from the buttermilk and the white vinegar, this unique cake truly stands alone. The cocoa powder is actually subdued a bit by the acidity of the buttermilk and vinegar, leaving a very mild chocolate flavor.
For this recipe, I doubled the recipe for my Red Velvet Cupcakes and used the batter to make two 9-inch cake rounds. A quick overview:
Step #1: Preheat the oven to 350 degrees, then grease two 9-inch cake pans, line the bottoms with parchment paper, grease the parchment paper, and then coat the pan in flour, tapping out any excess.
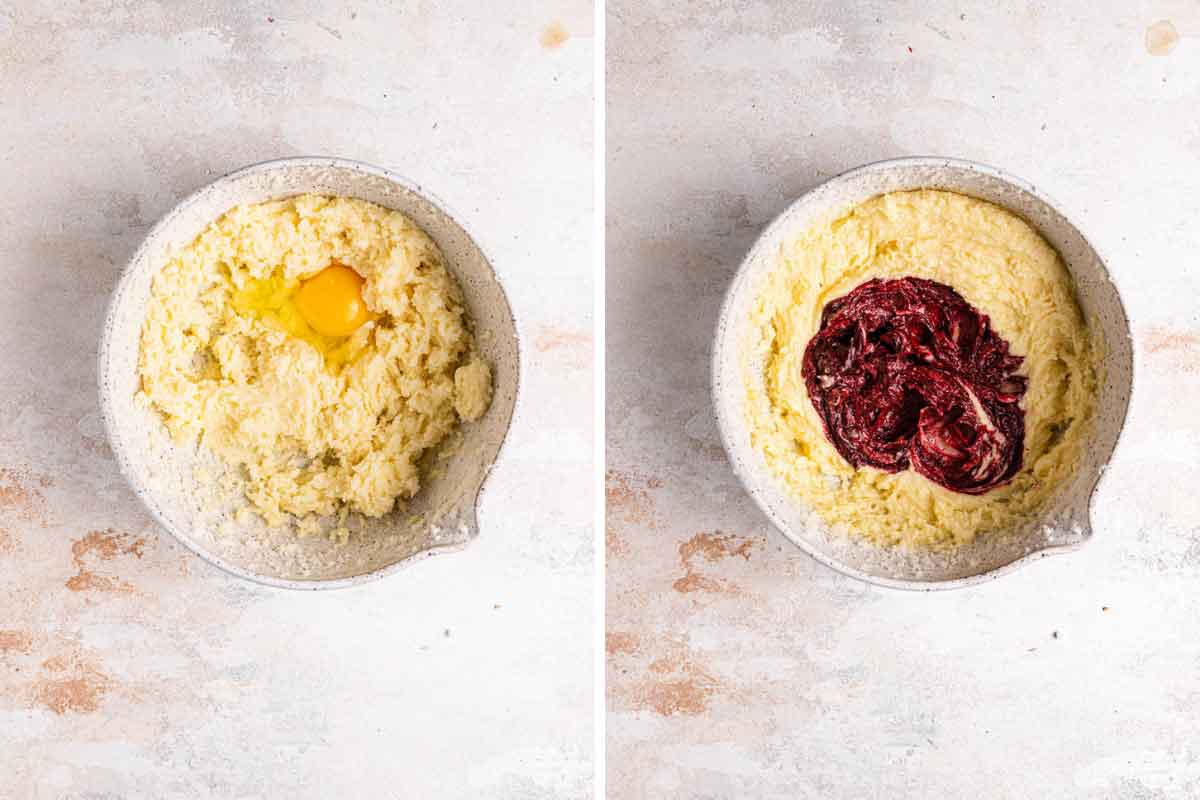
Step #2: Using a stand mixer or a large bowl with a hand mixer, cream the butter and sugar together, then add the egg and beat until well incorporated.
Step #3: In a separate bowl, combine the cocoa powder, vanilla extract, and red food coloring, which will make a thick paste. Add it to the batter and mix until combined.
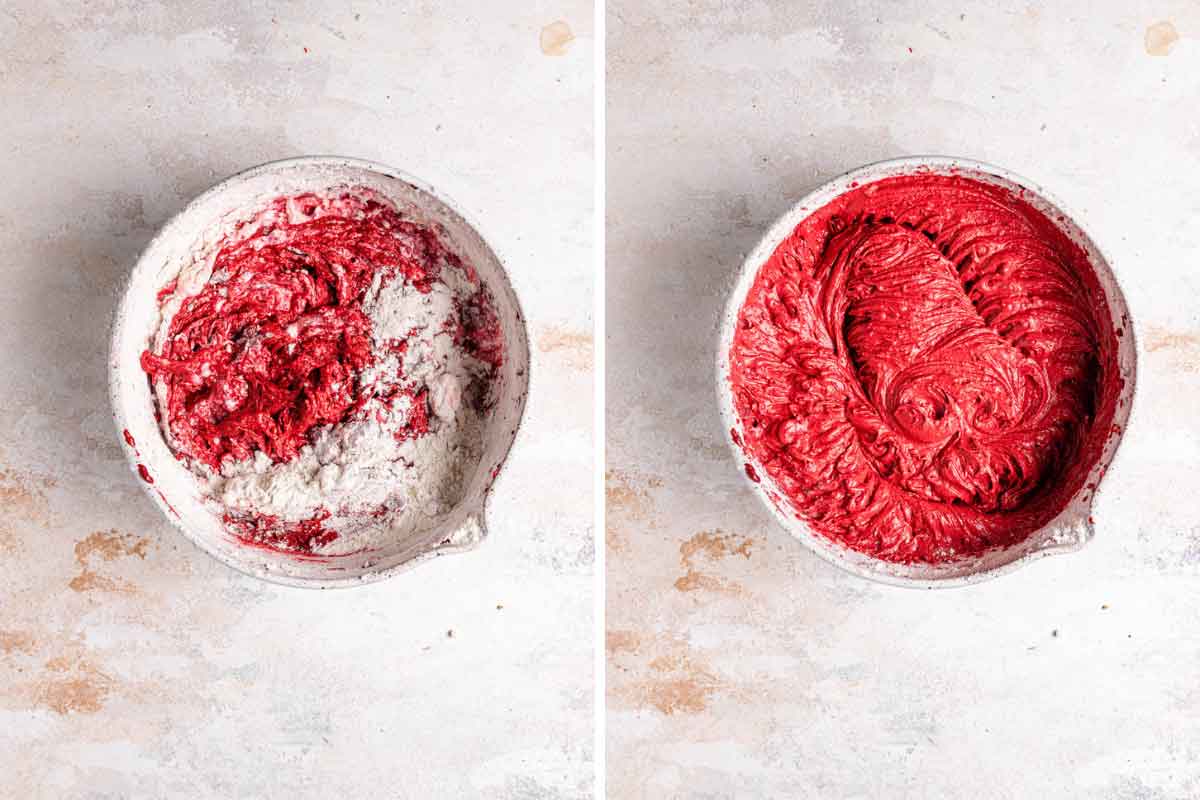
Step #4: On low speed, alternate adding the buttermilk and flour, then beat on high until smooth.
Step #5: On low speed again, add the salt, baking soda, and vinegar. Beat on high until the mixture is completely combined and smooth.
Save This Recipe
Step #6: Divide the batter evenly between the two cake pans and bake for about 30 minutes or until a thin knife inserted in the center comes out clean. Cool in the pan for 10 minutes then remove the cakes from the pans and place on a cooling rack to cool completely.
Note: You can also use a red velvet cake mix and prepare according to the package directions for two 9-inch cake layers.
Cream Cheese Frosting
I use my favorite cream cheese frosting to cover this beautiful dessert:
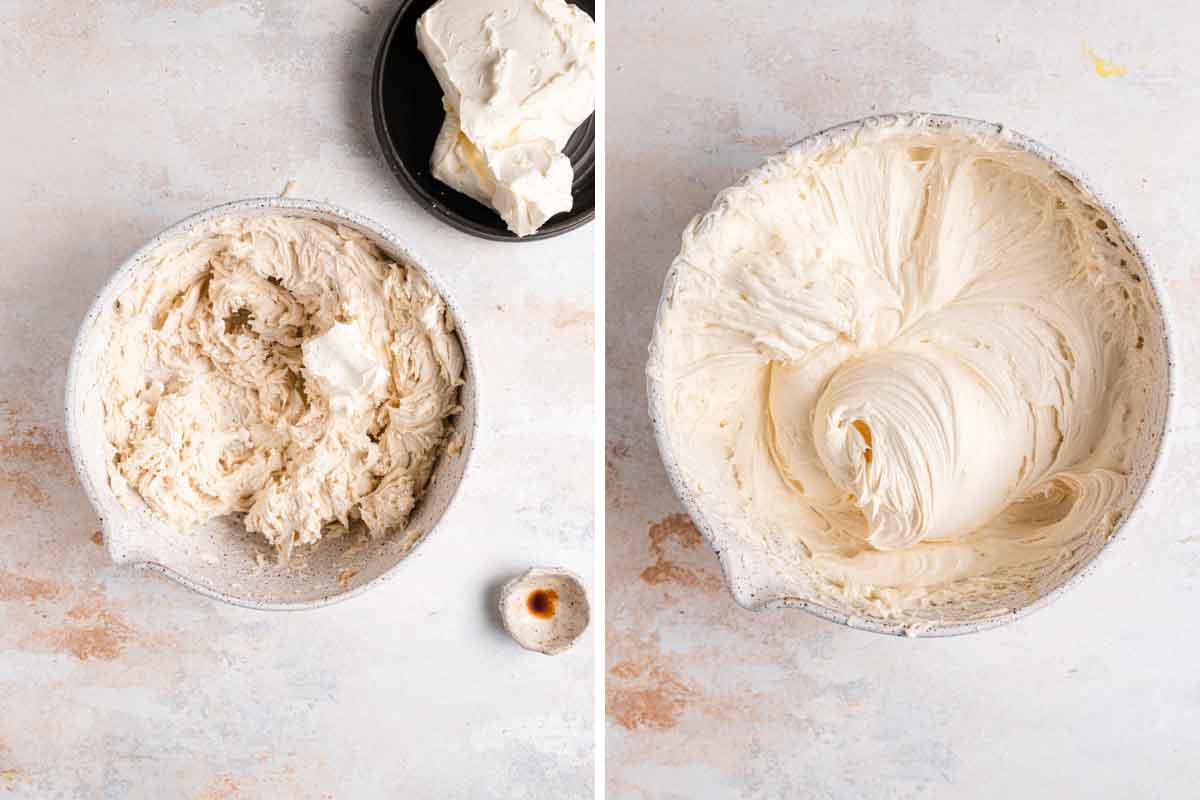
Step #1: Beat the butter, powdered sugar, vanilla, and salt with an electric mixer on low until smooth. Then mix for an additional 2 minutes, scraping down the bowl as needed.
Step #2: Increase the speed to medium-low and add the cream cheese, one piece at a time, and mix until smooth. Then mix for an additional 2 minutes.
Assembling the Cheesecake
Now that you have all of the components made for this decadent cheesecake, let's get it put together:
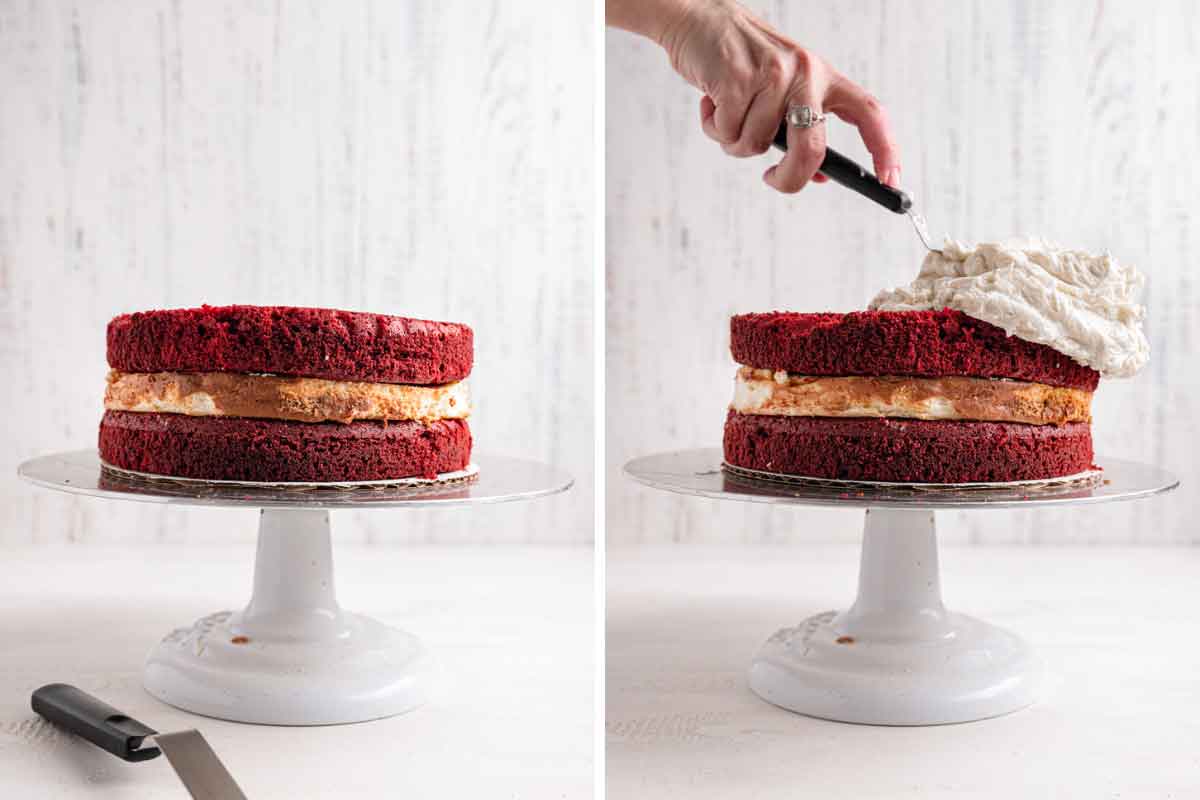
- Level the tops of the cakes if necessary, then place one cake layer on a serving platter.
- Remove the cheesecake from the freezer and remove the sides of the springform pan. If the cheesecake is wider than the cake layers, use a sharp knife to gently shave off some of the sides of the cheesecake so it is the same width as the cake layers.
- Place the cheesecake layer on top of the first cake layer, then place the second cake layer on top of the cheesecake layer, upside-down., and then frost the whole thing with the cream cheese frosting.
Decorate and Serve
After frosting the cake, you have a blank canvas for decorating. Some ways you can spice up the look of this cake are to:
- Pipe the edge with a shell border and fill the center with red velvet cake crumbs. For a tutorial on shell borders, check out this example from Wilton.
- You can use red velvet cake crumbs to press on the side of the cake.
- Top the finished cake with shaved white or dark chocolate!
- Press red or pink sprinkles into the sides of the cake, or garnish the top with them.
When you are ready to serve, dish out your slices as is or with a side of whipped cream.
Make-Ahead Instructions
This is a perfect dessert to make ahead of time! Each of the components can be made in advance, and the whole red velvet cheesecake is best when chilled for at least 4 hours or overnight before serving.
- Cheesecake Layer: This can be wrapped tightly in plastic wrap, then in foil, and frozen for up to 3 months.
- Cakes: Once the cakes have cooled, wrap them tightly in plastic wrap and refrigerate for up to 3 days.
- Frosting: This can be made up to 2 days in advance and stored in the refrigerator in an airtight container.
How to Store the Finished Red Velvet Cheesecake
Keep this cheesecake in an airtight container (or wrapped in plastic wrap) in the refrigerator for up to 5 days. Let sit at room temperature for 20 to 30 minutes before serving.
Freezing Instructions
This freezes very well! You can freeze any or all of the components, or freeze the entire assembled cheesecake:
- To Freeze the Cake Layers: Allow the cakes to cool completely and then wrap them tightly in plastic wrap and store them in the freezer for up to 3 months. Move the wrapped cakes to the refrigerator the night before you plan to use them.
- To Freeze the Cream Cheese Frosting: The cream cheese frosting can be kept in an airtight container in the freezer for up to 3 months. Thaw in the refrigerator overnight; allow to come to cool to room temperature, and then stir vigorously with a rubber spatula before spreading or piping.
- To Freeze the Whole Cheesecake: Wrap it tightly with plastic wrap and then cover it with foil. Freeze for up to 1 month. Thaw in the refrigerator overnight. You can also wrap individual slices in plastic wrap, then place in a ziploc freezer bag and thaw in the refrigerator overnight or at room temperature for about 30 minutes.
More Red Velvet Recipes You Must Try
- Red Velvet Cupcakes with Cream Cheese Frosting
- Easy Red Velvet Poke Cake
- Red Velvet Whoopie Pies
- Creamy Red Velvet Ice Cream
- Red Velvet Roll Cake
If you make this red velvet cheesecake recipe and love it, remember to stop back and give it a 5-star rating - it helps others find the recipe! ❤️️

Red Velvet Cheesecake
Ingredients
For the Cheesecake:
- 16 ounces cream cheese, at room temperature
- ½ cup (99 g) granulated sugar
- 1 tablespoon all-purpose flour
- Pinch salt
- ¼ cup (60 ml) heavy cream
- ½ teaspoon vanilla extract
- 2 eggs, at room temperature
For the Red Velvet Cake:
- ½ cup (113 g) unsalted butter, at room temperature
- 1½ cups (298 g) granulated sugar
- 2 eggs
- ¼ cup (26 g) + 1 tablespoon unsweetened cocoa powder
- 6 tablespoons red food coloring, liquid
- 1 teaspoon vanilla extract
- 1 cup (240 ml) buttermilk
- 2¼ cups (270 g) all-purpose flour
- 1 teaspoon baking soda
- 1 teaspoon salt
- 1 tablespoon distilled white vinegar
For the Cream Cheese Frosting:
- 1 cup (227 g) unsalted butter, at room temperature
- 4 cups (454 g) powdered sugar
- 2 teaspoons vanilla extract
- Pinch salt
- 16 ounces cream cheese, chilled and cut into 16 pieces
Instructions
- Make the Cheesecake: Preheat oven to 350 degrees F. Spray a 9-inch springform pan with non-stick cooking spray and line the bottom with a round of parchment paper.
- Using an electric mixer on medium-low speed, beat the cream cheese, sugar, flour, and salt until the mixture is creamy and no lumps of cream cheese remain, about 3 minutes. Scrape down the sides of the bowl, add the heavy cream and vanilla, and beat to combine. Beat in the eggs one at a time, beating for about 15 seconds before adding the next. Using a rubber spatula, mix a few times by hand to ensure that all of the ingredients are evenly incorporated.
- Pour the filling into the prepared pan and spread into an even layer. Bake until the cheesecake is set and does not jiggle, about 40 to 55 minutes. Remove from the oven and cool on a wire rack for at least 1 hour. Once the cheesecake has cooled to room temperature, place it in the freezer for at least 3 hours or overnight.
- Make the Red Velvet Cake: Preheat oven to 350 degrees F. Grease two 9-inch cake pans. Line the bottoms of the pans with a parchment round, butter the parchment paper, and then flour the pans.
- On medium-high speed, cream the butter and sugar until light and fluffy, about 3 minutes. Turn the mixer to high and add the eggs one at a time, mixing for about a minute after each addition. Scrape down the bowl and beat until well incorporated.
- In a separate small bowl, mix together the cocoa powder, vanilla extract and red food coloring to make a thick paste. Add to the batter and mix on medium speed until completely combined. You may need to stop the mixer to scrape the bottom of the bowl, making sure that all the batter gets color.
- Reduce the mixer speed to low and slowly add half of the buttermilk. Add half of the flour and mix until combined. Scrape the bowl and repeat the process with the remaining buttermilk and flour. Beat on high until smooth.
- Again, reduce the mixer speed to low and add the salt, baking soda and vinegar. Turn to high and beat for another couple of minutes until completely combined and smooth.
- Divide the batter evenly between the two cake pans and bake for about 30 minutes, or until a thin knife or skewer inserted into the center comes out clean. Cool for 10 minutes and then remove cakes from the pans and place them on a cooling rack to cool completely.
- Make the Frosting: Using an electric mixer, beat the butter, powdered sugar, vanilla, and salt on low speed until smooth, then mix for an additional 2 minutes, scraping down the bowl as needed. Increase the speed to medium-low and add the cream cheese one piece at a time and mix until smooth, then mix for an additional 2 minutes.
- Assemble the Red Velvet Cheesecake: Level the tops of the cakes if necessary, then place one cake layer on a serving platter. Remove the cheesecake from the freezer and remove the sides of the springform pan. Slide a knife between the bottom of the cheesecake and the parchment paper to remove the cheesecake from the pan bottom and parchment round. If the cheesecake is wider than the cake layers, use a sharp knife to gently shave off some of the sides of the cheesecake so it is the same width as the cake layers.
- Place the cheesecake layer on top of the first cake layer, then place the second cake layer on top of the cheesecake layer, upside-down.
- Spread a very thin layer of cream cheese frosting (the "crumb coat") over the top and sides of the cake, then refrigerate for 30 minutes to set the frosting. Then apply another liberal coat of frosting and decorate as desired. Keep refrigerated, then let sit at room temperature for 20 minutes before serving. Cover leftovers and store in the refrigerator for up to 5 days.
Notes
- Equipment: Two 9-inch round cake pans / 9-inch springform pan
- Buttermilk: You can substitute sour cream or plain Greek yogurt.
- Cocoa Powder - Use unsweetened, natural cocoa powder. We want to avoid Dutched since it has already been alkalized.
- Cream Cheese - For both the cheesecake layer and the frosting, use full fat cream cheese, otherwise you can have a watery consistency.
- Food Coloring: If you prefer to use gel food coloring, substitute 1 teaspoon gel food coloring and add about 1 tablespoon water.
- Make-Ahead Tips: I highly suggest making the cheesecake at least one day in advance of serving but it can also be made up to 3 days in advance. You can make the cake layers up to 2 days in advance without freezing. Bake, cool, and wrap tightly with plastic wrap. The frosting can be made up to 2 days in advance and stored in the refrigerator in an airtight container.
- Storing: Keep this cheesecake in an airtight container (or wrapped in plastic wrap) in the refrigerator for up to 5 days. Let sit at room temperature for 20 to 30 minutes before serving.
- To Freeze the Cake Layers: Allow the cakes to cool completely and then wrap them tightly in plastic wrap and store them in the freezer for up to 3 months. Move the wrapped cakes to the refrigerator the night before you plan to use them.
- To Freeze the Cream Cheese Frosting: The cream cheese frosting can be kept in an airtight container in the freezer for up to 3 months. Thaw in the refrigerator overnight; allow to come to cool to room temperature, and then stir vigorously with a rubber spatula before spreading or piping.
- To Freeze the Whole Cheesecake: Wrap it tightly with plastic wrap and then cover it with foil. Freeze for up to 1 month. Thaw in the refrigerator overnight. You can also wrap individual slices in plastic wrap, then place in a ziploc freezer bag and thaw in the refrigerator overnight or at room temperature for about 30 minutes.
Did you make this recipe?
Leave a review below, then snap a picture and tag @thebrowneyedbaker on Instagram so I can see it!
Photography by Dee Frances
The original recipe was published in February 2012.


You saved the day!! Hooray!! Finally a recipe with good reviews!!
-Alaina
I just want to say that I made this cake for my daughter’s Snow white themed birthday party and it was a HUGE success. I wish I could post a picture the cake was so beautiful. I made everything the same except only made 1 layer of cheesecake. I got so many great comments on the flavor as well as the aesthic. Thank you so much for a great blog. Definitly the best cake I have ever made!
I blame The Cheesecake Factory for every pound I am overweight ;) I ALWAYS get the strawberry cheesecake. It’s simple and divine! I’ve tried several but this is hands down my favorite. I’m going to try this red velvet recipe for a baby shower. The mother to be loves red velvet cake. I’ll keep you posted how it turns out.
GAh! I am making this for my son’s birthday. I just made the cheesecake and had a water bath fail. First time cheesecake baker. Double wrapped with foil but water must have got in the cracks (obviously). Thought I had a decent quality springform pan, too. My question, the cheesecake still looks ok. I have it in the fridge firming. Will it still be ok to use? Or does the water destroy it? We can always just have red velvet cake, I guess.
Hi Susan, That has happened to me before, too. The crust can get a little soft, but I have never thrown it away – definitely still edible! :) And since there’s no crust I think you’re okay.
I made this for my family and everyone liked it! i didn’t have food colouring though, so I tried to use as much water as I thought it needed, and it worked well! I would make this again for sure
may I know how to achieve a flat top when baking a cake?
do we lower the temperature and increase the baking time? Because the temperature stated is the same is the temperature to bake the red velvet cupcakes. So I was wondering if the top of the cake will be flat or domed?
Thanks in adv!
Hi Nel, Usually all cakes have at least a slight dome to them when they are baked. Some folks use cake strips that you can wrap around a cake pan that supposedly keeps the top of the cake flat. For the most part, I think most times you see a flat cake, it’s because it has been manually leveled with a cake leveler or a serrated knife. This is what I usually always do.
This looks amazing! I have to make a cake for a birthday today at 7 she wanted red velvet cake or cheesecake, I don’t think I’ll have time to do this today but I’ve been trying to find a good red velvet cake recipe because i’ve made two practice cakes with another recipe and both turned out dry! so I found the one on your website and then this one and i’m debating if I should use the red velvet cake recipe you have or the one you have for this cheesecake. SO I was wondering which one is more moist?
Hi Paige, I’m not sure if you’re referring to the red velvet cupcakes or the red velvet whoopie pies? I used the same recipe for this cake and the cupcakes (just doubled the cupcake recipe). I think it’s great and very moist.
This is more of what I had in mind when I ordered red velvet cheesecake at a restaurant on Valentine’s night. Sadly, it was red colored cheesecake and I couldn’t find any of the cake part. It was pretty terrible and a miss. I should know better than to order a “special” dessert that they don’t usually serve. No time to perfect it. Now, what you put together is exactly what I wanted. I’m going sugar free for a while so it will have to wait for a special occasion.
I made this RedVelvet Cheesecake over the weekend.It was the best one I ever made.The cheesecake was so creamy,everyone enjoyed it. Love it,love it.I can’t tell you how many friends asked for the recipe. *****
Red velvet and cheesecake – two of the yummiest treats combined into one! Love this recipe and will definitely give it a go!
The result was the same as the picture! this is amazing!
i worked more then 7 hours on this cake but it was really amazing!
the cake tastes so good, but i must say it’s a little heavy.
after cutting the cheese cake ( i was veryyy sleepy ), it broke but i managed to put in on the cake as a “puzzle” but it doesn’t matter and no one could see it after putting all the cream! this will go to my secret recipe book =P. thank you!
I made this…it was…..AWESOME!! Thanks.
This is perfect for my husband’s birthday dinner party next weekend! Thanks!
Hi!
I’m from Brazil, and I never saw a red velvet cake here. It is so beautiful and looks so delicious.
I realy want try to prepare, but I never find here a red food coloring liquid (a good one), and buttermilk.
Did you know you can make your own Buttermilk!
One cup of regular milk and add one tablespoon of vinegar and mix it togheter. It is the exact same thing as buttermilk. I use it as a substitute all the time!
Karen
Yes, thank you for sharing!
I adore any cheesecake but especially NY Style. I have only had Cheesecake Factory 2x – once at the actual restaurant in Providence, RI and once in the frozen food aisle at Costco where I had a chocolate cheesecake of some kind. I think the first time I went to the restaurant we all shared a slice of something. It has been a few years and don’t remember what it was.
Anyway, NY Style Cheesecake is my favorite.
Oh my, look at those layers of cheesecake & red velvet!! I’m not a big fan of cheesecake but I’m sure I could get it down with all of that red velvet cake, yum!
I am so glad to hear I’m not the only one who loathes the menu at cheesecake factory. Too many choices just bogs me down. This cheesecakes though… there would be no other options in my mind. It looks outstanding.
OMG! I love that cheesecake there! I never thought to try it at home! Thanks for Sharing!
I agree, the Cheesecake Factory menu can definitely be overwhelming – and I often am too full to have cheesecake after their very generous main courses! We had the red velvet cheesecake one of those times, and shared a piece between three of us. It was amazing. I really like the look of your version – it looks every bit as good as theirs and I’m sure it tastes just as wonderful too!
Beautiful cake! I love red velvet! I made some red velvet cheesecake cookies this weekend and love them. This looks great!
I love what you said about the Cheesecake Factory. I am the same way! I love the options, but find it so hard to pick only one thing to order. They need samplers!
The Cheesecake Factory is only held alive by their massive stone pillars and their glowing case of mystery cakes. I’m with you on the intense menu. I just ask what the soup of the day is and order that. It’s not worth stressing over 30 pages of American food. Plus, that way I save room for dessert :)
This looks amazing! I have a question about the assembly though. How exactly did you get the cheesecake out of the pan/base without it falling apart? Maybe it’s easy and obvious, but I’m not sure how I would do it. I haven’t made very many cheesecakes though, so I’m sure there are tricks that I’m not familiar with! Thanks!
Hi Ginny, I have a large cake spatula like this one: http://www.amazon.com/gp/product/B000237LPC/ref=as_li_ss_tl?ie=UTF8&tag=broeyebak-20&linkCode=as2&camp=1789&creative=390957&creativeASIN=B000237LPC. It definitely helps to lift and move cake layers, including the cheesecake. If you find it’s a little too difficult, you could always leave the cheesecake in tact and do three layers – red velvet, the whole cheesecake layer, then red velvet.
Is it best to remove the cheese from springform base after it has cooled on rack and before putting in the refrigerator? Do you remove from base at same time you remove the springform sides. I have made this cake several times but have not mastered the best way to get the cheese cake from the springform pan. Can I flip it out of the pan like other layer cakes?
Hi Andrea, I wait until it has cooled completely, you don’t want to move it before it’s completely set. No, I do not recommend flipping it out as the cheesecake will likely crack and break.
I never buy pre-made cheesecake no matter where I go, not when I can easily make it at home. I am excited to try this for Valentine’s. My fav cheesecake (I have cheesecake only once a year or less) is chocolate cheesecake with a classic sour cream layer on top!
I do love red velvet and this is going to be fun!!
Can you believe I have never ordered cheesecake from the Factory!? I didn’t realize the RVC I posted about recently was so similar. The two layers makes this extra special! looks irresistible.
That looks SO fantastic! I’ve only eaten at the Cheesecake Factory once, but I’ve seen so many of their recipes recreated that I now know I need to get there more often :)
OMG! My 2 favorite desserts in ONE! Be still my heart!
I’ve had this at CF and it’s to-die-for, so glad to have a recipe to try at home! Quick and silly question, but as I’ve never cut a cheesecake in half horizontally I’m imaging that it’s a mess! How do you keep it from crumbling or getting misshapen? Any tricks/tips?
Hi Jacquelyn, I have a large cake spatula like this one: http://www.amazon.com/gp/product/B000237LPC/ref=as_li_ss_tl?ie=UTF8&tag=broeyebak-20&linkCode=as2&camp=1789&creative=390957&creativeASIN=B000237LPC. It definitely helps to lift and move cake layers, including the cheesecake. If you find it’s a little too difficult, you could always leave the cheesecake in tact and do three layers – red velvet, the whole cheesecake layer, then red velvet.
I tried to slice the cheesecake in 1/2, but it was too difficult so I just did the 3 layers. Can’t wait to give it a try tomorrow at a ladies gathering!
Please don’t let my hubby see this… It looks so fabulous, and I know that he will demand that I make it once a week for the next 3 months. :) Though, I may have to risk it and make it for him for Valentine’s Day!
What a beautiful and delicious cake! My husband would love this! Thanks for sharing this fabulous recipe for valentines day!
Oh dear Cupid, this looks sinfully delicious! This may just have to be my sweet treat for my hubby this Valentine’s Day!
Oh, and I totally know what you mean about the Cheesecake Factory. I’m the Queen of Indecisiveness and that + their loooong menu and long list of cheesecake options makes for a very hard decision making process!