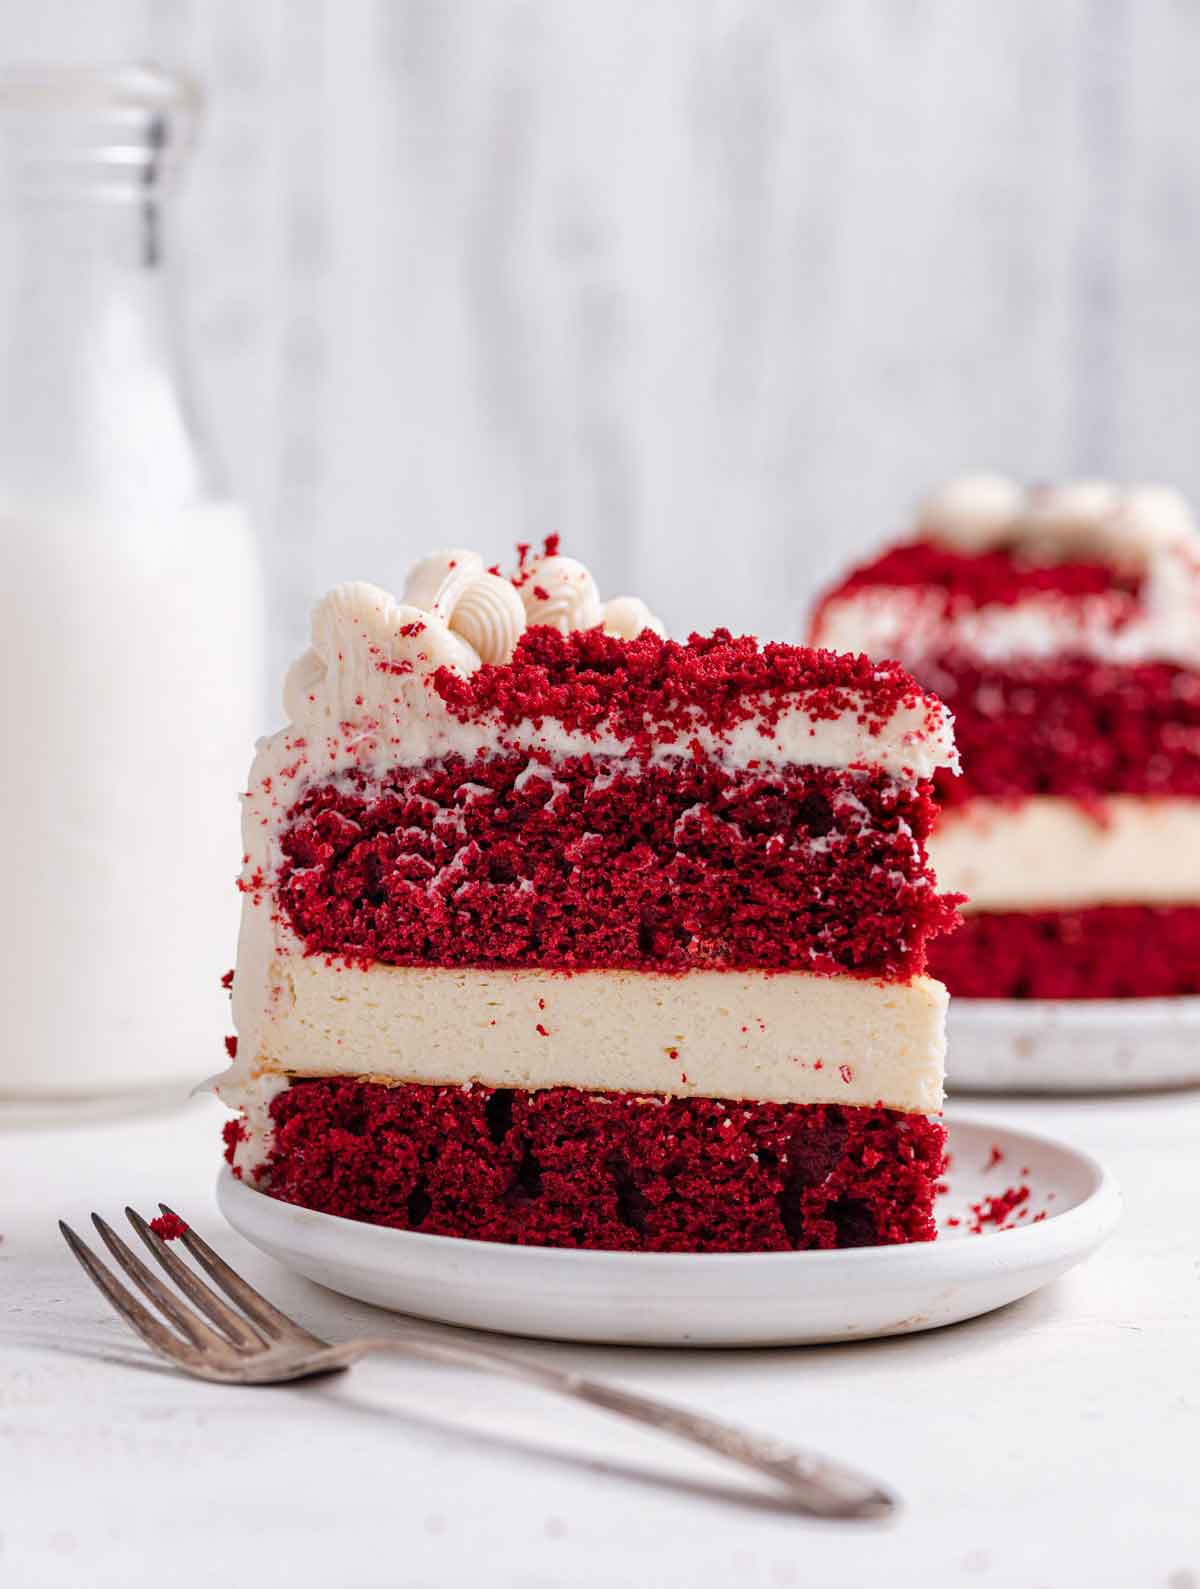
Red Velvet Cheesecake

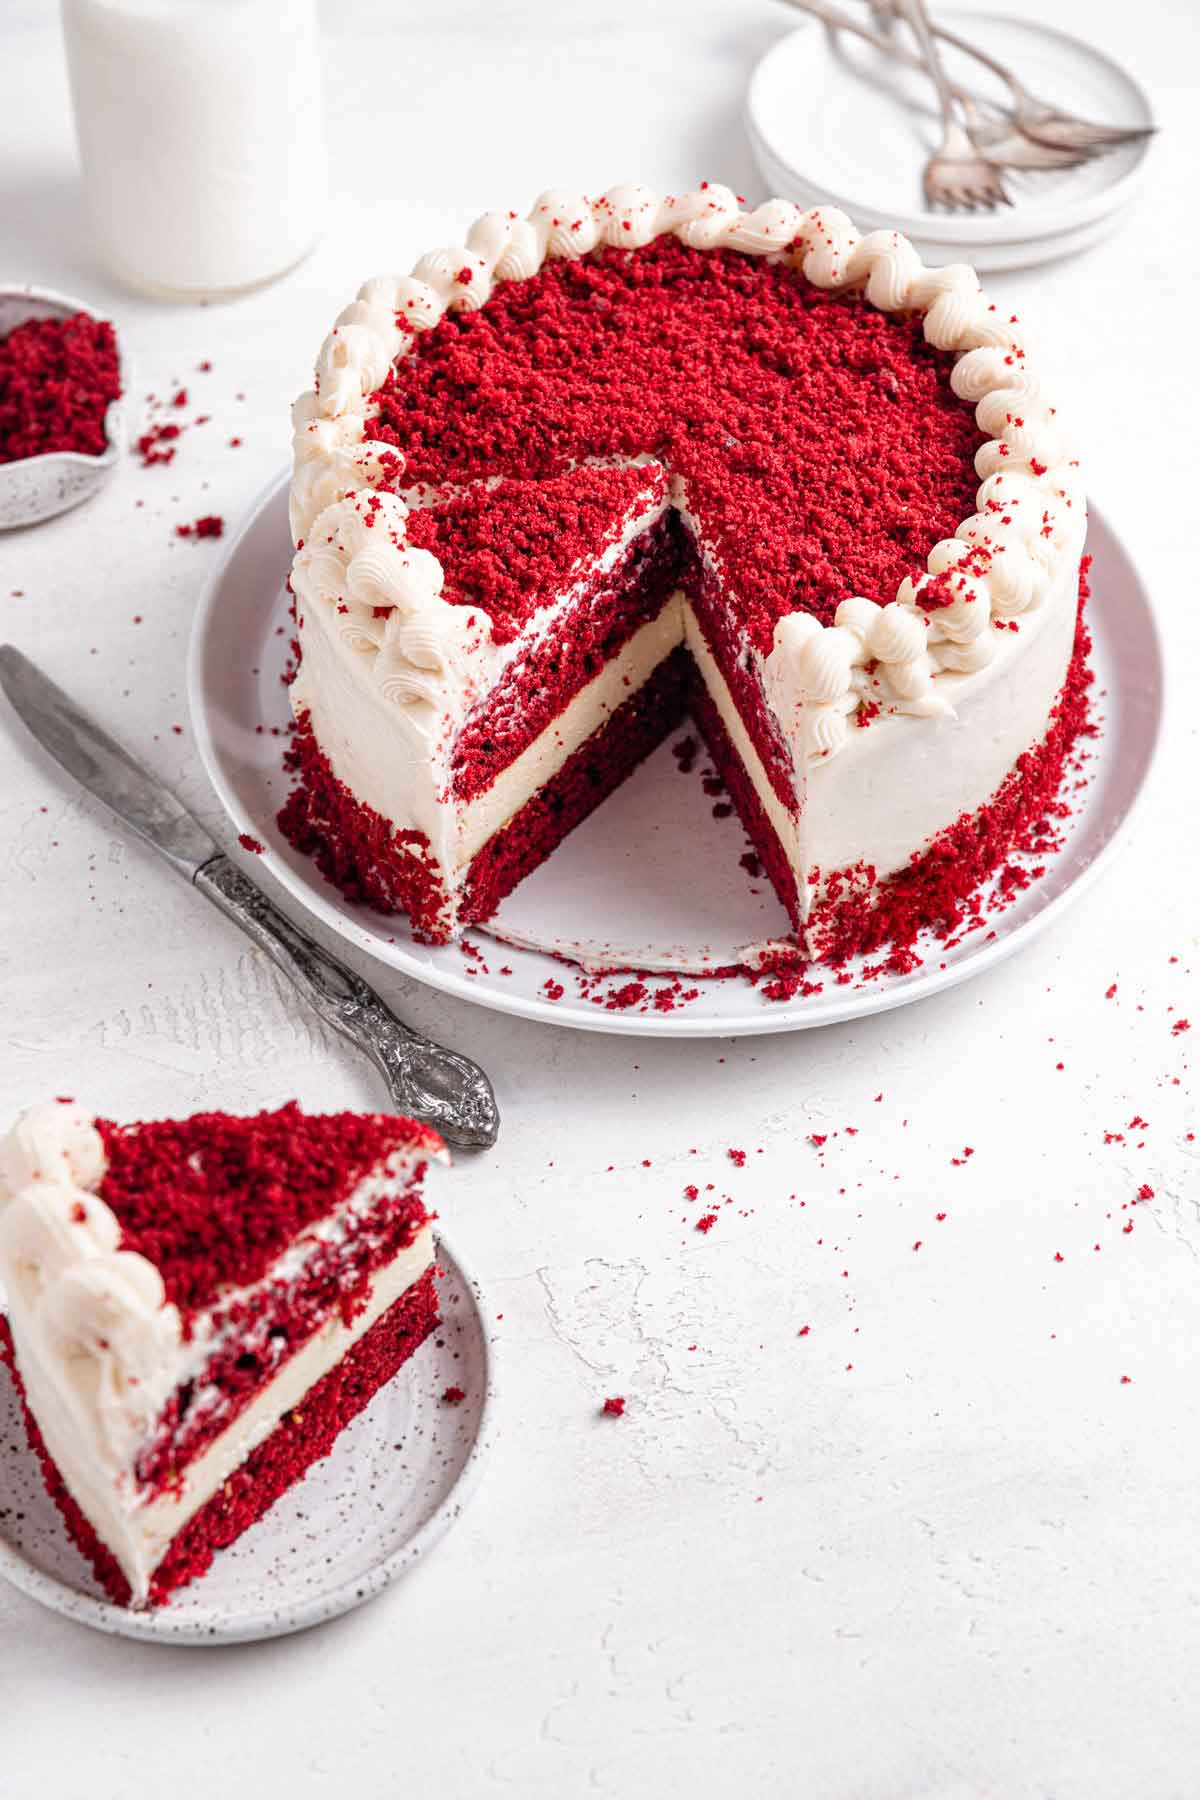
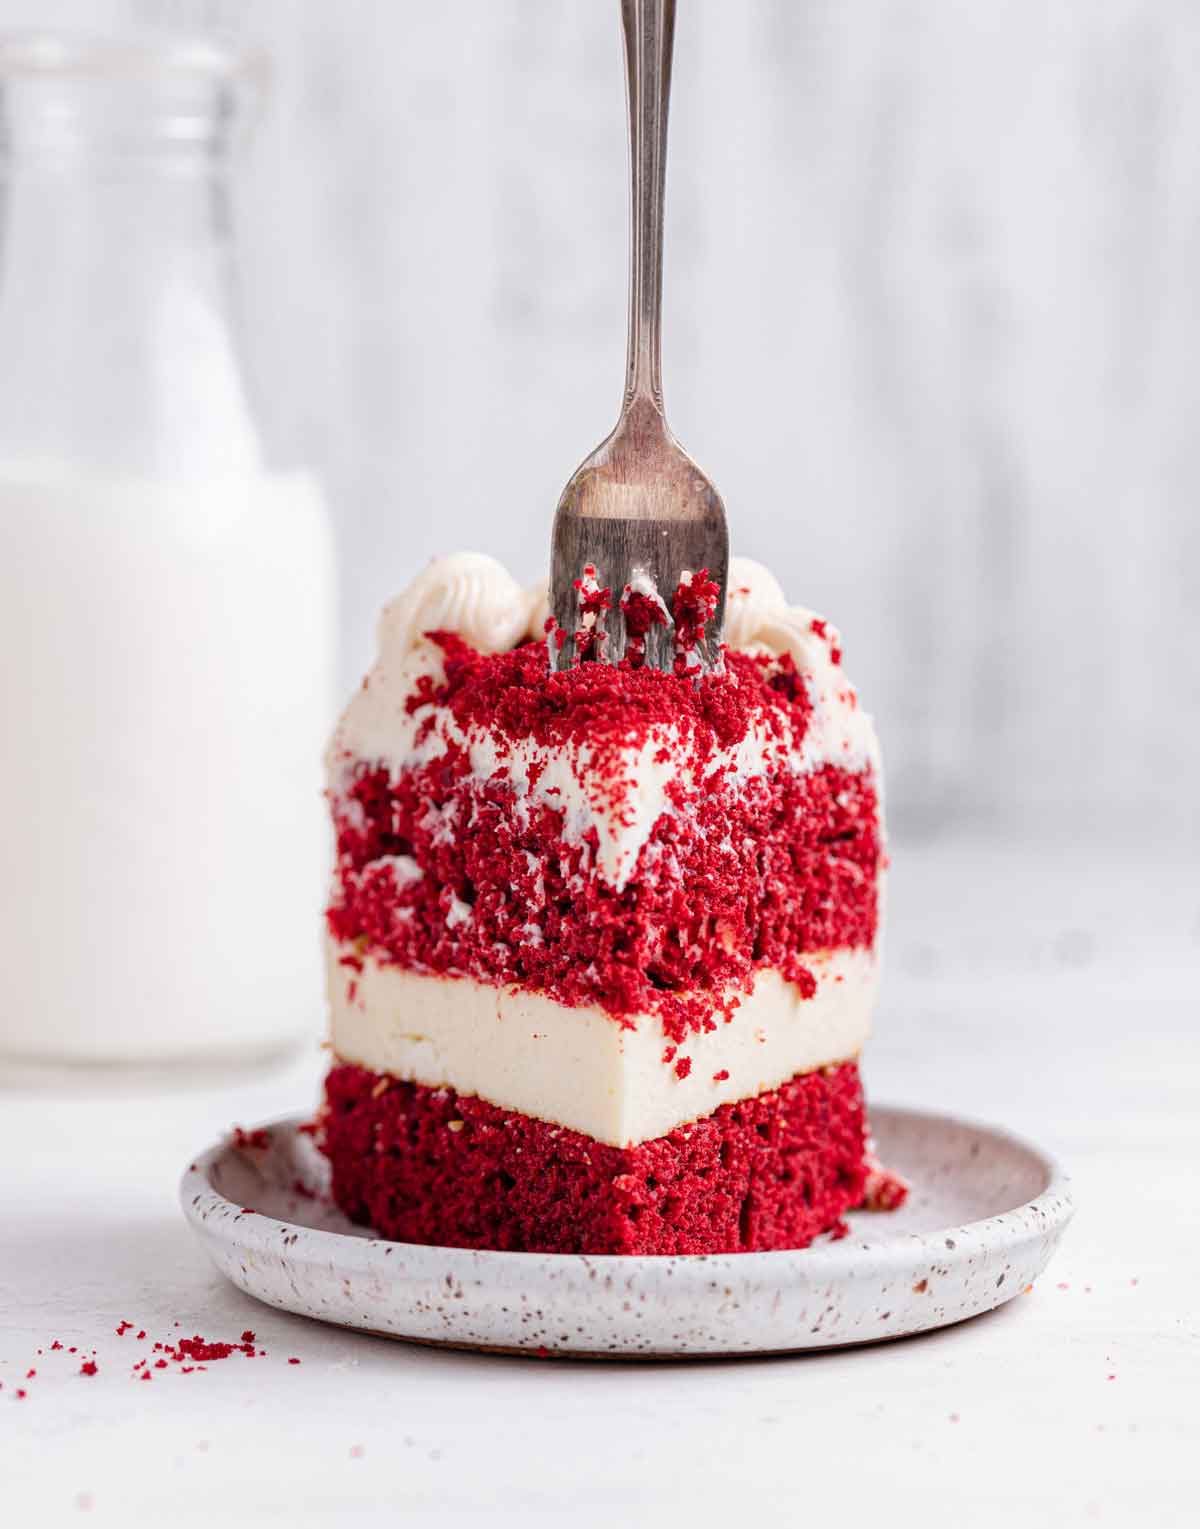
Treat yourself with a slice (or two) of this divine Red Velvet Cheesecake. Tender red velvet cake sandwiches creamy cheesecake for the ultimate dessert pairing. Based on the Cheesecake Factory's decadent version, this unforgettable cheesecake recipe is perfect for Valentine's Day, date night in, or just because.
I have made my share of red velvet desserts over the years, but this red velvet cheesecake truly stands above the rest. Moist red velvet cake layered with creamy cheesecake all wrapped up in a velvety cream cheese frosting… What more could you want?!?
Cheesecake Factory Copycat Recipe
This beauty originated at the Cheesecake Factory, where all incredibly decadent cheesecakes are born into existence.
For a long time, Oreo cheesecake reigned supreme for me, then I tried some different varieties and crowned the Snickers cheesecake as my favorite. It's been many years since we've had a slice from there, but my husband has an old standby favorite - the red velvet cheesecake. It is a four-layered dessert, with two layers each of red velvet cake and creamy cheesecake, all covered in cream cheese icing. I was so excited to make my own homemade version finally!
A previous version of this cheesecake recipe featured all four layers, but slicing a cheesecake in half horizontally isn't the easiest, so I've streamlined and simplified the recipe. If you want to go the full four-layer route, double the cheesecake layer, and once it has been chilled, slice it in half horizontally and alternate layers with the red velvet cake.
Important Ingredients
While many of the ingredients for the cake and cheesecake are pantry and refrigerator staples (flour, sugar, eggs, etc.), there are a few important ones to make note of:
For the Cheesecake
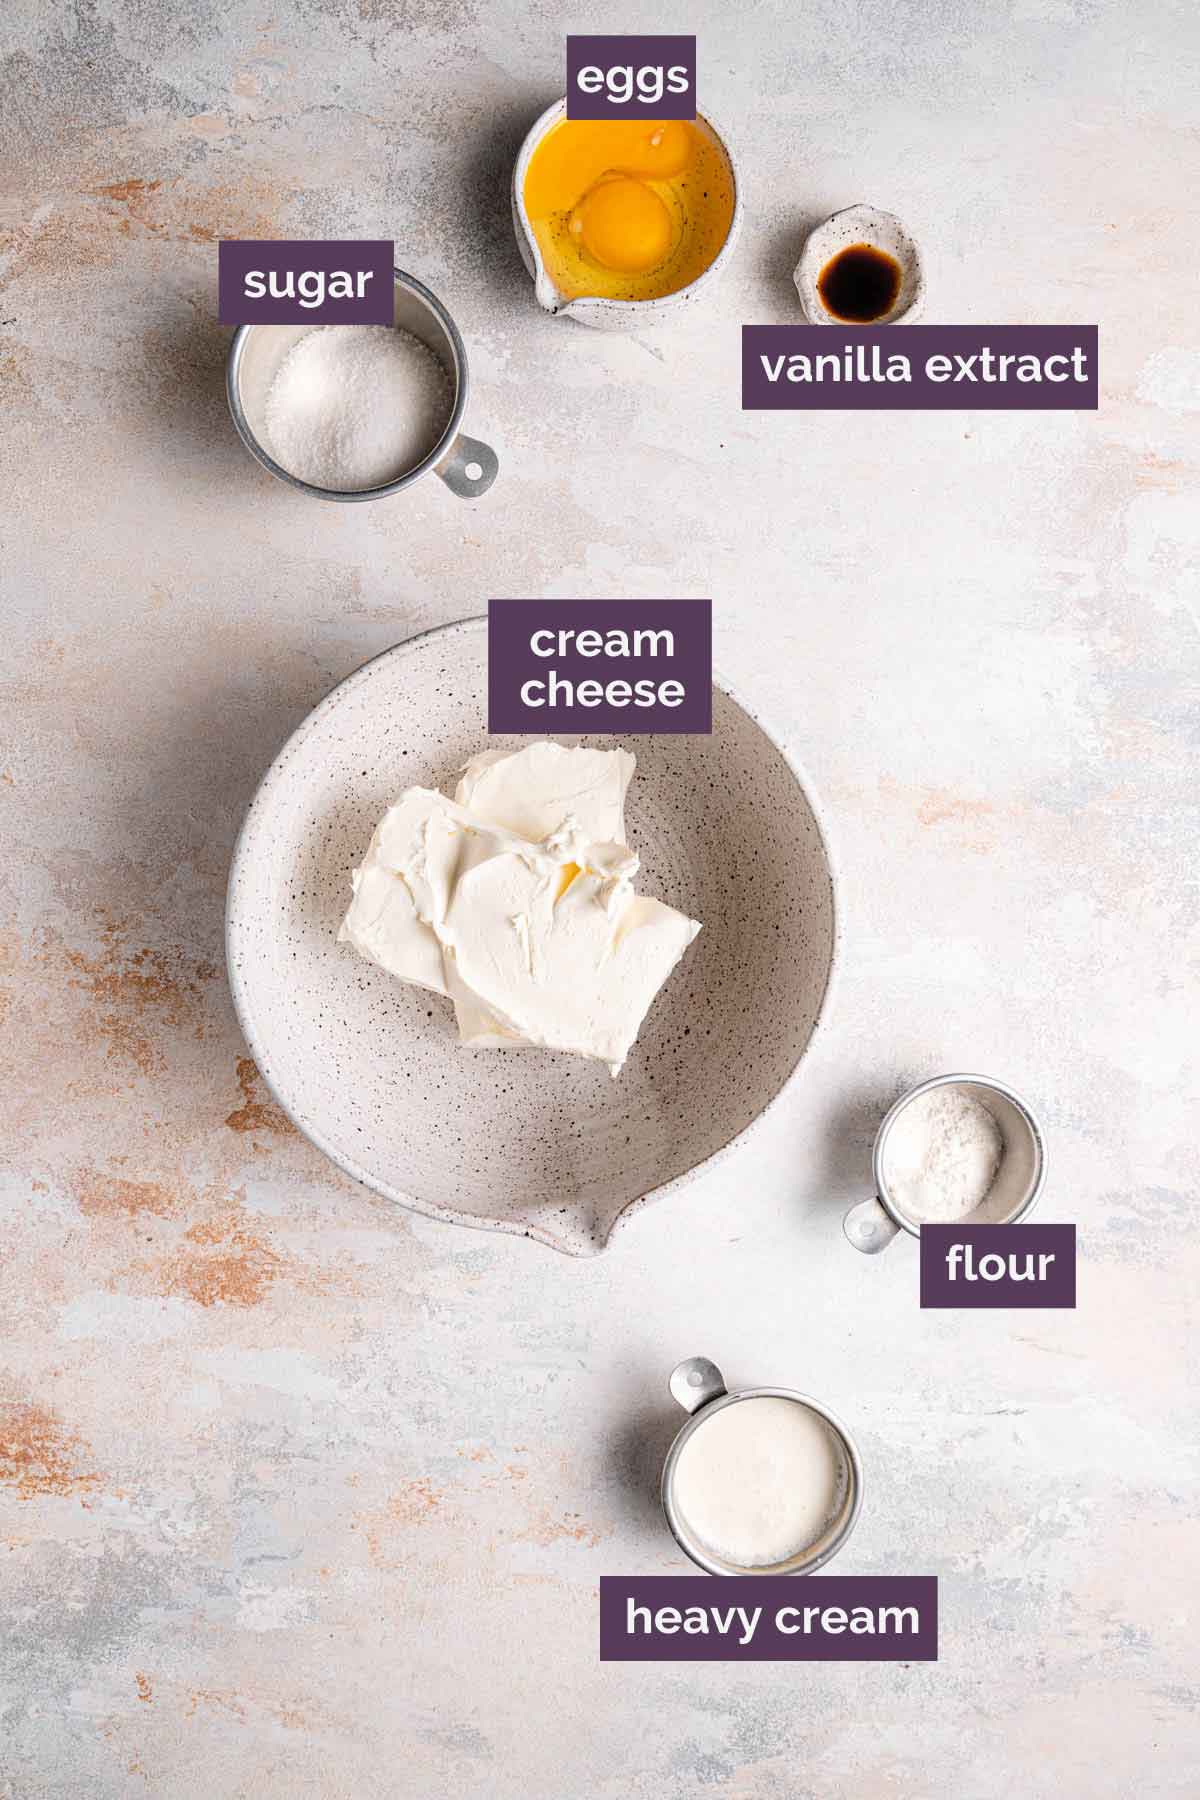
- Cream Cheese – For the cheesecake layer. Use full fat cream cheese to ensure the cheesecake is rich and creamy.
- Heavy Cream – This softens the texture of the cream and cheese and adds a little moisture. It is sometimes also called heavy whipping cream. You can substitute half and half or whole milk if necessary.
For the Cake Layers
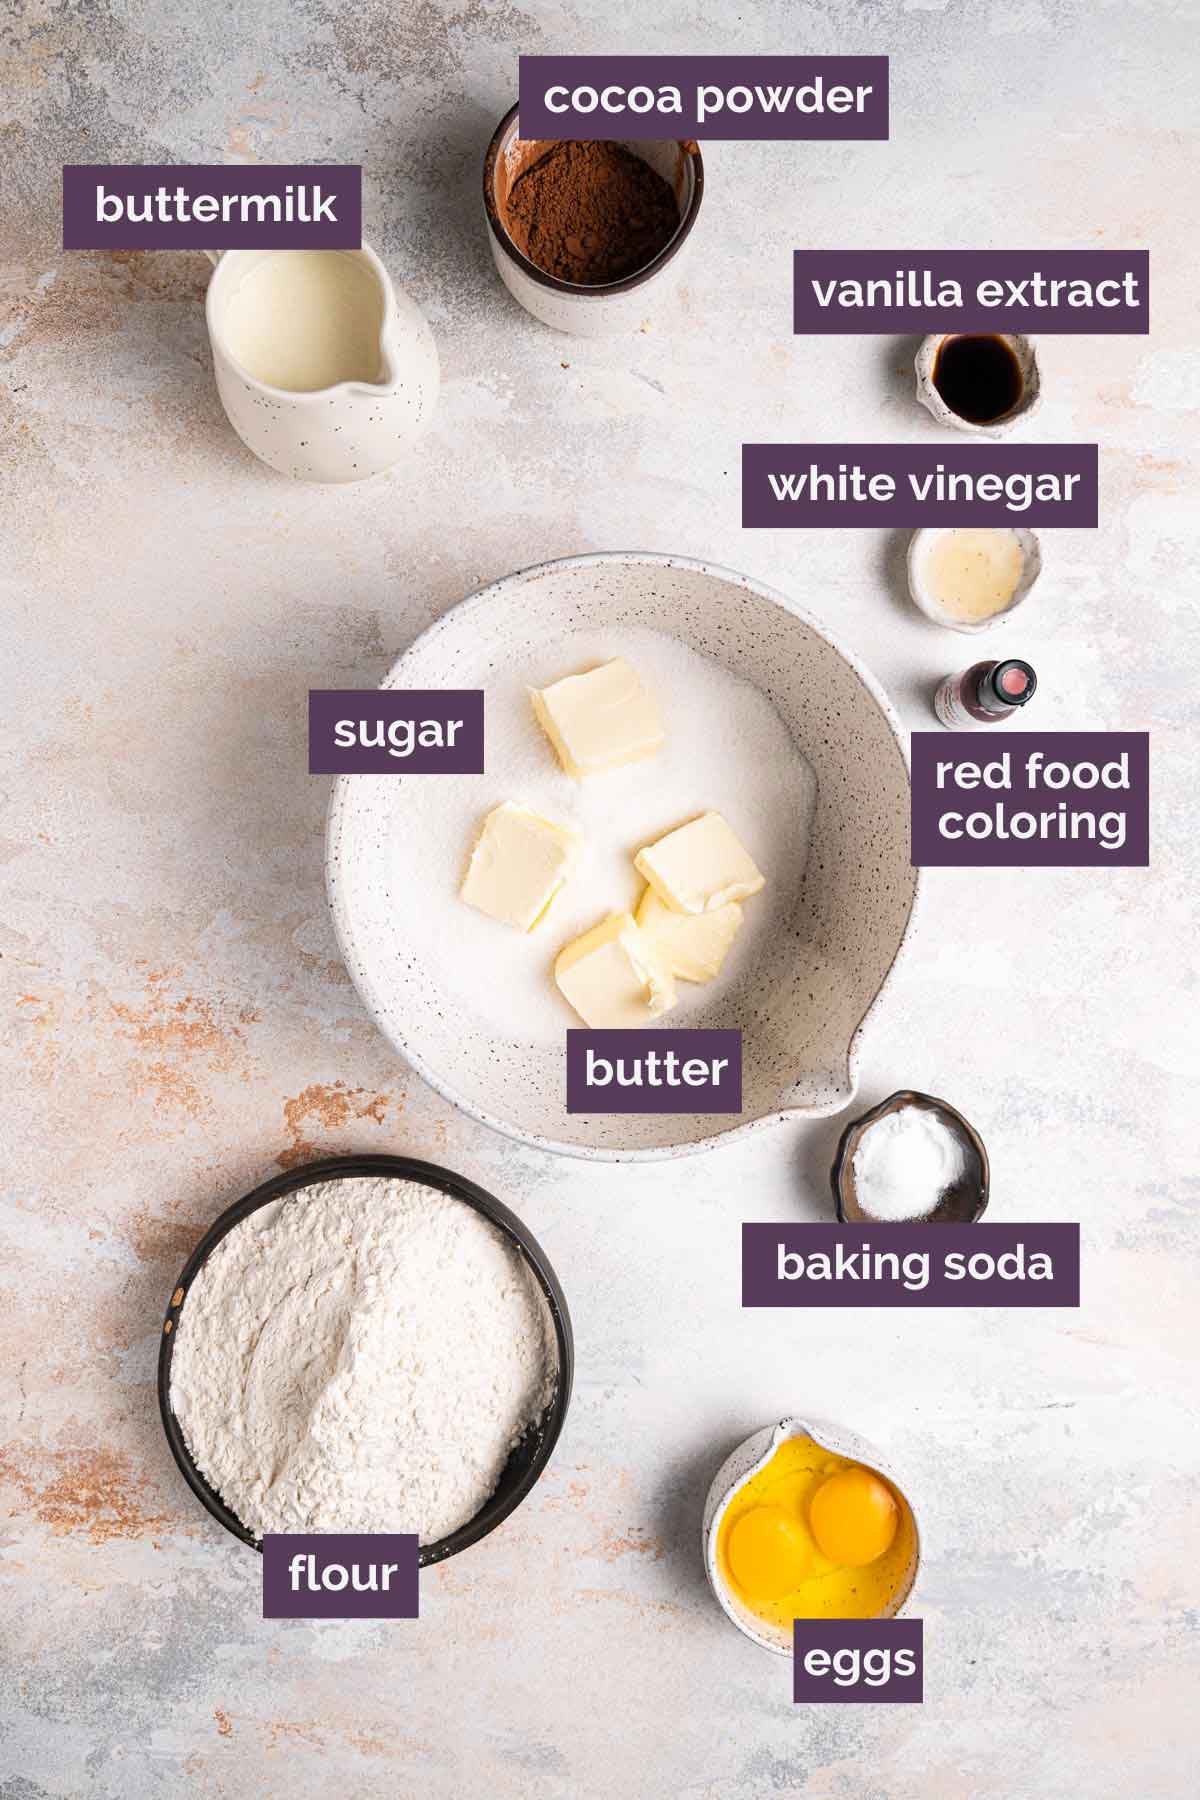
- Cocoa Powder – Use unsweetened, natural cocoa powder here. We want to avoid Dutched since it has already been alkalized.
- Vinegar - The reaction of the vinegar with the buttermilk helps to pull out the red hue in the cocoa powder. For this recipe, we use white vinegar, but you could also substitute apple cider vinegar.
- Buttermilk - Using soured milk is a key component of red velvet cake batter, as the acidic liquid is needed to combine with the baking soda and cocoa powder to get the rise and texture right. You can substitute sour cream or plain Greek yogurt.
- Baking Soda - This works magic with cocoa powder and buttermilk to get a beautiful rise and tender crumb.
- Red Food Coloring - We want to boost that beautiful red color! If you prefer to use gel food coloring, substitute 1 teaspoon gel food coloring and add about 1 tablespoon of water.
How to Make Red Velvet Cheesecake
Now on to the cheesecake… this really isn't terribly difficult, just a little time-consuming. It helps to spread the work out over a couple of days, and then it's easy breezy.
The Cheesecake Layer
To start, you will want to make the cheesecake first to ensure it sets and cools in time. I would plan to make the cheesecake layer at least one day in advance. Here is the cheesecake-making process:
Step #1: Spray a 9-inch springform pan with non-stick cooking spray and line the bottom with parchment paper (pre-cut parchment rounds are so handy for things like this!).
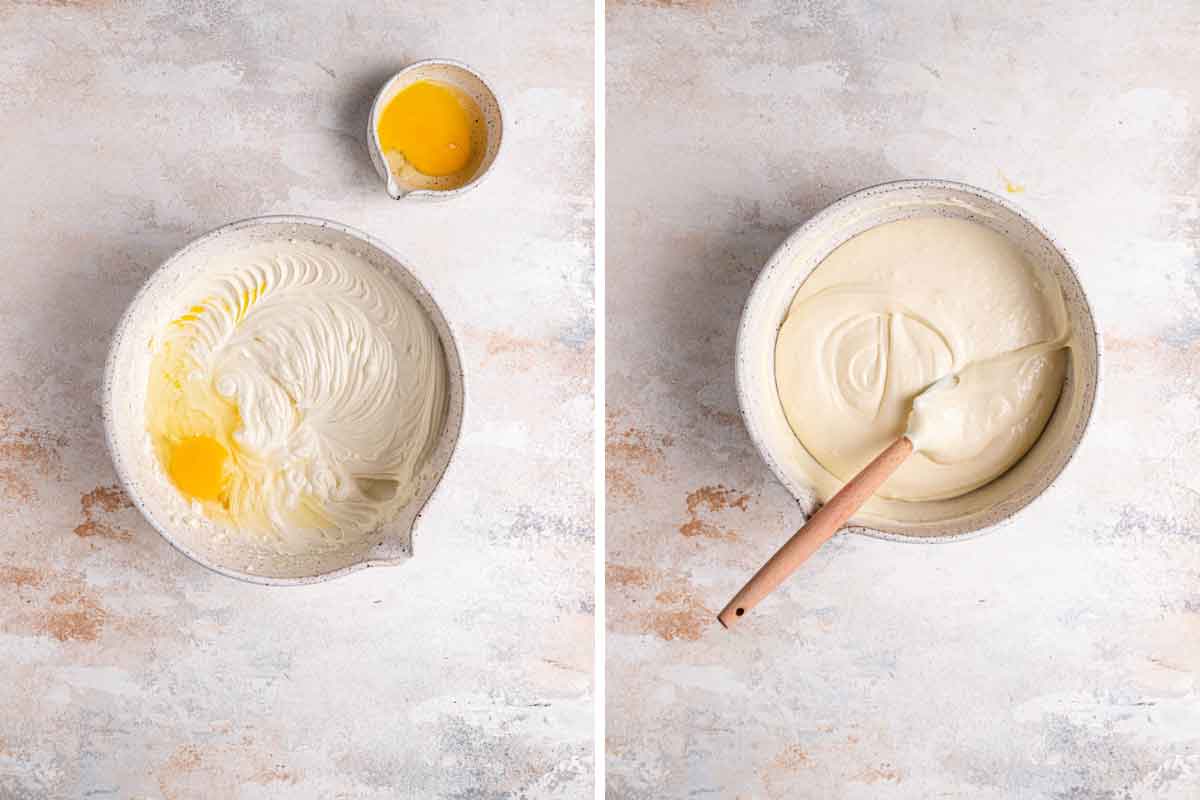
Step #2: Beat the cream cheese, sugar, flour, and salt until the mixture is creamy with no lumps. Add the heavy cream and vanilla, then the eggs, one at a time.
Step #3: Pour the filling into the pan and bake until the cheesecake is set and does not jiggle (40 to 55 minutes). Remove from the oven and cool for an hour on a wire rack. Once at room temperature, place in the freezer for 3 hours, or overnight.
The Red Velvet Cake Layers
Red velvet cake often gets written off as just a red chocolate cake, but it is SO much more than that. With a slightly acidic taste coming from the buttermilk and the white vinegar, this unique cake truly stands alone. The cocoa powder is actually subdued a bit by the acidity of the buttermilk and vinegar, leaving a very mild chocolate flavor.
For this recipe, I doubled the recipe for my Red Velvet Cupcakes and used the batter to make two 9-inch cake rounds. A quick overview:
Step #1: Preheat the oven to 350 degrees, then grease two 9-inch cake pans, line the bottoms with parchment paper, grease the parchment paper, and then coat the pan in flour, tapping out any excess.
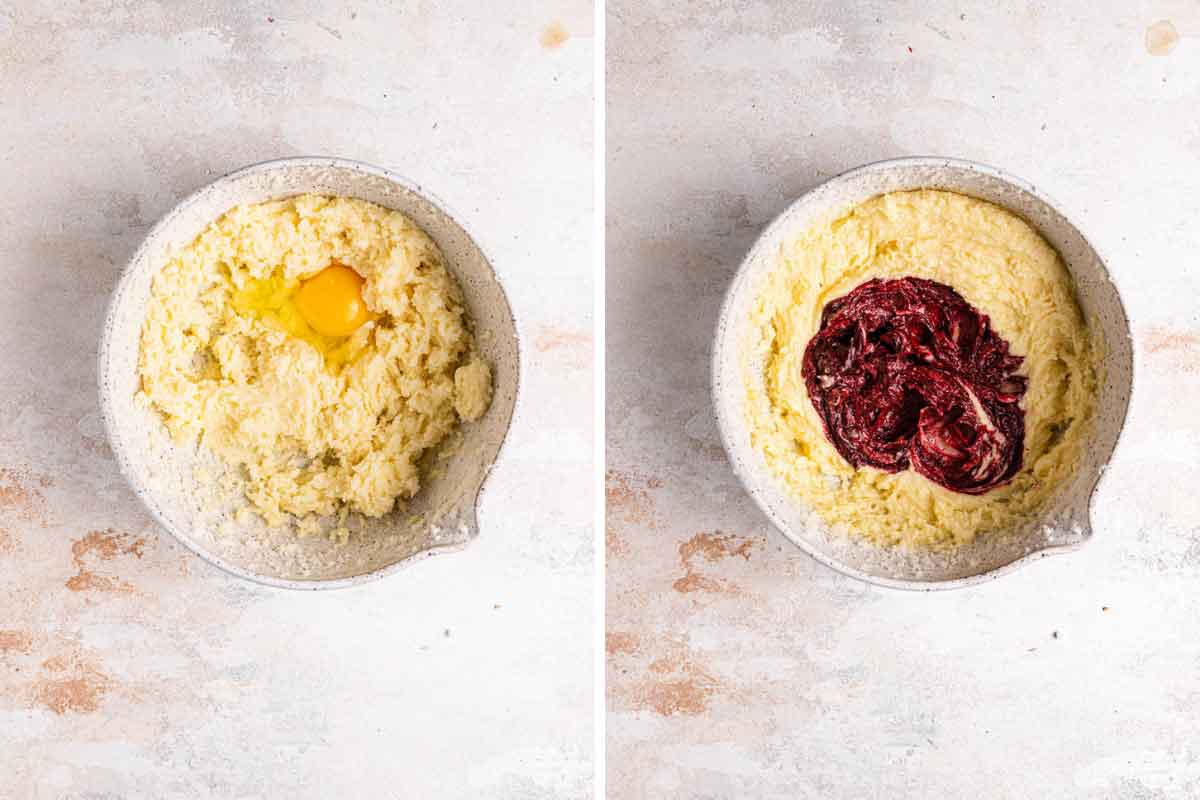
Step #2: Using a stand mixer or a large bowl with a hand mixer, cream the butter and sugar together, then add the egg and beat until well incorporated.
Step #3: In a separate bowl, combine the cocoa powder, vanilla extract, and red food coloring, which will make a thick paste. Add it to the batter and mix until combined.
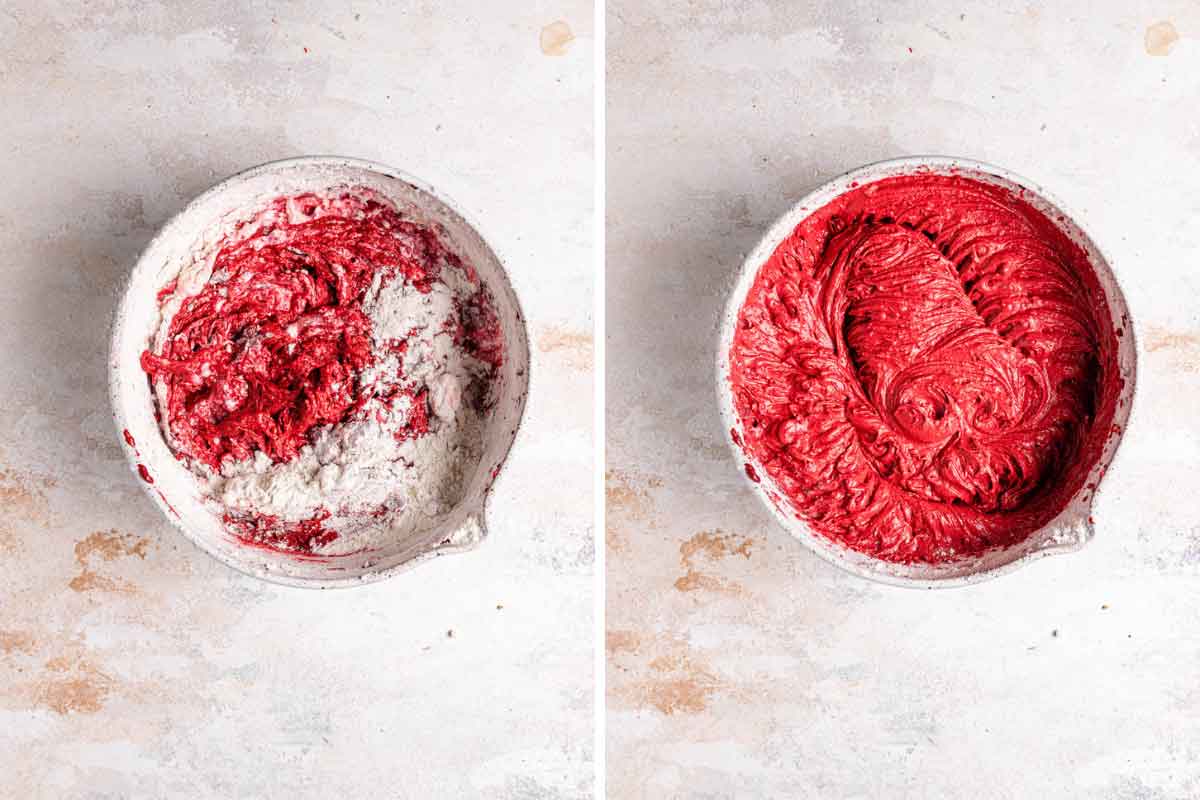
Step #4: On low speed, alternate adding the buttermilk and flour, then beat on high until smooth.
Step #5: On low speed again, add the salt, baking soda, and vinegar. Beat on high until the mixture is completely combined and smooth.
Save This Recipe
Step #6: Divide the batter evenly between the two cake pans and bake for about 30 minutes or until a thin knife inserted in the center comes out clean. Cool in the pan for 10 minutes then remove the cakes from the pans and place on a cooling rack to cool completely.
Note: You can also use a red velvet cake mix and prepare according to the package directions for two 9-inch cake layers.
Cream Cheese Frosting
I use my favorite cream cheese frosting to cover this beautiful dessert:
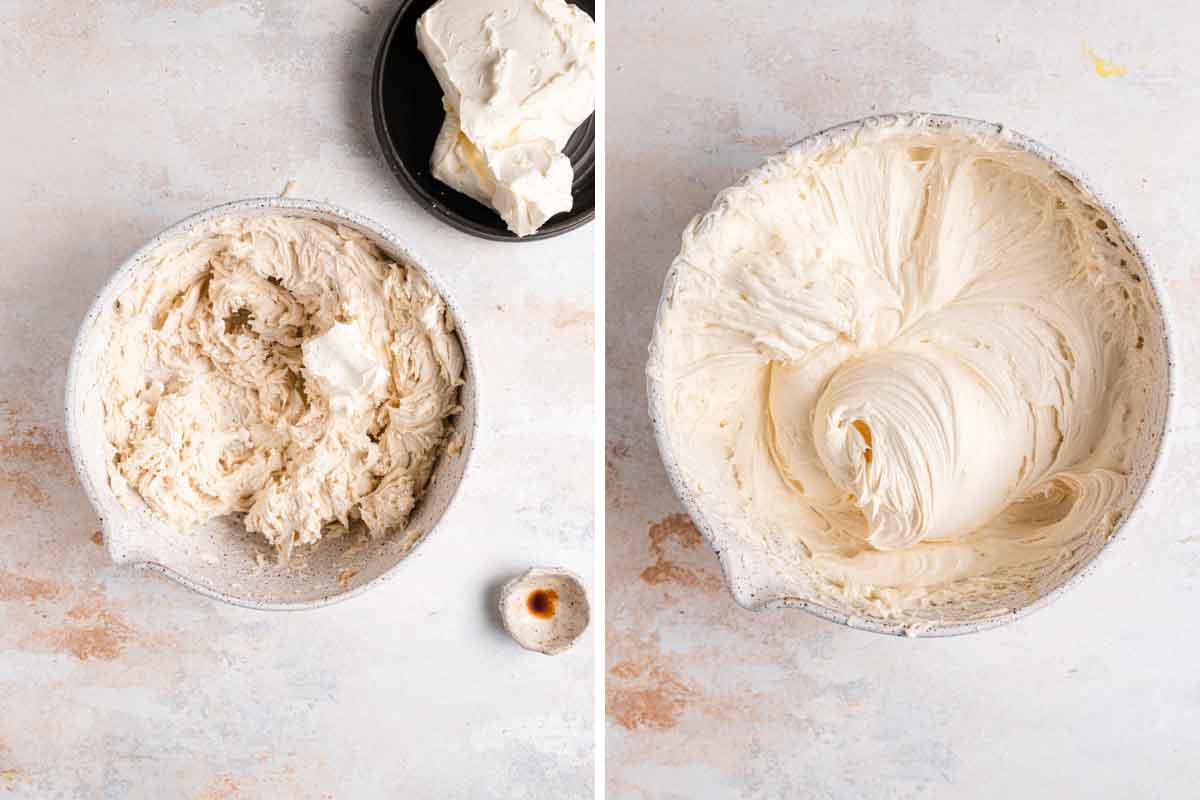
Step #1: Beat the butter, powdered sugar, vanilla, and salt with an electric mixer on low until smooth. Then mix for an additional 2 minutes, scraping down the bowl as needed.
Step #2: Increase the speed to medium-low and add the cream cheese, one piece at a time, and mix until smooth. Then mix for an additional 2 minutes.
Assembling the Cheesecake
Now that you have all of the components made for this decadent cheesecake, let's get it put together:
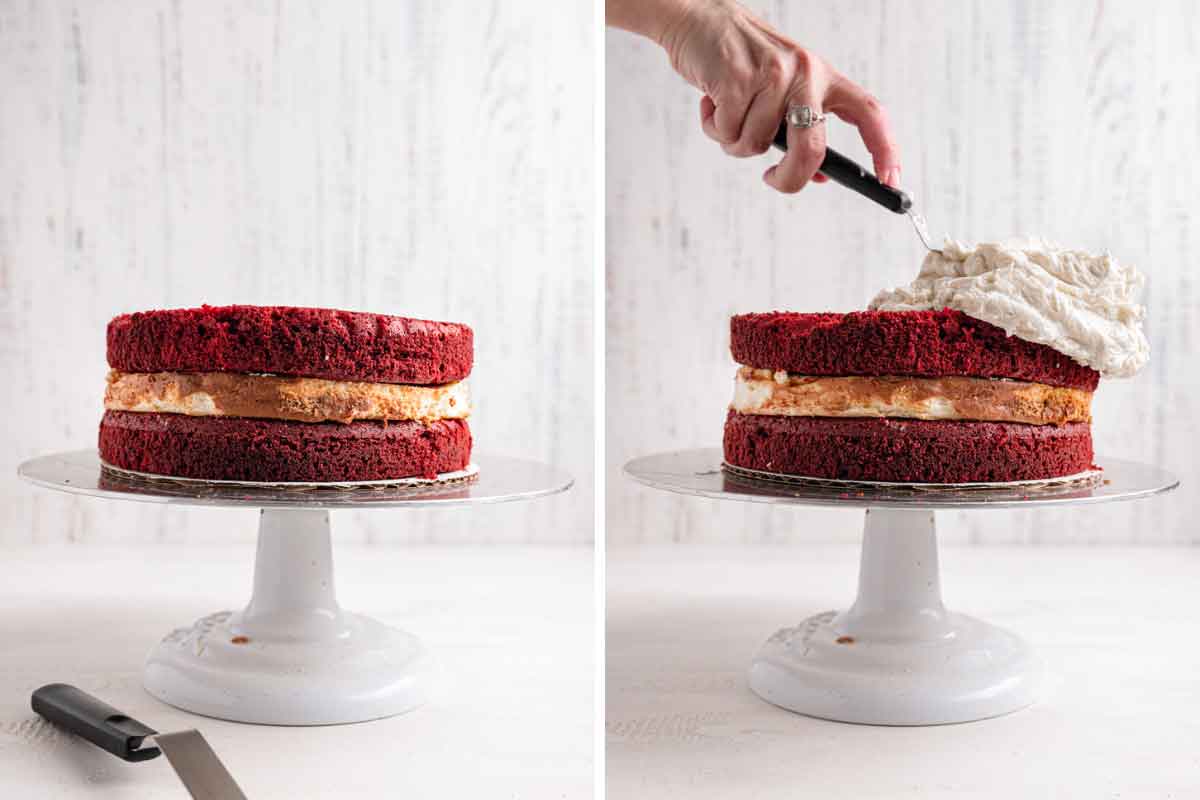
- Level the tops of the cakes if necessary, then place one cake layer on a serving platter.
- Remove the cheesecake from the freezer and remove the sides of the springform pan. If the cheesecake is wider than the cake layers, use a sharp knife to gently shave off some of the sides of the cheesecake so it is the same width as the cake layers.
- Place the cheesecake layer on top of the first cake layer, then place the second cake layer on top of the cheesecake layer, upside-down., and then frost the whole thing with the cream cheese frosting.
Decorate and Serve
After frosting the cake, you have a blank canvas for decorating. Some ways you can spice up the look of this cake are to:
- Pipe the edge with a shell border and fill the center with red velvet cake crumbs. For a tutorial on shell borders, check out this example from Wilton.
- You can use red velvet cake crumbs to press on the side of the cake.
- Top the finished cake with shaved white or dark chocolate!
- Press red or pink sprinkles into the sides of the cake, or garnish the top with them.
When you are ready to serve, dish out your slices as is or with a side of whipped cream.
Make-Ahead Instructions
This is a perfect dessert to make ahead of time! Each of the components can be made in advance, and the whole red velvet cheesecake is best when chilled for at least 4 hours or overnight before serving.
- Cheesecake Layer: This can be wrapped tightly in plastic wrap, then in foil, and frozen for up to 3 months.
- Cakes: Once the cakes have cooled, wrap them tightly in plastic wrap and refrigerate for up to 3 days.
- Frosting: This can be made up to 2 days in advance and stored in the refrigerator in an airtight container.
How to Store the Finished Red Velvet Cheesecake
Keep this cheesecake in an airtight container (or wrapped in plastic wrap) in the refrigerator for up to 5 days. Let sit at room temperature for 20 to 30 minutes before serving.
Freezing Instructions
This freezes very well! You can freeze any or all of the components, or freeze the entire assembled cheesecake:
- To Freeze the Cake Layers: Allow the cakes to cool completely and then wrap them tightly in plastic wrap and store them in the freezer for up to 3 months. Move the wrapped cakes to the refrigerator the night before you plan to use them.
- To Freeze the Cream Cheese Frosting: The cream cheese frosting can be kept in an airtight container in the freezer for up to 3 months. Thaw in the refrigerator overnight; allow to come to cool to room temperature, and then stir vigorously with a rubber spatula before spreading or piping.
- To Freeze the Whole Cheesecake: Wrap it tightly with plastic wrap and then cover it with foil. Freeze for up to 1 month. Thaw in the refrigerator overnight. You can also wrap individual slices in plastic wrap, then place in a ziploc freezer bag and thaw in the refrigerator overnight or at room temperature for about 30 minutes.
More Red Velvet Recipes You Must Try
- Red Velvet Cupcakes with Cream Cheese Frosting
- Easy Red Velvet Poke Cake
- Red Velvet Whoopie Pies
- Creamy Red Velvet Ice Cream
- Red Velvet Roll Cake
If you make this red velvet cheesecake recipe and love it, remember to stop back and give it a 5-star rating - it helps others find the recipe! ❤️️

Red Velvet Cheesecake
Ingredients
For the Cheesecake:
- 16 ounces cream cheese, at room temperature
- ½ cup (99 g) granulated sugar
- 1 tablespoon all-purpose flour
- Pinch salt
- ¼ cup (60 ml) heavy cream
- ½ teaspoon vanilla extract
- 2 eggs, at room temperature
For the Red Velvet Cake:
- ½ cup (113 g) unsalted butter, at room temperature
- 1½ cups (298 g) granulated sugar
- 2 eggs
- ¼ cup (26 g) + 1 tablespoon unsweetened cocoa powder
- 6 tablespoons red food coloring, liquid
- 1 teaspoon vanilla extract
- 1 cup (240 ml) buttermilk
- 2¼ cups (270 g) all-purpose flour
- 1 teaspoon baking soda
- 1 teaspoon salt
- 1 tablespoon distilled white vinegar
For the Cream Cheese Frosting:
- 1 cup (227 g) unsalted butter, at room temperature
- 4 cups (454 g) powdered sugar
- 2 teaspoons vanilla extract
- Pinch salt
- 16 ounces cream cheese, chilled and cut into 16 pieces
Instructions
- Make the Cheesecake: Preheat oven to 350 degrees F. Spray a 9-inch springform pan with non-stick cooking spray and line the bottom with a round of parchment paper.
- Using an electric mixer on medium-low speed, beat the cream cheese, sugar, flour, and salt until the mixture is creamy and no lumps of cream cheese remain, about 3 minutes. Scrape down the sides of the bowl, add the heavy cream and vanilla, and beat to combine. Beat in the eggs one at a time, beating for about 15 seconds before adding the next. Using a rubber spatula, mix a few times by hand to ensure that all of the ingredients are evenly incorporated.
- Pour the filling into the prepared pan and spread into an even layer. Bake until the cheesecake is set and does not jiggle, about 40 to 55 minutes. Remove from the oven and cool on a wire rack for at least 1 hour. Once the cheesecake has cooled to room temperature, place it in the freezer for at least 3 hours or overnight.
- Make the Red Velvet Cake: Preheat oven to 350 degrees F. Grease two 9-inch cake pans. Line the bottoms of the pans with a parchment round, butter the parchment paper, and then flour the pans.
- On medium-high speed, cream the butter and sugar until light and fluffy, about 3 minutes. Turn the mixer to high and add the eggs one at a time, mixing for about a minute after each addition. Scrape down the bowl and beat until well incorporated.
- In a separate small bowl, mix together the cocoa powder, vanilla extract and red food coloring to make a thick paste. Add to the batter and mix on medium speed until completely combined. You may need to stop the mixer to scrape the bottom of the bowl, making sure that all the batter gets color.
- Reduce the mixer speed to low and slowly add half of the buttermilk. Add half of the flour and mix until combined. Scrape the bowl and repeat the process with the remaining buttermilk and flour. Beat on high until smooth.
- Again, reduce the mixer speed to low and add the salt, baking soda and vinegar. Turn to high and beat for another couple of minutes until completely combined and smooth.
- Divide the batter evenly between the two cake pans and bake for about 30 minutes, or until a thin knife or skewer inserted into the center comes out clean. Cool for 10 minutes and then remove cakes from the pans and place them on a cooling rack to cool completely.
- Make the Frosting: Using an electric mixer, beat the butter, powdered sugar, vanilla, and salt on low speed until smooth, then mix for an additional 2 minutes, scraping down the bowl as needed. Increase the speed to medium-low and add the cream cheese one piece at a time and mix until smooth, then mix for an additional 2 minutes.
- Assemble the Red Velvet Cheesecake: Level the tops of the cakes if necessary, then place one cake layer on a serving platter. Remove the cheesecake from the freezer and remove the sides of the springform pan. Slide a knife between the bottom of the cheesecake and the parchment paper to remove the cheesecake from the pan bottom and parchment round. If the cheesecake is wider than the cake layers, use a sharp knife to gently shave off some of the sides of the cheesecake so it is the same width as the cake layers.
- Place the cheesecake layer on top of the first cake layer, then place the second cake layer on top of the cheesecake layer, upside-down.
- Spread a very thin layer of cream cheese frosting (the "crumb coat") over the top and sides of the cake, then refrigerate for 30 minutes to set the frosting. Then apply another liberal coat of frosting and decorate as desired. Keep refrigerated, then let sit at room temperature for 20 minutes before serving. Cover leftovers and store in the refrigerator for up to 5 days.
Notes
- Equipment: Two 9-inch round cake pans / 9-inch springform pan
- Buttermilk: You can substitute sour cream or plain Greek yogurt.
- Cocoa Powder - Use unsweetened, natural cocoa powder. We want to avoid Dutched since it has already been alkalized.
- Cream Cheese - For both the cheesecake layer and the frosting, use full fat cream cheese, otherwise you can have a watery consistency.
- Food Coloring: If you prefer to use gel food coloring, substitute 1 teaspoon gel food coloring and add about 1 tablespoon water.
- Make-Ahead Tips: I highly suggest making the cheesecake at least one day in advance of serving but it can also be made up to 3 days in advance. You can make the cake layers up to 2 days in advance without freezing. Bake, cool, and wrap tightly with plastic wrap. The frosting can be made up to 2 days in advance and stored in the refrigerator in an airtight container.
- Storing: Keep this cheesecake in an airtight container (or wrapped in plastic wrap) in the refrigerator for up to 5 days. Let sit at room temperature for 20 to 30 minutes before serving.
- To Freeze the Cake Layers: Allow the cakes to cool completely and then wrap them tightly in plastic wrap and store them in the freezer for up to 3 months. Move the wrapped cakes to the refrigerator the night before you plan to use them.
- To Freeze the Cream Cheese Frosting: The cream cheese frosting can be kept in an airtight container in the freezer for up to 3 months. Thaw in the refrigerator overnight; allow to come to cool to room temperature, and then stir vigorously with a rubber spatula before spreading or piping.
- To Freeze the Whole Cheesecake: Wrap it tightly with plastic wrap and then cover it with foil. Freeze for up to 1 month. Thaw in the refrigerator overnight. You can also wrap individual slices in plastic wrap, then place in a ziploc freezer bag and thaw in the refrigerator overnight or at room temperature for about 30 minutes.
Did you make this recipe?
Leave a review below, then snap a picture and tag @thebrowneyedbaker on Instagram so I can see it!
Photography by Dee Frances
The original recipe was published in February 2012.


Can you send me your old recipe for the Red Velvet Cheesecake? I’ve made is several times before and we love it!
I can’t believe I didn’t save it all those years. I really need that old recipe. this once just didn’t work for me.
Question: do I need to wrap/cover the cheesecake for the freezer?
Super excited to bake this for my brothers 30th. Thanks for the recipe!
Hi! I made this in December 2020 for my bf’s birthday and he loved it.
Surprising him with it tonight.
I noticed that you changed the recipe in the comments, I was wondering when you did that?
Hi! I love your recipes! Would you be able to send me the original recipe? I’ve made the original several times before and it is a family favorite! It is so worth the effort! I’ve even made the cheesecake by itself for parties and it is always a hit! Thank you!
My family raved about this cake! I tweaked it a little bit adding red velvet emulsion and used 6 inch cake pans. This cake will be on my family’s menu for years to come. Thank you!!
Lea
I’ve made your original 4layer recipe several times over the years. It’s amazing. The cheesecake is soft and smooth. I do sometimes have issues with leaks from the original water bath. I have made it with a water pan on a second rack and it isn’t as good. The texture is so much better when the cheesecake is in the water bath. I’ve also used boxed cake mixes which for my standards have turned out great. I’ve also did a strawberry cheesecake version of this with strawberry cream cheese icing at Easter that was also an awesome hit! I’m going to make this for Christmas this year. Would you mind to send me the original recipe? Mine has faded over time and I’d like to print it off.
Could you send me the original recipe for the cheesecake in your red velvet cheesecake , the one that used the water bath ! Thanks so much
Can you send me the recipe for the cheesecake that uses the waterbath in the original red velvet recipe ? Thanks , my Email is billfox55@hotmail.com
hi , i was wondering if you could give me the original recipe as i never wrote it down . I have made this cake at least 15 times and have perfected cutting the cheesecake in half. I just made your new recipe and honestly don’t think its as good . Don’t git me wrong , its good , really good but not as good as the other. Something about 2 layers of cheese cake send people into Dessertopia ! Thanks , I have friends change their plans when they hear I’m bringing one of these to an event. Honestly, sooo much better the the Cheesecake Factory
I got one at Costco,n I can’t believe it was a 1 time deal. Haven’t seen it since,tried ordering one from there,but no deal. Thank God u guys had the recipe,,,can’t wait to make this.
I love red velvet and cheesecake so whipping up this cake will definitely satiate my tastebuds.
I tried this recipe and, I am sorry to say, it was a total failure. I am an experienced baker too as I’ve been baking for 50 years! I thought it seemed strange when I put it together because, normally, you mix dry ingredients together and wet ingredient together and combine. But I made it exactly as directed. The layers did not rise.
I was making it for my husband for Valentine’s Day. Those layers went in the garbage (and I hate wasting food). I remade the cake with another recipe that I found on line. Normally, I really like your recipes, but not this one!
It was just okay . I felt like the red velvet cake was somewhat not as tasty, as other cakes . I do love the ideal of the cream cheese in the middle .
Help! Do you have the original recipe anywhere? I used that for every kind of cheesecake I make and can’t remember how much heavy cream.
Hi Kelly, Sure! Send me an email and I’ll get it to you!
Please send me your original Red Velvet Cheesecake recipe.
Does the cheesecake require 2 eggs plus one yolk? Ingredient list only 2 eggs. Why are people commenting on splitting the cheese cake? Don’t you use the whole cake between the layers of red velvet? Thank you
Hi Kathy, The cheesecake requires 2 eggs, I’ve adjusted the typo. And I mentioned this in the post above, but a previous version of this recipe required a larger cheesecake and slicing it in half horizontally. I have updated and revised the recipe to make it more streamlined and easier to execute, so now there is just one whole cheesecake between the cake layers, no splitting.
Is the butter in the frosting salted or unsalted?
I see in the cake specifically calls for unsalted, but it isn’t specified in the frosting.
Thanks!
Hi Brett, It’s salted, but you can use unsalted butter and add a pinch of salt to the frosting.
I made this for my husband’s birthday and he loved it!! The only thing I didnt like very much was that my red velvet cakes were a little denser than I would have like. The taste was amazing!!
Hey do you have a video on this recipe? I don’t see it on the video page
I do not have one for this recipe yet.
I made this a while back for someone and she loved it! I now need to make some plain cheesecakes for an upcoming wedding and am wondering if the cheesecake recipe in this could be baked with a graham cracker crust? Could you please email me back to let me know?
Hi Melissa, Sure I don’t see why not!
Outstanding Cake! I made it for my Brother-IN-Law’s wife for her Birthday. Crazy good cake.
Hello, how long should I bake if I would like to bake the red velvet cake together instead of separating them into 2? thank you !
Hi Felicia, It will take quite awhile, probably check around 40 minutes and then go from there.
I want to make this but don’t have oven like. you do. So would I still bake at same temperature. and minutes? Want to make this weekend
Thanks Dee
This looks super divine! I was planning to make individual servings. Any recommendations how that will work if I use a cupcake tin/ silicone for the cheesecake? What will be the baking timings?
Hi Sana, It really depends on the size of the silicone or cupcake pan you’re using; I would probably start checking around 15 or 20 minutes depending on the size.
How do you cut the cheese cake horizontally .
Hi Bill, I use this cake leveler to slice it in half: http://amzn.to/2gTARpk
This is simply the best cake I have ever made. I make this for my friends special occasions and they RAVE about it until I make the next one. Thank You for the recipe .
I have now made this cake twice in the last week! The first time was for coworkers, who gave it rave reviews, but let’s be honest, pretty much anything red velvet with cream cheese can show up on a Tuesday and everybody is going to be happy about it. The second time was for my best friend’s birthday. The Cheesecake Factory red velvet cheesecake is her favorite, when she was on weight watchers it was the one thing she’d guiltlessly splurge on, and she often keeps a slice in the freezer for special occasions. She has had many of my baked goods over the years, and always ranks them in order of her favorites. The BEB Irish cream cupcakes have been unbeatable at the top of her list for years, until now. This cake is incredible.
The first time around I had a few issues, mainly I didn’t quite butter my springform pan well enough and slightly overcooked the cheesecake so it split in the middle. I also couldn’t figure out how to get it to come away from the bottom of the pan, so I had to piece parts of the cheesecake back together on top. It was fine though, frosting covers all sins. The second time I used my cake leveler to both cut the cheesecake in half, and also to cut the bottom layer of cheesecake off the pan, which left me with perfectly even lines. It’s actually helpful for it to stick to the pan, because that allowed me to lay the bottom layer of red velvet with a thin layer of icing upside down on top of the cheesecake, then flip the whole thing out onto the cake platter. I then lifted up the bottom of the cheesecake pan, with the other half of the cheesecake still attached, didn’t need a huge spatula to split it, and everything came apart cleanly. I dropped the next red velvet layer on top of that (with the frosting in between layers), then inverted the cheesecake again on top and used the leveler to cut just underneath the pan to pull it away. The cake is a lot of work, so I don’t think I’ll be doing it twice in one week again, but it is incredibly delicious. Breaking it down over a couple of days is a must, so that the Cheesecake can fully cool in the fridge, but it also makes it slightly less upfront work for the baker.
Hi Jessica, Thank you so much for taking the time to come back here and leave your review, as well as share some tips you uncovered along the way! So thrilled to hear that your coworkers and friend loved the cake! :)
im planning on making this recipe next month for a friend! im curious if you have made it into a blue velvet cheesecake?! or if you have any tips for getting the blue velvet to a nice color without it tasting like blue dye… thank you so much!
Hi Liz, I’ve never made blue velvet, unfortunately!
This sounds killer good and this gives me an idea for a gluten-free version.
However, I make my cheesecakes in a cold oven (200°F) baking them overnight for 8 hours (I use a different recipe from America’s Test Kitchen but any recipe will work). See the Washington Post article Making Cheesecake While You Sleep
http://www.washingtonpost.com/wp-dyn/content/article/2010/11/24/AR2010112403714.html
. Only catch is, one has to use an accurate digital thermometer, in order to figure out what temperature setting gives a 2oo°F oven. It takes about half a day to do this being sure to place a metal pan with an equal amount of tepid, not cold, water in it to simulate a springform pan full of cheesecake mix. Once that’s done, just preheat the oven for an hour prior to baking to ensure a stabilized oven.
Can you use whipping cream? Heavy cream is hard to find
Hi Janis, Yes, that would be fine.
wow~~~ the result is the same as the picture!!!!! This is really awesome!!!=P
I saw this on Pinterest and it looks very good. I am interested in trying this out for my upcoming birthday however, with my work schedule I doubt I would have time to do so. At least from scratch. How do you think it would turn out by using a no-bake cheesecake and boxed cake mix?
Hi Sherrell, Yes, I think that would still work out just fine! Enjoy!
Okay, great! I’m looking forward to trying it out. Thank you!