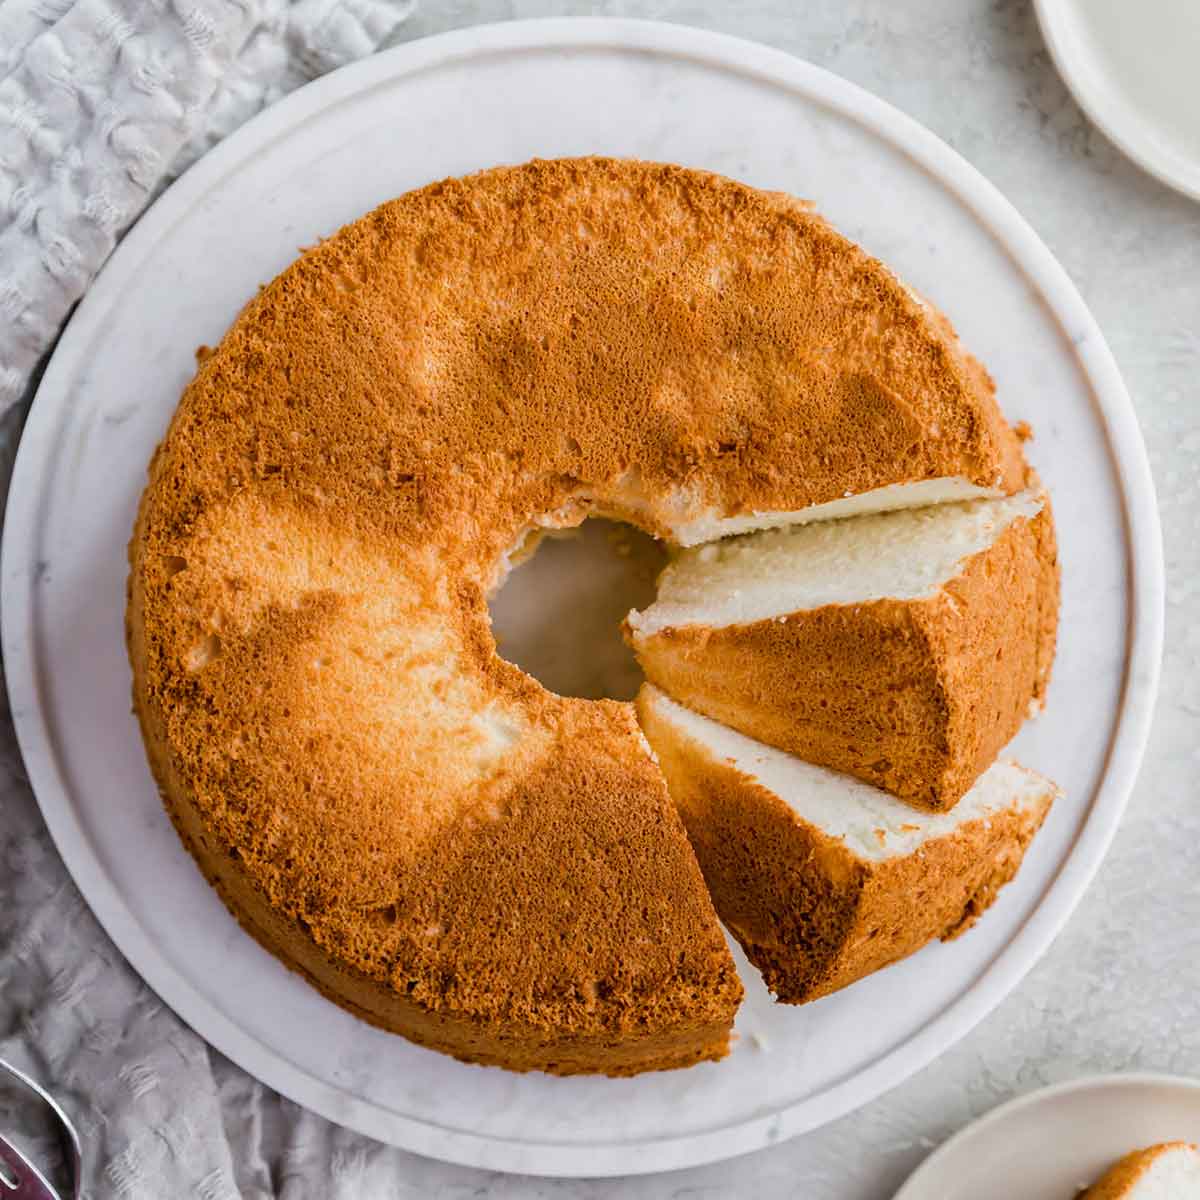
Angel Food Cake
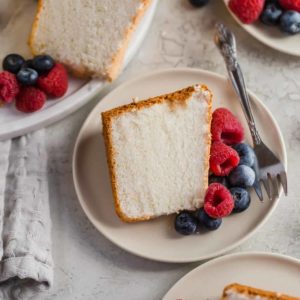
Made entirely from scratch with just six ingredients, light and fluffy angel food cake is a summertime staple. This homemade cake is easier than you think to make and always impresses a crowd. Top with whipped cream and fresh berries for the ultimate seasonal dessert!

While a chocoholic at heart, I have a soft spot for angel food cake. Since childhood, it’s been one of my favorite desserts – a big slice of it always capped off each summertime Sunday dinner at my grandma’s house. Today, I’m recreating those memories with this fluffy angel food cake recipe!
Only 6 Ingredients
I always appreciate simple recipes, especially when summer rolls around. You only need 6 simple ingredients for angel food cake – many of which are probably already in your pantry.
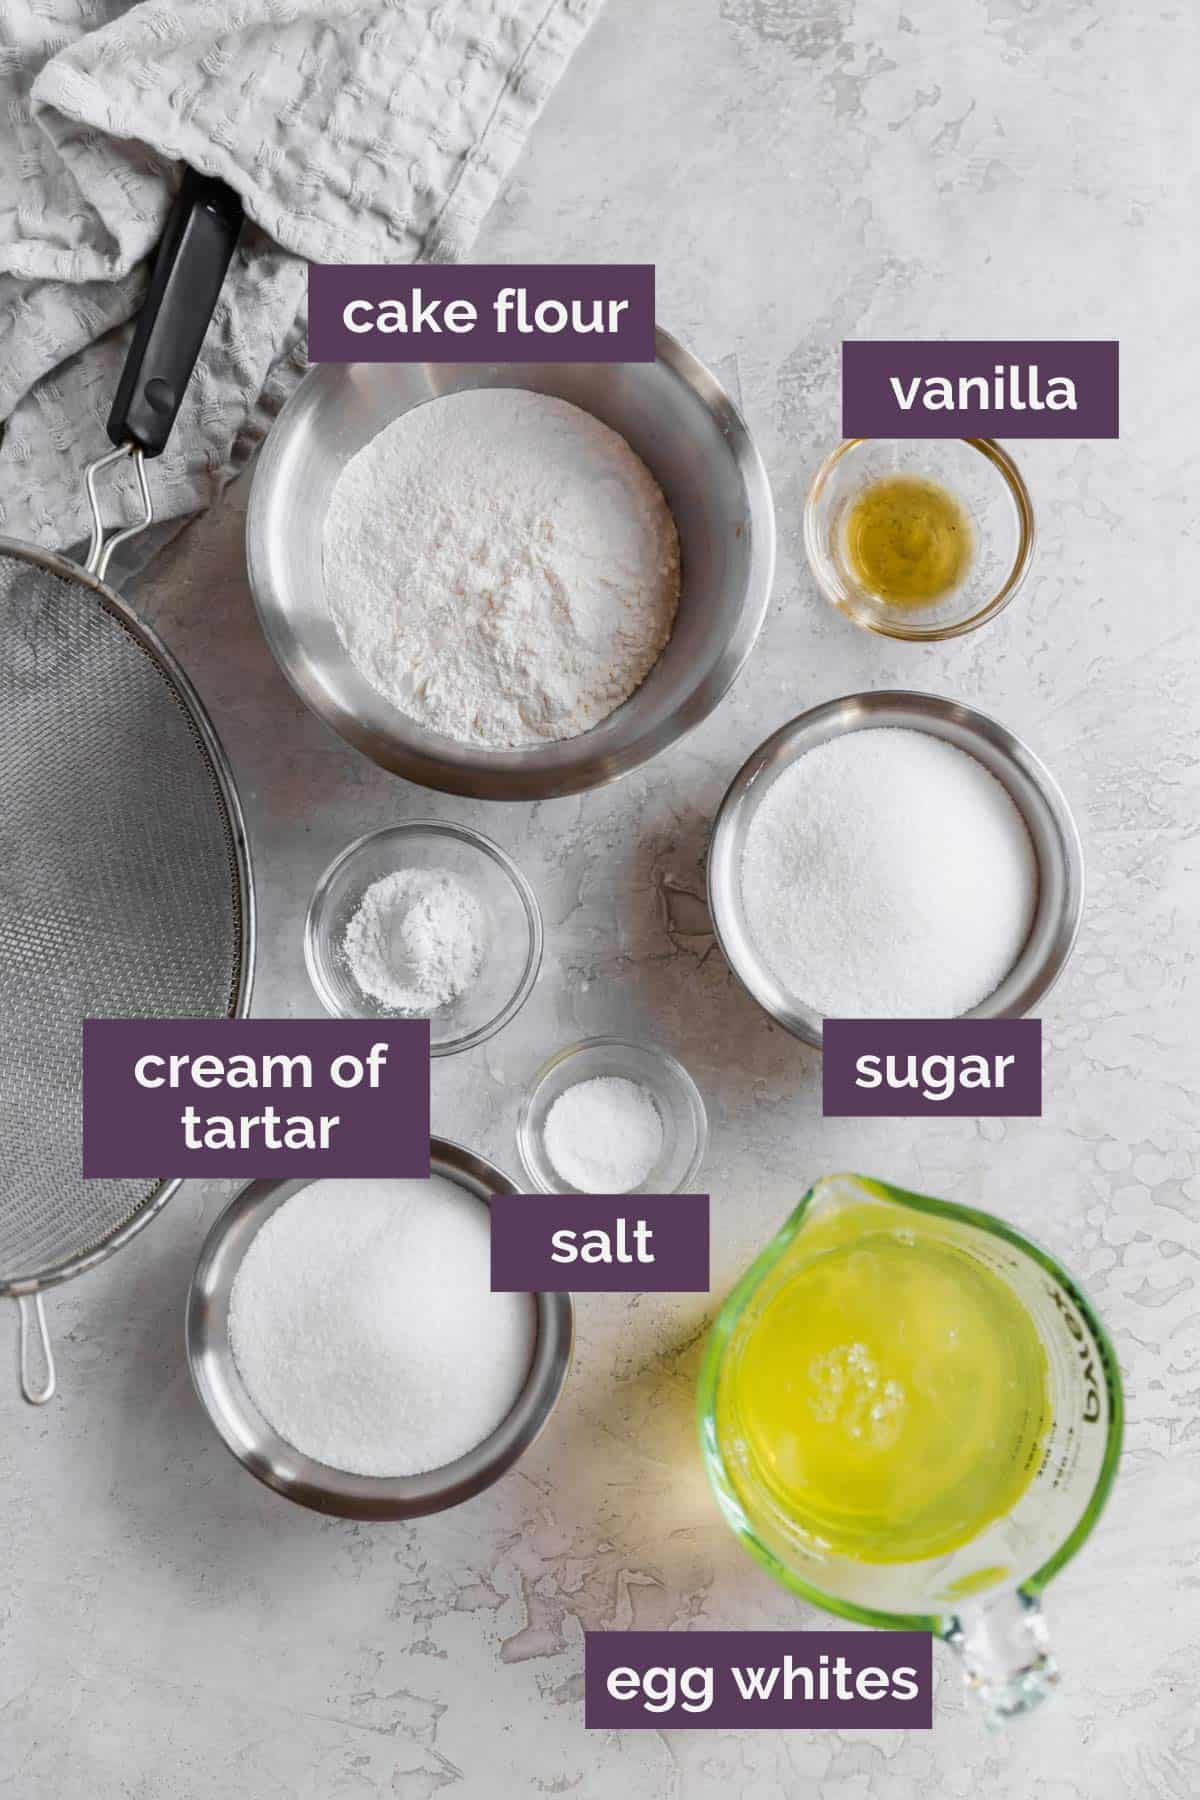
With such a short ingredient list, each plays an important role:
- Cake Flour: Cake flour has a lower protein content and ensures a soft, tender crumb. I don’t recommend using all-purpose flour instead – your angel food cake will be incredibly dense and will likely fall. If you don’t have cake flour, use this cake flour substitute from The Kitchn.
- Sugar: Granulated sugar sweetens the cake.
- Salt: A little bit of salt balances out the sweetness and enhances the other flavors.
- Egg Whites: The star of the show! They provide all of the leavening for angel food cake. Using only whites (no yolks) gives this cake a super light texture. Be sure to use only fresh eggs; liquid egg whites in a carton have been pasteurized, which can prevent them from whipping into stiff peaks.
- Cream of Tartar: Stabilizes the egg whites and keeps them from deflating. This helps create that light, fluffy texture.
- Vanilla: Vanilla extract adds incredible flavor! For angel food cake variations, try replacing some or all of the vanilla with almond extract, orange extract, or lemon extract. If making a swap, be sure to check the extract label! If there is any oil (sometimes included in flavored extracts), it can prevent the eggs from forming stiff peaks.
A note about eggs: You’ll need about 10-12 large eggs to get 1½ cups of egg whites – it all depends on the size of the yolk in each individual egg. For best results, separate them when cold, then let them come to room temperature.
Best Pan to Use
A 16-cup tube pan is a must for this cake (I use and love this angel food cake pan). With tall sides and an inner tube, this specialty pan allows the cake to “climb” the pan and cling to the sides while it bakes. Perhaps even more important are the “feet” that allow the cake to cool upside down without the top of the cake touching the counter or a cooling rack. This is vital in ensuring the cake maintains volume and doesn’t collapse.
Do not grease the pan before adding the batter. The cake needs to be able to cling to the sides of the pan while it bakes and while it cools. Any grease will prevent this from happening. If your tube pan has no removable bottom, line only the bottom with parchment paper for easier release.
If you’re tempted to try a Bundt or traditional cake pan instead, I don’t recommend it. The cake will fall when this cake bakes and cools in something other than a tube pan.
How to Make Angel Food Cake
No fancy layers or complicated steps are required! Here’s a quick overview of the process – you’ll find the full recipe card and instructions at the bottom of this post:
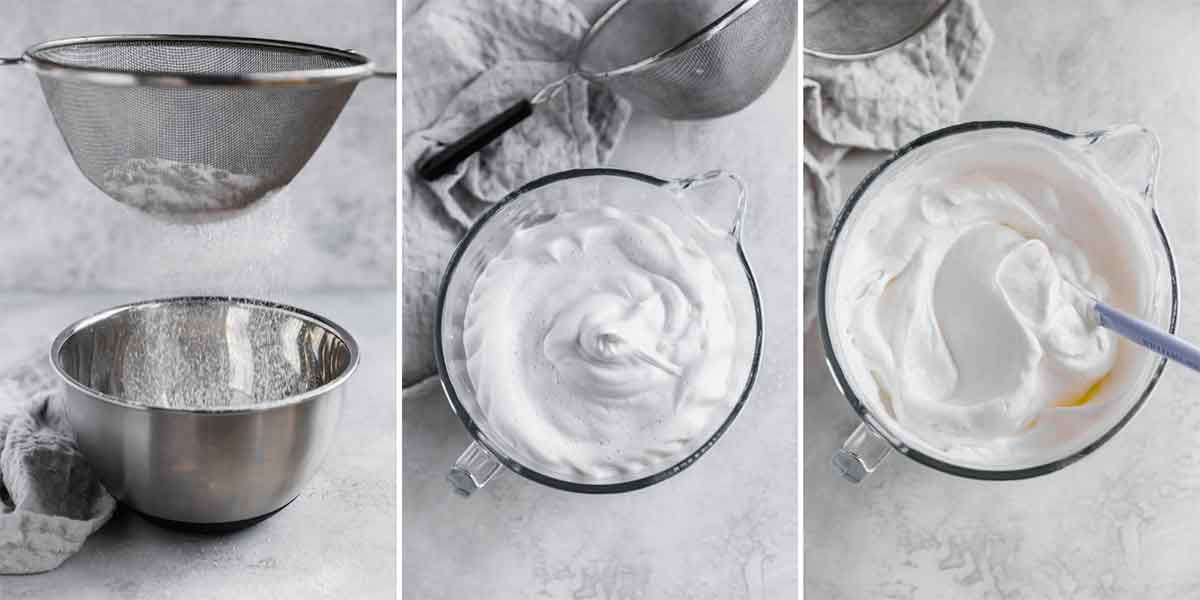
- Sift: Sift, sift, sift! Sift half of the sugar with flour and salt. Repeat this process 5 times.
- Combine: Beat the egg whites on low speed until frothy, then add vanilla extract and cream of tartar. While mixing is easiest with a stand mixer fitted with the whisk attachment (or a hand mixer), you can certainly whisk the by hand using a balloon whisk and elbow grease!
- Add: With the mixer on medium speed, add the remaining sugar, one tablespoon at a time.
- Look for Stiff Peaks: Once all of the sugar is added, increase the speed to medium-high and beat until stiff, glossy peaks form.
- Fold: Working 1/4 cup of the flour mixture at a time, sift onto the egg white mixture and fold gently to incorporate. Repeat until all flour is used.
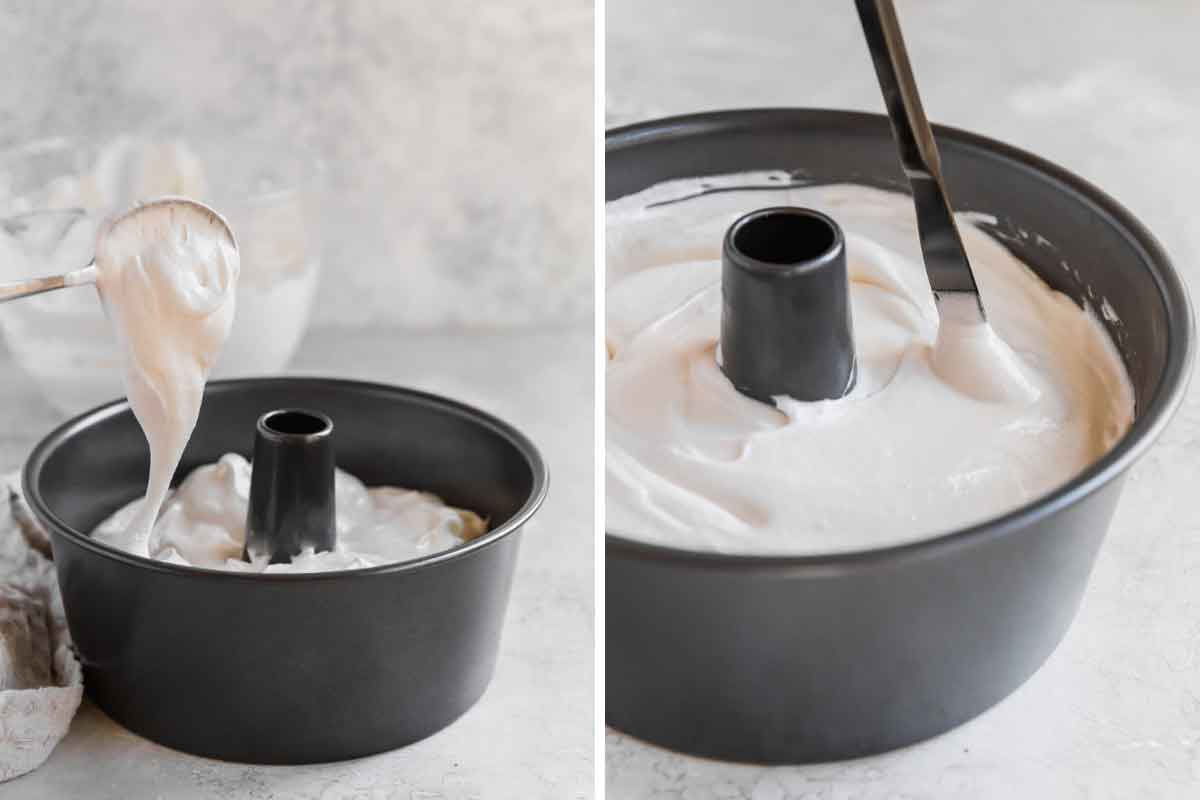
- Fill: Spoon the angel food cake batter into the ungreased tube pan. Smooth the top and run a knife through the batter to break any air bubbles.
- Bake: Bake the cake for about 25-40 minutes – until a skewer inserted halfway between the edge and the center comes out clean.
Cool Upside Down
Yes, really! Cool angel food cake upside down until it’s completely cool. This usually takes at least an hour.
Footed Pan: If your tube pan has little feet on the bottom, simply set it upside down to cool on a wire rack.
Unfooted Pan: If your tube pan does not have feet, invert the pan onto the neck of a glass bottle and let it cool that way.
When ready to serve, first run a knife around the edge of the cake and turn it out onto a serving dish or plate. Then, run a knife around the bottom and release. When ready to slice, use a serrated knife and a gentle sawing motion to cut slices (a bread knife or tomato knife work great). Using a straight-edge knife and/or cutting straight down will smoosh the cake.
Topping & Serving Ideas
One of the many things I love about angel food cake is that each slice is delicious with just about anything. A few of my favorite angel food cake toppings are:
- Homemade whipped cream or 7-minute frosting
- Fresh fruit or berries (blueberries, strawberries, and raspberries are my favorite!)
- Homemade berry jam
- Drizzle of chocolate ganache or salted caramel
- Lemon curd
- Sprinkles or mini chocolate chips
For a crowd, set up a toppings bar with a variety for everyone to choose from!
You can also use this baked and cooled angel food cake as a base for the red, white, and blue berry trifle!
Make Ahead Tips
- Storage: Tightly wrap any leftover angel food cake with plastic wrap and place in an airtight container at room temperature for up to 2 days.
- Make Ahead Instructions: Make the angel food cake as directed up to 1 day in advance. Once cooled completely, remove from the tube pan, cover tightly with plastic wrap, and keep at room temperature.
- Freezing Instructions: Wrap the entire cake or individual slices in plastic wrap, then in aluminum foil. Place in a freezer-safe bag or container and freeze for up to 4 months. When ready to serve, thaw at room temperature.
FAQ and Troubleshooting Tips
Why is my angel food cake falling?
I’ve been there many times, and it’s so frustrating. There are 3 main reasons your angel cake may fall:
- Opening the oven door: This releases heat from the oven and can cause the cake to collapse while baking. I know it’s tempting to check on the cake multiple times, but wait until the minimum baking time has elapsed before checking the cake for doneness.
- Incorrect oven temperature: If the oven is too hot, the exterior of the cake will bake more quickly than the interior, causing the cake to collapse as it cools. I highly recommend an oven thermometer and adjust the temperature as needed so the interior of the oven is 350 degrees F while the cake bakes.
- Cooled in the pan incorrectly: Inverting the pan ensures that the cake continues to expand and hold its shape once cooled. Cooling the cake upside down is crucial – if you cool the cake in the pan right side up, the cake will collapse on itself.
Why is my angel food cake tough?
Angel food cake should be light, airy, and fluffy. If your cake has a tough texture, the flour may have been mixed in with too much force, causing the egg whites to deflate. Next time, gently mix the flour into the batter so the whipped egg whites retain their ary texture.
Light as air and virtually fat-free, angel food cake is the dessert of your dreams! If you haven’t tackled angel food cake from scratch yet, I highly recommend it. If you want to try something a little different, give this strawberries and cream angel food cake roll a go!
Watch How to Make This Traditional Angel Food Cake:
If you make this recipe and love it, remember to stop back and give it a 5-star rating – it helps others find the recipe! ❤️️
Angel Food Cake
Ingredients
- 1 cup (112 g) cake flour, sifted
- 1½ cups (298 g) granulated sugar, divided
- ¼ teaspoon salt
- 1½ cups egg whites, at room temperature
- 1½ teaspoons cream of tartar
- 1 teaspoon vanilla extract
Instructions
- Preheat oven to 350 degrees F. Have an ungreased 16-cup tube pan ready.
- Sift half of sugar with flour and salt. Repeat 5 times.
- Beat egg whites on low until frothy, then add vanilla extract and cream of tartar. Increase to medium, adding remaining sugar 1 tablespoon at a time. Increase to medium-high and beat until stiff, glossy peaks, scraping sides and bottom of bowl once or twice as needed. Sift about ¼ cup flour mixture on top and fold gently to incorporate; repeat until all flour is used.
- Spoon into tube pan, smooth the top, then run a knife through batter to break any air bubbles. Bake until skewer inserted halfway between edge and center comes out clean, about 35 to 40 minutes.
- Cool upside down at least 1 hour. Run knife around edge and turn out onto serving dish; run knife around bottom and release. Place on a serving platter, slice and serve. Angel food cake is best the day it is made, but can be stored for up to 2 days at room temperature, wrapped well in plastic wrap or stored in an airtight container.
Notes
- Equipment: A tub pan is essential for this recipe; you want one that has a 16-cup capacity – this is the one I use.
- Do NOT Grease the Pan: This is very important! The cake needs to cling to the sides of the pan in order to rise, as well as during the cooling process. This ensures that the angel food cake will be high and retain its volume. If your tube pan does not have a removable bottom, then line the bottom only with parchment paper for an easier release.
- Egg Whites: Use real, fresh eggs for this recipe. Egg whites in a carton have been pasteurized, which can result in their inability to be whipped to stiff peaks.
- Cooling: If the pan has little feet on the bottom, you can simply set it upside down to cool on a wire rack. However, if it does not have feet, then you will want to invert the pan onto the neck of a glass bottle for the cooling process.
- Stand Mixer Alternatives: While the mixing is easiest with a stand mixer using a whisk attachment or a hand mixer, you can whisk the egg whites by hand using a balloon whisk and elbow grease!
- Number of Eggs: How many eggs you use will vary based on the size of the egg and the size of the yolk in each individual egg. I typically only need 10 eggs to get 1½ cups of egg whites, but most recipes say 11 or 12 is the average.
- Separating Eggs: Eggs separate easier when they are cold, and if there is any yolk in with the egg whites, it will prevent them from whipping up into stiff peaks, so I recommend separating and measuring the eggs while cold, then allowing them to come to room temperature before proceeding with the recipe.
- Different Flavors: You can substitute almond extract, orange extract, lemon extract, or use them in combination with the vanilla to adjust the flavoring. Be sure to check the label on them, however; if there is any oil (which is sometimes included in flavored extracts) it can prevent the eggs from forming stiff peaks.
- Slicing the Cake: It’s super important that when cutting angel food cake, you use a sharp, serrated knife and a gentle sawing motion (I use my favorite bread knife). Using a straight-edge knife and/or cutting straight down will smush the cake.
- Serving Suggestions: Fresh berries, whipped cream, vanilla ice cream, 7-minute frosting, and /or chocolate ganache are all wonderful accompaniments!
- Make-Ahead: Angel food cake can be prepared one day in advance; once cooled completely and removed from the tube pan, cover with plastic wrap and keep at room temperature.
- Freezing Instructions: Angel food cake can be frozen by wrapping it (either the whole cake or individual slices) tightly in plastic wrap, then in aluminum foil. Place in a freezer-safe bag or container and freeze for up to 4 months. Thaw at room temperature.
Did you make this recipe?
Leave a review below, then snap a picture and tag @thebrowneyedbaker on Instagram so I can see it!
Photography by Ari Laing.


far too sweet
A note about chocolate. I once compared Canadian made chocolate with Lindt chocolate. The Canadian made chocolate consisted of all natural ingredients while the Lindt chocolate listed some chemicals. I’m sure the chemicals are harmless but guess what? I don’t eat Lindt chocolate.
For the very first time i made this Angel Food Cake following exacly your recipe. Running through several stores to find the angel cake pan – it was totally worth it. I just turned out perfect! I will certainly repeat it many more times. Thank you for the easy to follow steps.
Delicious!!! I’m never doing a box one again
BEST CAKE EVER!!!!!!!!!!!!
Made this cake and it turned out burnt in 19 minutes. Started from cold oven. Could be oven errors but I highly doubt it. The eggs also need to be whipped to stiff peaks before adding the other things because it just becomes flat egg whites.
Almond extract??
The cake is super delicious. I made it for my kids and they really like it.
Hi Michelle!
I love your recipes and have enjoyed many of them. I’ve always wondered if you have to use real eggs or if you can just buy the liquid egg whites and use those?
Thanks
Hi Lori! It is recommended that you use real eggs. The liquid egg whites in a carton are pasteurized; that process oftentimes causes the proteins in the egg whites to be disturbed, which may make them unable to be whipped to stiff peaks, which is what you need in this recipe, as well as things like meringue. I hope that helps!
I’ve made this recipe a few times before and it always turns out great! I was wondering if it could be halved? We’re craving some angel food cake, but don’t want a ton leftover! I realize we’re probably the minority here, ha! Last time I made this, just a few weeks ago for Memorial Day, I shared with my neighbors and we still had leftovers – that ended up sitting and being thrown away.
This is the easiest and best angel food cake I’ve ever made! It’s not dry at all! It was so easy thank you very much!
I make an angel food cake for my mom’s birthday every year. She will be 77 this year and has had one every year of her life except one! When my grandmother passed away, I kept up with the tradition. I use 7 minute frosting on mine and dye it the lightest pink shade. Love all your tips for making an angel food cake!
My wonderful aunt Annie taught me how to ice angel food cakes with ice cream, yes ice cream. Believe me on a hot summer day this is a real cool treat.
Can you share a link for the sifter/mesh strainer you used?
Hi Debbie, Sure! Here it is: https://www.amazon.com/dp/B007426KZG/
Michelle, can’t wait to make this! Do you suggest spoon and leveling the cake flour here or dip and sweep? Also, would you go ahead and sift the cream or tartar in (mine sometimes gets clumpy) or does it matter? And I plan on using superfine sugar, I take it same amount as granulated? Thanks!
This turned out great! We loved it! I spooned and leveled the cake flour, didn’t bother sifting the cream of tartar, used superfine sugar, and upped vanilla to 1 1/2 tsp. Thanks for the super yummy recipe!!!
I apologize for missing your original comment, but I’m thrilled to hear how great this turned out for you! One of my favorite recipes, for sure! :)
Has anyone turned this vegan using aquafaba, thinking it would be good for my daughters birthday. Thank you. X
Can I bake this in a circular cake pan if I don’t have a bundt pan?
You should always use a pan made for angel food cake or it may never come out of the pan (this is a sticky cake). The pans also have “legs” on the top. Cakes must be cooled upside down and the “legs” keep it elevated to aid in cooling. If you cool upright, the cake will collapse. Make sure to never grease an angel food pan or your cake will not rise properly. I use a tube pan with a removable bottom or a 15″ long rectangular loaf style angel food pan with legs and have also baked in a jelly roll pan to make a rolled cake.
Can I use confectioners sugar in the angel food cake?
Hi Michelle
Could I use caster sugar instead of granulated sugar?
And if so, would it be the same amount as the granulated sugar? Your recipe sounds wonderful! Thank you
Mmm… I think I just heard my tummy growl. lol. Thank you for making me hungry!
This is just awesome cake, Some of our Bakery’s Ladies customers were looking for same kind of light spongy cake on their Kitty Party occasion, and i must thank you because every one loved this cake and appreciated.Thanks for Sharing.
This is the first angel food cake I have ever made. Was fairly simple and it was so delicious!
Cant wait to make this. My Mom still remembers my Grandma making an angel food cake for my birthday. I was probably around 2. My Grandma had my Mom pick fresh daisies or flowers of some kind from the garden to decorate the cake. I have my Grandma’s tube pan now. She gave it to me on a visit when she was much older…I’m sure it’s the same pan she used when I was 2 for that birthday cake. They didnt buy a lot of new or expensive stuff. It’s my favorite pan, and I cant wait to make this cake in her honor. Shes gone onto heaven, with my Grandpa…but my Mom n Dad will be surprised with a homemade angel food cake I’m sure😊
Was just reading your Grandma’s Fried Dough Recipe. My Mother made these or something very similar. If I recall correctly, she cut a hole in the middle of the strip and pulled one end of the dough through that hole, making a bow tie shape. I do not know if that alone made the shape or if after the dough was cut into strips she cut the ends on the diagonal. Hopes this helps.
Your post made me think of my Mom who has been gone 20 years. She always made home made Angel Food Cake for our birthdays. She would frost it with the best homemade Butter Cream Frosting.
Thanks for the memory.
Aww, you are so welcome, xo.
I am so excited to try this! My mom has had an angel food cake for every birthday except one. When my grandmother passed away I became the angel food cake maker for her birthday. Even though I’ve done from scratch, I usually rely on a box. I will be making this in May for her birthday! I always add a 7 minute frosting to it as well, and tint it very light pink.
LOVE the addition of 7 minute frosting – totally making that next time!
ooh, I love angel food cake! I’m excited :)
My mom wasn’t much of a baker, but angel food cake was her specialty. I haven’t made one for at least 10 years, but it isn’t that difficult. Like a lot of other things, it’s a matter of right ingredients and right equipment. Mom made a chocolate angel food cake by adding 1/4 cup cocoa powder. You could also add a little instant espresso powder to deepen that flavor.
Love the chocolate spin, I will have to try that!
Thoughts on a carton of egg whites vs separating them???
Also, which whip cream recipe would you suggest? I notice you have a few variations with your recipes. Thank you!
The whipped cream that goes on top of my tres leches cake is my all-time favorite (probably because it’s quite sweet, ha!): https://www.browneyedbaker.com/tres-leches-cake-recipe/
thanks :)
Hi Carolyn, I’ve never used carton egg whites, so I couldn’t say how they would hold up in this recipe. If you’ve used them before without an issue they should be okay.
Thanks Michelle….a couple more questions….thoughts on making the cake a day ahead and any suggestions for soaked berries to top it? I would like to do in wine but am open to any thoughts.
Hi Carolyn, You could certainly make this a day ahead and soaked berries would be delicious!
Awesome…thank you…any tips on soaking the berries? Recipe? Wine…sugar????
Oh…but the whipped cream should be the day of right…I shouldn’t do that ahead or can I?
Just a follow-up for anyone who wants to make this….it turned out AWESOME…the family loved it! Great light dessert for the spring/summer! Thank you, Michelle!
Alright, angel food cake had been my favorite as a child. growing up nothing was better than coming home from the grocery store with a cake and strawberries to top it with. I don’t remember the last time I had any angel food cake but it is most like in excess of 10 years.
I took this recipe and split it out into cupcakes and topped it with the strawberry meringue buttercream icing from another recipe on here. I wasn’t the most impressed with the icing but the cake is bloody amazing. I’m trying to not eat it all, tonight.
thank you again for another great recipe.
I made this to use for the Red, White and Blue Berry Trifle. I almost went with store-bought but I’m really glad I didn’t. My son got the leftover pieces and devoured them:) I hadn’t had Angel Food cake in at least 5 years. I forgot how good it is.
What a great way to use up the egg whites in my freezer! And fun to make too!
I happened to have a dozen egg whites in the freezer (leftover from making a couple batches of ice cream). This cake is now in my oven.
We are looking for Angel Food Cake recipes for National Angel Food Day. If you would please stop by and link-up this recipe and/or if you have any other Angel Food Cake recipes! We would greatly appreciate it!
http://momscrazycooking.blogspot.com/2011/10/this-weeks-cravings-50-angel-food-cake.html
The trick with angel food cake is to bake it in a tube pan. I used a bundt pan the first time I tried it. Big mistake. It stuck to the pan horribly. I turned it into a trifle since it came out of the pan in pieces :)
Gorgeous cake! I can’t wait to try it…it’ll be perfect with some fresh strawberries or blueberries, mmm.
I just made the “cook’s country” version of this cake tonight…also my first. The hardest part for me was…well the whole thing made me very nervous. i didn’t have cake flour so i did a LOT of processing and sifting. The cake is now cooling on a root bear bottle.
Angel Food cake is one of those dishes I’d also like to make from scratch. Your recipe looks simple and delicious. I should try this for the Fourth of July! Wouldn’t it be pretty with blueberries and strawberries? Yum!
I love angel food cake! But I have no room for another baking pan. I wish you could make this in a bundt cake pan… LOL has anyone tried?
Yes I have tried in a bundt pan! I had trouble with my egg whites peaking, so my cake did not fully bake. I got the cake out of the bundt pan in one piece, but I’m not sure if this because it was more moist due to being under baked. You can see what I mean here — http://raisinquestions.wordpress.com/2011/04/26/how-come-my-guardian-angels-didnt-show-up-for-angel-food-cake/. Michelle, I was laughing when I read your post, because when I recently blogged about my Angel Food Cake experience, it was all about how DIFFICULT it was! I didn’t have the right pan, or cream of tartar, or enough eggs, or a sifter, or an electric mixer… I couldn’t get the egg whites to peak and I was pretty freaked about not being able to get it out of the pan! But I think after reflecting on your post, Angel Food Cake really must be easy for experienced bakers — you just need the right tools, and maybe a little confidence. I’m still gaining that experience, but hopefully one day I will believe that Angel Food Cake is easy!
Angel food cake always just tastes like summer to me. My friend’s Mom used to make it all the time and I have great memories of enjoying a nice summer breeze along with my slice of cake. Love it. Want it. Have to make it now.
This Angel Food Cake recipe looks delicious! Have had this cake so many times, but never had an opportunity (and the recipe) to bake one myself. The texture of the cake looks perfect!
This is definitely on my top 100 to make list! Thank you, it looks delicious!
i abosultely love that you update your site everyday…that keeps me coming back..i was wondering if u had a recipe for grapenut custard pudding? Thanks so much
Hmmm I’ve never heard of grapenut custard pudding! Sorry I’m not much help!
I used to have grapenut pudding all the time , my sister makes it , I’ll check for a recipe
would the cream of tartar be essential for making this cake? thanks for sharing this recipe! :)
Hi Lou, It is, it is what helps the egg whites set up.
I always wanted to try this angel food cake! I might give it a shot! Thank you for sharing your recipes! :)
How gorgeous! I’ve never tried baking an angel food cake before, but now you’ve made me want to run out and grab a tube pan!
Oh it is so lovely! I love angel food cake with strawberries and whipped cream. Honestly I can eat angel food cake all by itself too!
Angel Food cake is something I have always wanted to try as well. Glad to know it’s not hard.
I’ve always loved angel food cake; I never think to make it though – love!
My Mother always made from scratch for my requested birthday cake. Every year that is what I always requested for my Birthday. Loved then then and still do.She would even ask me what color I wanted. Remember a blue one she used food coloring in and iced it with her great homemade icing. Thanks for the recipe and the memories.
There is nothing better for a light dessert than angel food cake with strawberries. Love this, Michelle!
One of my favorite desserts!
Gorgeous angel food cake, Michelle!
This is my father’s favorite cake and it is just in time for his birthday! Thank you for posting! Looks amazing!!
I haven’t had much angel food cake in my life. My Dad believed if it wasn’t chocolate it wasn’t dessert, so my mom never made this. I have tried a couple store bought ones at parties before, but have never had a homemade one. This looks amazing – I want to get a pan, so I can make one!
angel food cake reminds me of 8th grade basketball, when one mom would always bring us the funfetti angel food cake for after games! i’ve made cupcakes from scratch but need to get a tube pan so i can make a whole cake!!
I love this angel food cake because of its light and fluffy texture and because its so easy to make. I used to buy angel cake in the bakery but I find there is nothing better then to make it myself because I get to have control over how sweet the angel cake turns out. I prefer my cakes to be on a slightly less sweeter side (But thats just me). Awesome post and thank you for sharing this recipe!
My dad and I love baking…we made a delicious chocolate angel food cake (unbelievably good!) with a raspberry glaze and fresh whipped cream. A-ma-zing. It would take care of the chocoholic in you too!
The only tube pan i have is a kugelhopf pan. Can it be used the same?
12 egg whites! Wow. I have never tried to bake an angel food cake but I really want to and since I can trust your recipes with my eyes closed, this has to be good.
Great post! You’re absolutely right – Angel Food Cake is rarely made by scratch any more. My mother (who sadly died when I was a child) was NOT a cook. She made everything from a box….except Angel Food Cake. About once a year, she’d break out this amazingly old pan and make it…I wish I had that pan, but she ditched it years ago.
Looks amazing! I’ve been trying to find a great angel food cake recipe. This may be it!
So simple and yet so delicious! One of my favorite cakes is angel food with a strawberry icing/glaze!
If you like using gadgets an electric knife is beautiful for cutting Angel food cakes.
Homemade are the best and plenty of egg yolks for ice cream and/or pasta.
angel food cake is one of those summer staples that we always had in our house. so light and fluffy and delicious!
Angel food cake is my dad’s favorite. We used to make it for his birthday every year. There is something about a fresh homemade angel food cake that is so delicious!
My mother used to frost angle food cakes with frosting made with Hershey’s chocolate syrup, whipping cream, and ???–never got the recipe. Anyway, she’d buy English Toffee, scrape off the “coating”, and sprinkle on top to add crunch. It was so good, and I’ve been trying to find the recipe. I think it was common in the 1960’s. Have you or any of your readers seen this recipe? Do you have anything similar? Thanks, Michelle! Enjoy your blog.
I found this using google- maybe this is what your talking about.
http://www.cooks.com/rec/doc/0,1830,159183-249206,00.html
This light cake is one of my favorites! I love it. Thanks so much for the recipe!
This is my absolute favorite! I had one every year for birthday as a kid!! I haven’t had one in ages! I need to make one now.
There is something so simple about this cake, but it is so delicious. Simple is good.
And girl, you’ve been busy!!! How many posts you doing a day, 2 or 3? I can’t keep up!
You’re awesome Michelle, and I so look forward to reading your posts every day!