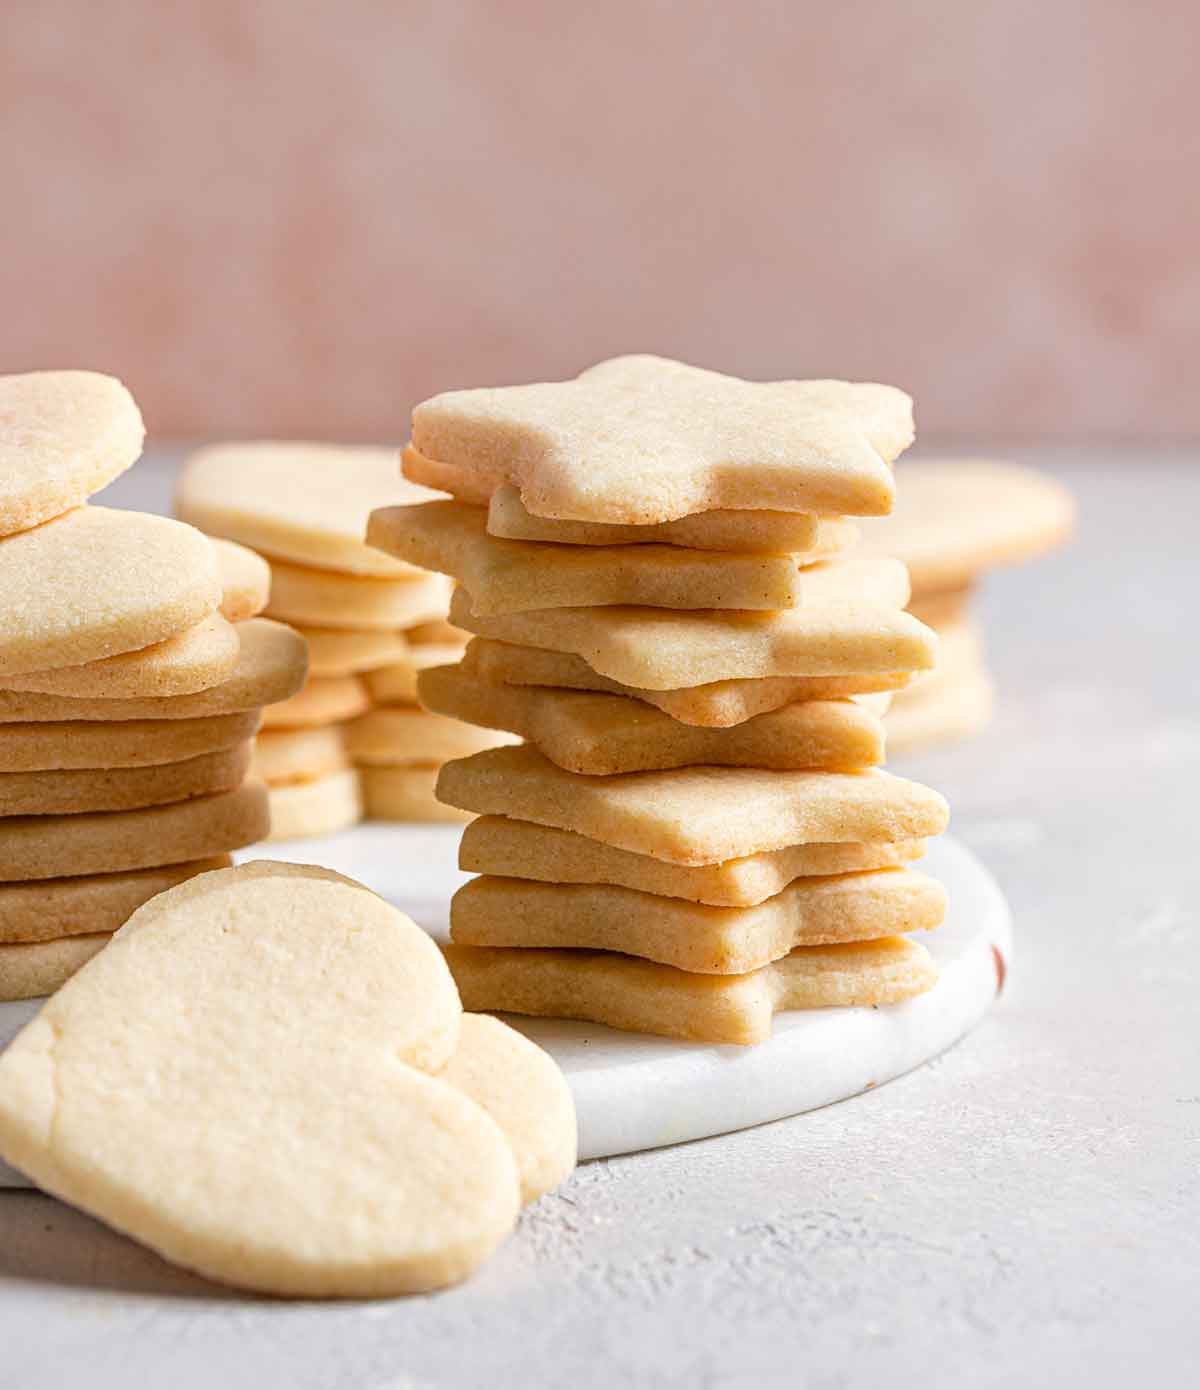
Best-Ever Cut-Out Sugar Cookies

This is the absolute BEST cut-out sugar cookie recipe, hands-down! No softening butter, no chilling dough, they bake up super soft with no spreading and keep their shape each and every time. Use your favorite cookie cutters and eat them plain or decorate them with an easy buttercream or royal icing. I guarantee you will never need another cut-out cookie recipe again!

Let's be honest, here. While cut-out sugar cookies from scratch always sound awesome in theory (the shapes! the icing! the decorations! the epitome of Christmas cookies!), they can be daunting both in time required and execution.
Sometimes you need to soften butter, and almost always you need to chill the dough… by the time you're pulling cookies out of the oven, you're crossing all of your fingers and toes hoping that they didn't spread and lose their shape, or become too brown or crunchy.
A couple of years ago when my boys begged to make classic sugar cookies, I unearthed this recipe that was perfectly suited to baking with kids - you use cold butter, you don't need to chill the dough, and the cookies were absolutely amazing time and again. It's the only recipe I've used since and will be a forever family favorite!
Why This Recipe Will Be Your Forever Favorite, Too:
Seriously, the buck stops here. This is the best sugar cookie recipe, and here's why:
- You don't need to bring butter to room temperature.
- You don't need to chill the cookie dough (but you can!).
- The cookies bake up super thick and soft (and STAY soft for days after baking!).
- They do not lose their shape.
- Absolutely delicious plain (yes, vanilla and butter!) but perfect for decorating, too.
- They don't puff up, which makes them a perfect surface for decorating.
- Freeze exceptionally well.
Step-by-Step: How to Make Them
I love the simplicity of this recipe and that it’s perfect for impromptu baking sessions! Here’s how the rolled sugar cookies come together:
- Preheat the oven and line baking sheets with parchment paper. An important note: I always, always line with parchment paper, not a silicone baking mat (which I find causes more spread).
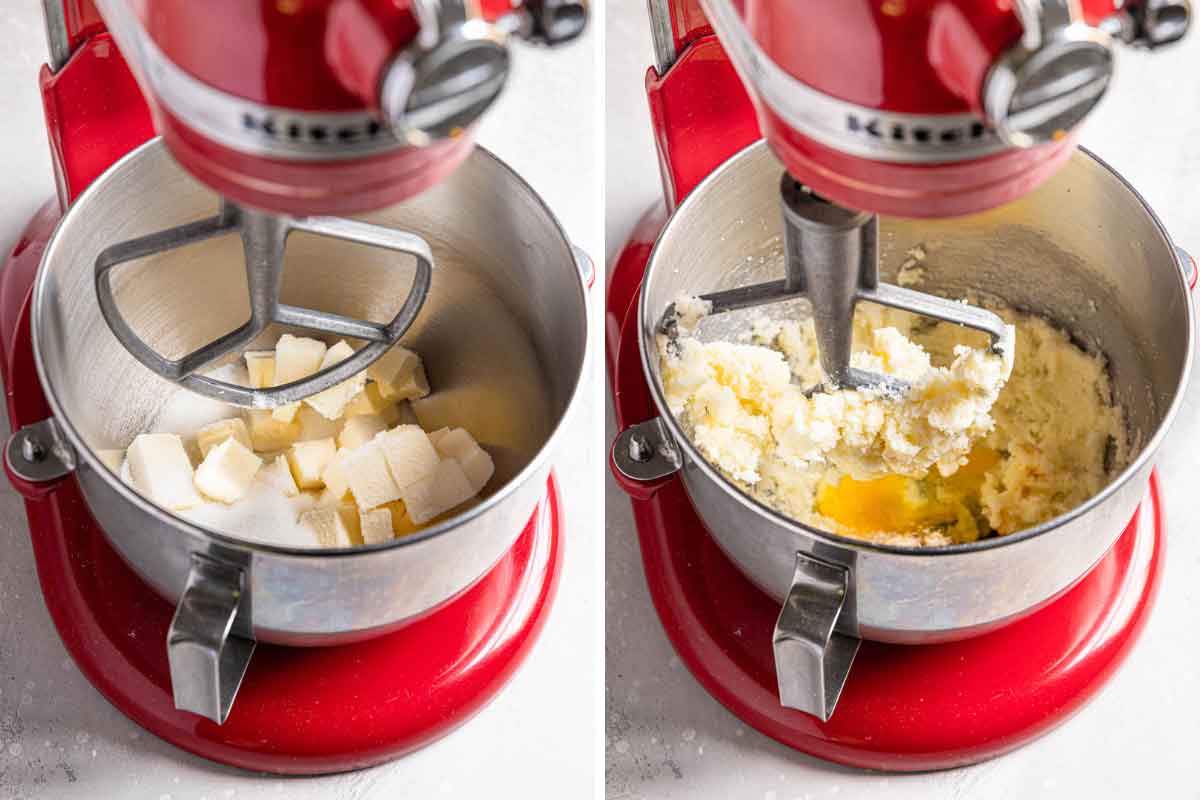
- Beat the butter and sugar together until light and fluffy. An important note: A stand mixer is ideal for this recipe; since we are starting with cold butter, the paddle attachment does a good job of beating it into the sugar. A hand mixer tends to send the butter and sugar flying; if all you have is a hand mixer, I recommend using your fingers to smash the cubes of butter into the sugar before starting the mixer to give everything a little headstart.
- Add the egg, vanilla, baking powder, and salt, and mix until combined and smooth. Scrape the sides of the bowl.
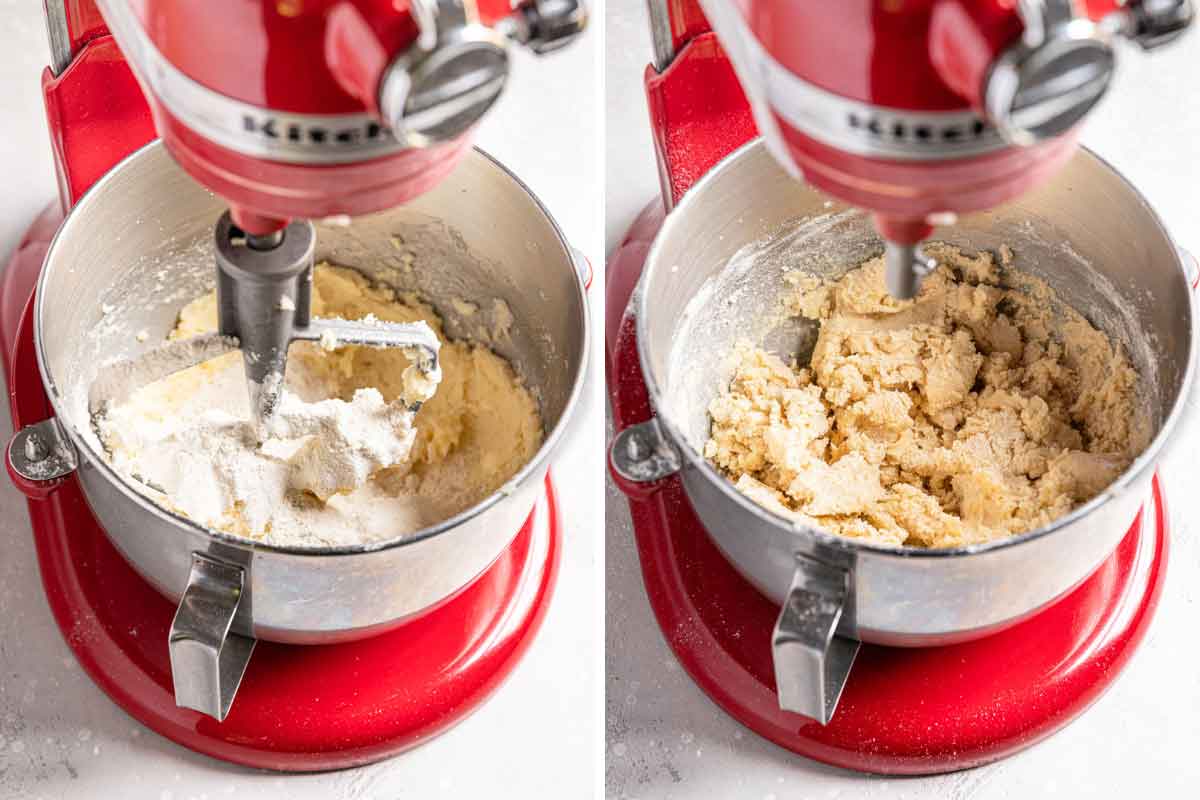
- On low speed, gradually add the flour and mix until just barely combined. Give it a final mix with a rubber spatula so no pockets of flour remain.
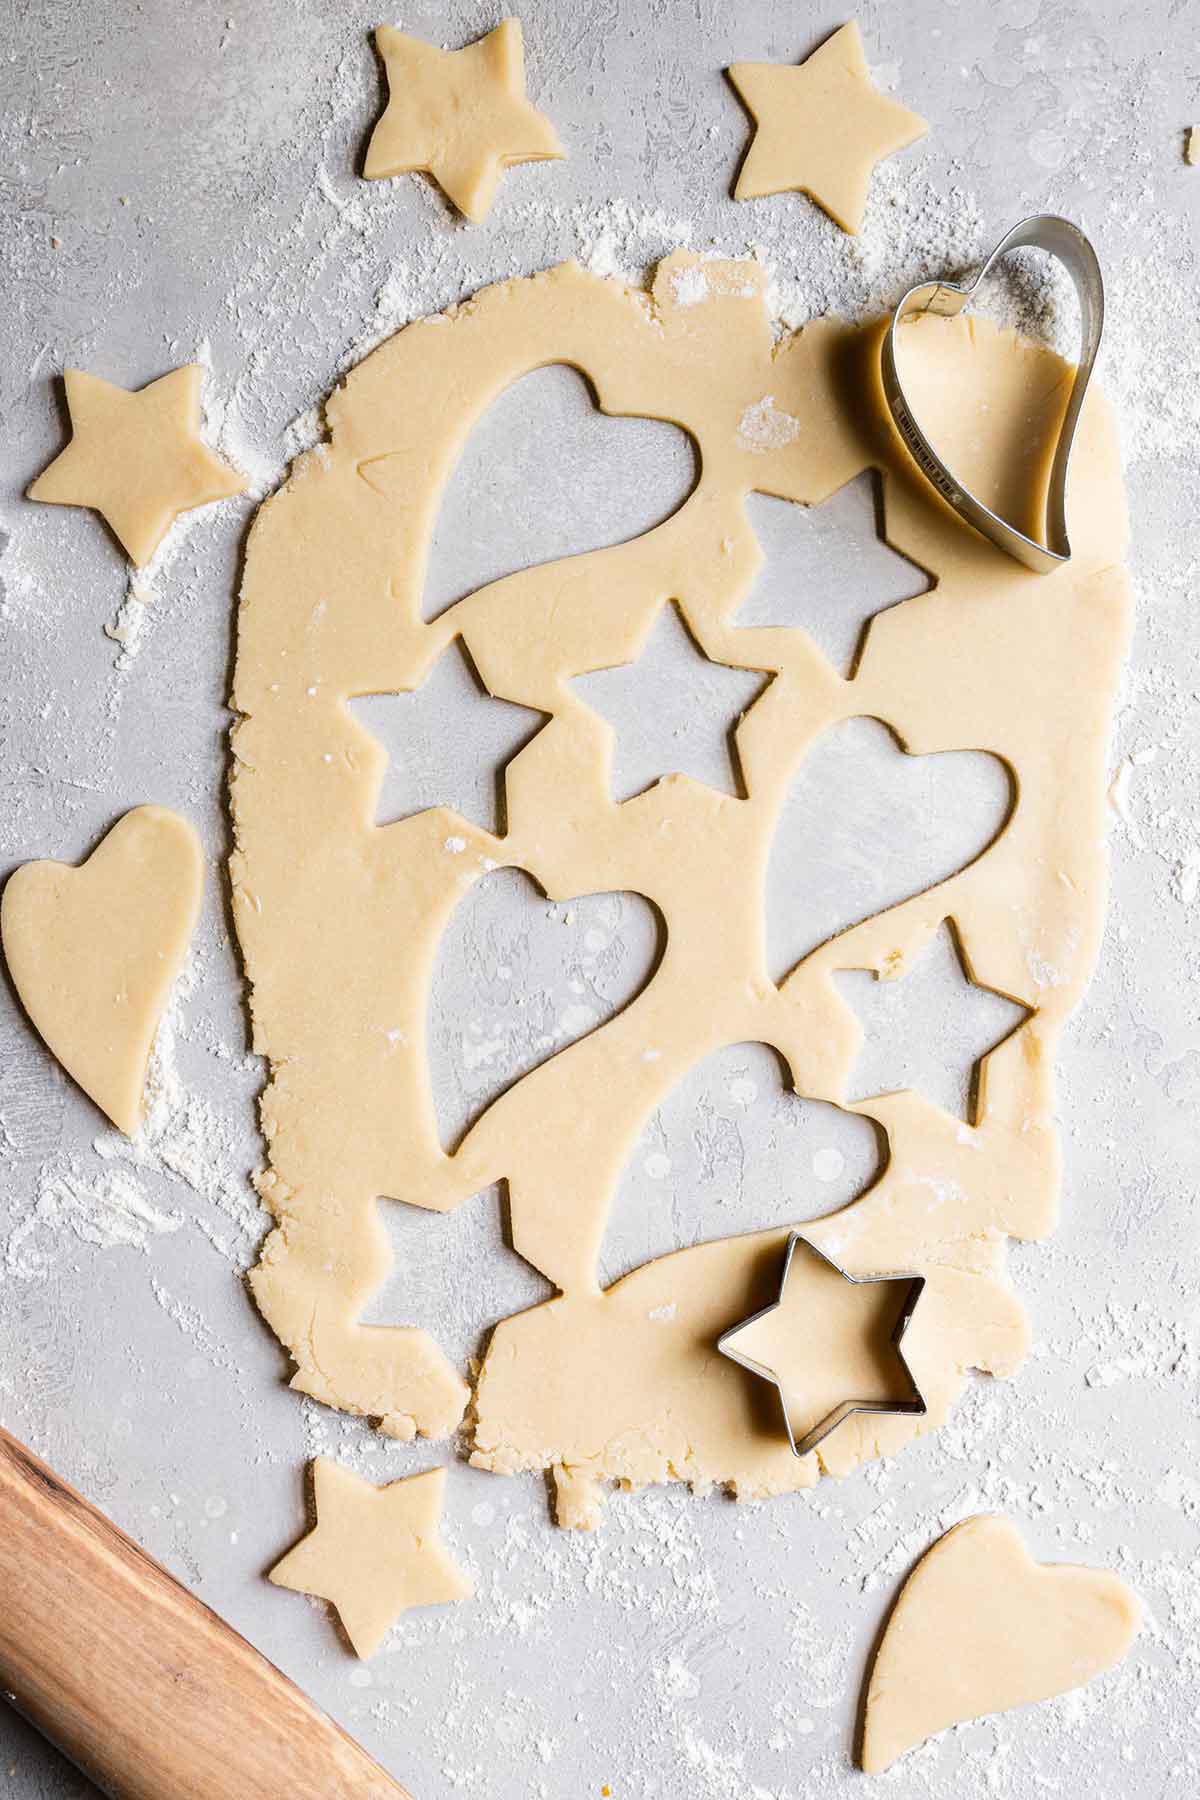
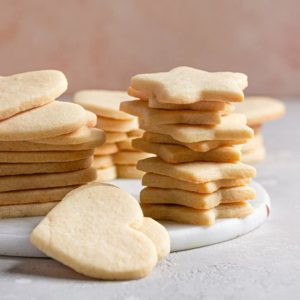
- On a lightly floured work surface, roll out the sugar cookie dough to ¼-inch thick. Cut out shapes as desired, transfer to prepared baking sheets, and bake cookies until set but still pale, 10 to 12 minutes. Cook for 5 minutes on the baking sheets, then transfer to a cooling rack. Cool completely before decorating.
How Thick to Roll Your Sugar Cookie Dough
This is a super key point! To ensure the wonderfully soft sugar cookies of your dreams, you want to roll the dough about ¼-inch thick. This may seem too thick when you are rolling and cutting, but it's absolutely vital.
If you've found your cut-out sugar cookies lose their shape in the past, it could have been due to a few factors (too much butter in the recipe, dough too warm, dough not rolled thick enough, etc.), but I can tell you that this recipe yields absolutely beautiful edges that do not spread if you take care to roll to the appropriate thickness (if rolled too thin then they can spread).
Use a thin metal spatula to carefully transfer your cut-out cookies from the rolling surface to your baking sheets.
Save This Recipe
If you prefer thinner cookies with some crispness to the edges, then roll the dough thinner and reduce the baking time a bit.
The Best Tools for Cut-Out Cookies
- Baking Sheets: I use my favorite rimmed half-sheet pans.
- Stand Mixer: For this particular recipe, since we do not soften the butter, a classic stand mixer works best. You can still use a hand mixer if that is all you have, but see note above.
- Rolling Surface: You can use a clean countertop, butcher block, or your favorite non-stick dough mat. A marble pastry board isn’t necessary, but if you have one, it's great for keeping sugar cookie dough and pie crust cold!
- Rolling Pin: A simple wooden one is all you need.
- Cookie Cutters: You can use absolutely any, so pick your favorites! I have had this 100-piece set for nearly 20 years and I love them… includes all letters, numbers, and cutters for every season and holiday.
- Food Coloring: I swear by gel food coloring! It creates a beautifully saturated color without thinning out the frosting.
Recipe Notes
A quick rundown of my best tips for making this easy sugar cookie recipe!
- Flavors: I adore the pure vanilla flavor, but some people like a little bit of almond - I would recommend starting with ¼ teaspoon of almond extract in addition to the vanilla. You can also use things like cake batter extract, lemon, maple, coconut, etc. You can also add a little bit of cinnamon to the cookie dough if you'd like!
- Scaling: You can double (or more!) this recipe without issue.
- Buttercream frosting: For a simple frosting (with or without sprinkles!), then I recommend my favorite vanilla buttercream. It is easily colored and tastes amazing!
- Royal Icing: To do more detailed decorating, see my tutorial on how to decorate cookies with royal icing.
- Storage: The cookies can be stored in an airtight container at room temperature for up to 5 days.
- Make-Ahead: While I love that you can whip up these cookies immediately, you can mix together the dough, divide it in half, form it into disks, wrap it in plastic wrap, and refrigerate for up to 2 days.
- Freezing the Dough: You can also freeze the dough (place the wrapped disk in a ziploc freezer bag) for up to 1 month; thaw it in the refrigerator overnight, then bring it to almost room temperature, roll it out, and proceed with the recipe.
- Freezing the Cookies: These cookies freeze exceptionally well! You can freeze them plain or decorated; if decorated, let the icing set before freezing. Store in an airtight container or ziplock freezer bag (with parchment paper between the layers if they are decorated). The cookies can be frozen for up to 3 months.
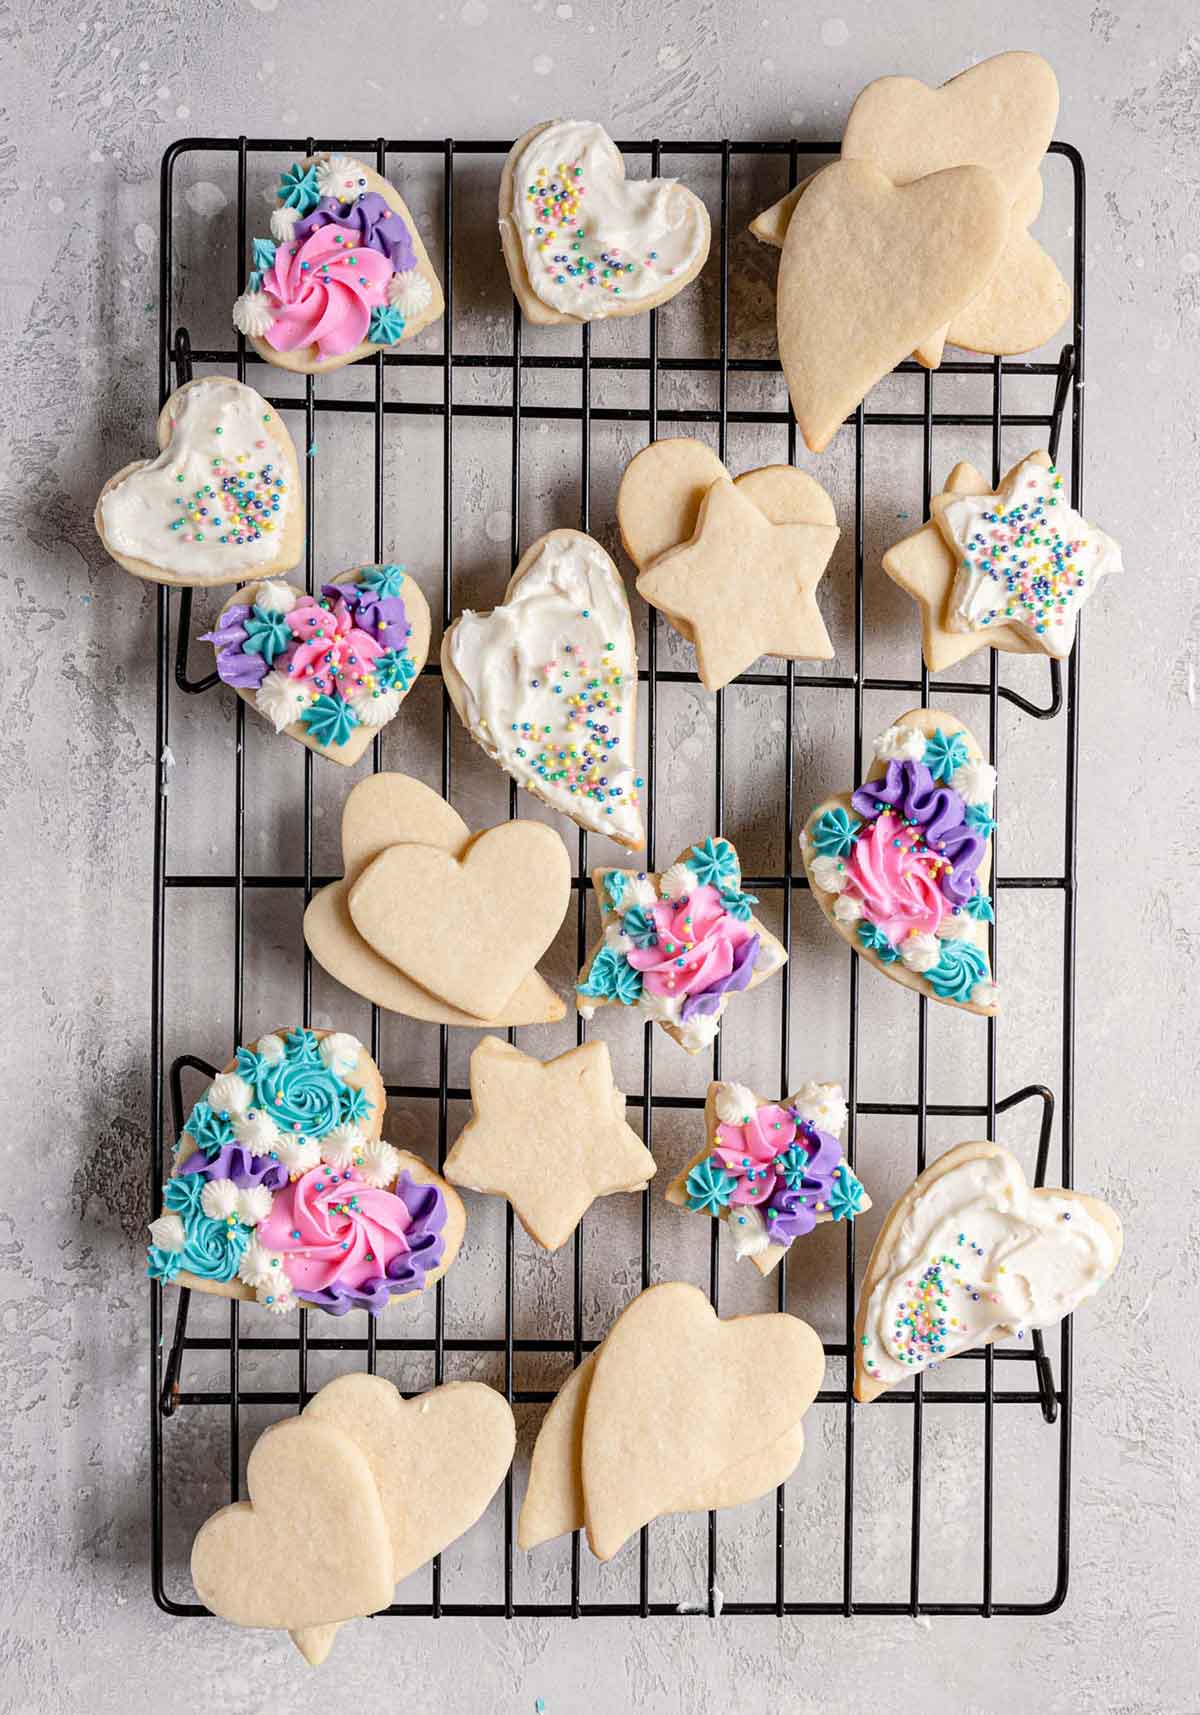
Ideas for Decorating Cut-Out Cookies
Use royal icing to create fun, beautiful cookies to celebrate holidays and special occasions:
- Valentine's Day Conversation Heart Cookies
- Baby Shower Cookies
- Easter Egg Cookies
- St. Patrick's Day Shamrock Cookies
- Football Cookies
More Sugar Cookie Recipes:
- Soft and Chewy Sugar Cookies (Drop-Style)
- Chocolate Sugar Cookies
- Frosted Sugar Cookie Bars
- Lofthouse Style Frosted Sugar Cookies
If you make this cut out cookie recipe and love it, please stop back and give it a 5-star rating - it helps others find the recipe! ❤️️
Cut-Out Sugar Cookies
Ingredients
- 1 cup (227 g) unsalted butter, chilled and cubed
- 1 cup (198 g) granulated sugar
- 1 egg
- 2 teaspoons vanilla extract
- 1½ teaspoons baking powder
- ½ teaspoon salt
- 3 cups (390 g) all-purpose flour
Instructions
- Preheat oven to 350 degrees F. Line two baking pans with parchment paper and set aside.
- Using an electric mixer on medium speed, beat the butter and sugar together until light and fluffy, about 2 minutes.
- Add the egg, vanilla, baking powder, and salt, and mix until combined and smooth, scraping the sides of the bowl as needed.
- Reduce the mixer speed to low and gradually add the flour, only mixing until the dough just comes together. Give it a final mix with a rubber spatula, folding and pressing it together, to ensure all of the flour is mixed in.
- Separate the dough in half and work with one piece at a time, roll the dough ¼-inch thick. Cut out shapes as desired and place them on the prepared baking sheets, leaving at least 1 inch of space between cookies.
- Bake until the cookies look set and are slightly firm to the touch but still pale, about 10 to 12 minutes.
- Cool on the baking sheet for 5 minutes, then remove to a wire rack to cool completely.
Notes
- Mixer: A stand mixer is ideal for this recipe; since we are starting with cold butter, the paddle attachment does a good job of beating it into the sugar. If all you have is a hand mixer, I recommend using your fingers to smash the cubes of butter into the sugar before starting the mixer to give everything a headstart.
- Baking Sheets: I use my favorite rimmed half-sheet pans. I always, always line with parchment paper, not a silicone baking mat (which I find causes more spread).
- Rolling Surface: You can use a clean countertop, butcher block, or your favorite non-stick dough mat. A marble pastry board isn’t necessary, but if you have one, it's great for keeping sugar cookie dough and pie crust cold!
- Rolling Pin: A simple wooden one is all you need.
- Cookie Cutters: You can use absolutely any, so pick your favorites! I have had this 100-piece set for nearly 20 years and I love them… includes all letters, numbers, and cutters for every season and holiday.
- Food Coloring: I swear by gel food coloring! It creates a beautifully saturated color without thinning out the frosting.
- Flavors: I adore the pure vanilla flavor, but some people like a little bit of almond – I would recommend starting with ¼ teaspoon of almond extract in addition to the vanilla. You can also use things like cake batter extract, lemon, maple, coconut, etc. You can also add a little bit of cinnamon to the cookie dough if you’d like!
- Scaling: You can double (or more!) this recipe without issue.
- Buttercream frosting: If you want to do a simple frosting (with or without sprinkles!), then I recommend my favorite vanilla buttercream. It is easily colored and tastes amazing!
- Royal Icing: To do more detailed decorating, see my tutorial on how to decorate cookies with royal icing.
- Storage: The cookies can be stored in an airtight container at room temperature for up to 5 days.
- Make-Ahead: While I love that you can whip up these cookies immediately, you can mix together the dough, divide in half and form into disks, wrap in plastic wrap, and refrigerate for up to 2 days.
- Freezing the Dough: You can also freeze the dough (place the wrapped disk in a ziploc freezer bag) for up to 1 month; thaw it in the refrigerator overnight, then bring it to almost room temperature, roll it out, and proceed with the recipe.
- Freezing the Cookies: These cookies freeze exceptionally well! You can freeze them plain or decorated; if decorated, let the icing set before freezing. Store in an airtight container or ziplock freezer bag (with parchment paper between the layers if they are decorated). The cookies can be frozen for up to 3 months.
- Recipe slightly adapted from Cookies & Cups.
Did you make this recipe?
Leave a review below, then snap a picture and tag @thebrowneyedbaker on Instagram so I can see it!
[Photography by Dee of One Sarcastic Baker]


I always find your recipes wonderful but the cut out cookie recipe was a bust. It was a jumble of crumbly dough that would not come together to roll. I baked the crumble for topping at a later time. I have no idea what I did wrong.
Recipe is too dry! The dough was a crumble mess so I added half a cup of milk to get it right.
Perfect! As soon as I saw your cookies on the front page, I knew this was the recipe need!! Those are some of the most beautiful cookies I’ve ever seen!!💟
Really holds its shape and tastes great! The royal icing recipe is perfect as well
Thank you !!!
Hi, do you have a video demo for this recipe? I would love to show it to my culinary class.
Great recipe for printed cookies holds there shape.
This one goes to the library. Thankyou
Rose
I love this cut out sugar cookie recipe! Works perfect every time! So delicious! Can I make a sugar cookie cake with the entire batch? How long should I bake? 1 batch should work in a 9 inch cake pan?
Exxxellent
I tried this and had significantly more spread than I would’ve liked (I even tried freezing the cutouts first). Much simpler than many sugar cookie recipes but I’d need to play around with it a little to prevent the spread.
I’ve been on the hunt for the best sugar cut out recipe for years and this is by far the BEST!! Cookies were perfectly buttery and crispy with a delicious vanilla flavor. I did chill my dough overnight, but I’m sure they’re just as great without following that step
I love, love this recipe. I have been practicing with it to create beautiful grad cookies for a party of 50. The flavor is exceptional. They hold the shape beautifully. My only question is that I made the dough, rolled it and cut out the shapes. Then I froze them for 1 week. I let the come to room temperature for approx 30 minutes. I noticed when I baked them, some spread a bit and I did not understand why. Still they are beautiful. Thank you so much for this tried and true recipe.
Hi Cindi, I would try either baking them from frozen, or baking immediately after rolling and freezing the baked cookies if you want to make them in advance.
I teach high school baking. This is our go-to recipe for making sugar cookies to decorate. I agree with other posters that weighing is the best method for measuring flour, but in the absence of a scale, the proper way to measure flour is to stir or fluff the flour and then spoon into a dry measuring cup and level off. The dough does appear dry, but it comes together just fine. I’ve found it can be helpful to roll between plastic wrap to avoid sticking to counters and/cracking. I split the dough and refrigerate between rolling out batches and use a bent edge spatula or bench scraper to transfer the cut cookies onto parchment. It’s easiest to remove the excess dough around cookies before attempting to transfer. Depending on the thickness you like, baking times may vary slightly.
hi, i want to make these sugar rolled cookies,but the actual cookie recipe is hard to follow on my computer.it says 1 cup of some ingredient but it dosen’t say what ingredient it is.the ingredients are not lined up properly.
1 c unsalted butter
1 c granulated sugar
Excellent recipe! Cookies hold shape and don’t spread, as promised. I made a double batch for decorated Easter cookies, using 3t. vanilla, 1 t. lemon flavoring; if I made another double batch, I’d do 2 and 2, but still great.
Someone mentioned needing to add liquid. I didn’t need to. A recipe from Alton Brown/Food Network once told me to weigh flour instead of measuring it for baking. I’ve found this to be great advice, and thank you, BrownEyedBaker for providing ingredients in grams as well as cups.
Thanks for a great recipe.
Perfect for Valentine’s Day and again for St. Patrick’s Day. Patience required for the last bit of flour, but lovely taste, shape and texture. Thanks for the tips! Joan
As far as I see no water or milk too mix does not work I add water and there are great😇
It needed just a cup and a half more flour but they came out nice!
These cookies are great…I love the texture and the flavor…I add half a teaspoon of almond to the basic recipe…also I grate the butter…dont really know if it makes a difference…also started adding some crisppearls to the dough…adds a nice gentle crunch to the middle of the cookie…I am a cookier…have been the past 5 years and this may become my preferred sugar cookie…it is that good…and …no spread…thanks Michelle for a wonderful recipe
1st time making these. Amazing soft silky dough. They were perfect for cut out cookies and still soft the next day when they sat out all night. So yummy too! I will never use another recipe!
These were perfect. They held there shape and were very tasty. In case anyone else is wondering, the Hamilton Beach stand mixer was very capable of doing the job, so if a Kitchen Aide is not in your budget, that’s an alternative. I actually bought my Hamilton Beach last year when my hand mixer burned out while I was making royal icing. I also had no trouble making royal icing with my Hamilton Beach this year.
I had to add an extra egg to the recipe. Originally the dough was very dry and crumbly.
Very crumbly. Trying to form into a ball and it’s falling apart.
First of all, I grew up on both of my great-grandma’s homemade cutout sugar cookies. That being said, of course the shape never held and looked more like a fluffy version of the actual cookie cutter. I came across this recipe this year, because I use so many of the Brown Eyed Baker desert recipes that have become traditional family favorites ❤ THIS DID NOT DISAPPOINT! The only point I would add, is let the butter sit and soften a little more if it’s straight from the fridge before mixing with the sugar. It took almost 10 minutes to mix and had to put my mixer on high to achieve, without the “light and fluffy” part. They still turned out just as expected and I’ll be using this recipe again! (Tip: if you like soft cookies, bake for 8 min.) ❤
Very nice info and right to the point. I am not sure if this is truly the best place to ask but do you folks have any thoughts on where to get some professional writers? Thank you :)
This is the first time I have successfully made a sugar cookie! Such an easy recipe and turns out perfectly sweet and doesn’t spread I love it!
these came out perefction
This recipe is so good and easy! I was able to roll them out so easily and they are delicious. I have a new favorite recipe.
These were a breeze to put together and I was able to cut 30 cookies from the recipe. It is now going to be my go to recipe from now on.
Merry Christmas to you and your family.
Worst recipe
Can you sub Cocoa for flour and make these chocolate sugar cookies?
These are amazing! I was looking for a simple recipe that was low maintenance and these came out wonderful! I have a set of “12 Days of Christmas” cookie cutters I like to use, but other recipes puffs up too much and the details bake out. I was very excited to see all my turtle doves and partridges still had their eye and feather lines after baking. I will be making these again!